Account Synchronization For WHMCS has reached End of Support (EOS) and is no longer actively maintained. The module remains available for purchase in the Open Source version, along with License Upgrade option at a discounted price. Current license subscriptions continue and stay valid for future renewals.
Account Synchronization For WHMCS will allow you to perform automated synchronization between external servers and your WHMCS.
The module lets you conveniently import and synchronize products, accounts and clients of cPanel, Plesk, DirectAdmin, SolusVM, OpenStack VPS and Proxmox VE VPS & Cloud servers with your WHMCS.
|
| ✔ Trigger Manual And Automated Actions:
|
| ✔ Synchronize Accounts With External Servers
|
| ✔ Import Accounts From External Servers
|
| ✔ Export Accounts To External Servers
|
| ✔ Validate Domain Nameservers
|
| ✔ Trigger Actions On Single And Multiple Accounts:
|
| ✔ Create WHMCS Products For Synchronized Accounts
|
| ✔ Create Accounts On External Servers
|
| ✔ Terminate Accounts In WHMCS
|
| ✔ Terminate Accounts On External Servers
|
| ✔ Configure Dependencies Between Packages On The Server And Products In WHMCS
|
| ✔ Define Global And Local Settings For Servers:
|
| ✔ Reset Password Of Synchronized Accounts Upon Importing Them Into WHMCS
|
| ✔ Toggle The Update Of Billing Details
|
| ✔ Set Default Billing Cycle And Next Due Date
|
| ✔ Define Correct Nameservers
|
| ✔ Set Up Cron Action For Accounts With Incorrect Nameservers
|
| ✔ Send Emails To Your Clients Upon Synchronizing Their Accounts With Your WHMCS
|
| ✔ Send Emails With New Password To Your Clients
|
| ✔ Email Notifications - Daily Cron Reports
|
| ✔ Supports PHP 8.2 Back To PHP 7.4
|
| ✔ Supports WHMCS V8.11 Back To WHMCS V8.8
|
| ✔ Requires ionCube Loader V13 Or Later
|
Installation and Configuration
Account Synchronization For WHMCS has reached End of Support (EOS) and is no longer actively maintained. The module remains available for purchase, including the Open Source version and License Upgrade at a discounted price. Current license subscriptions continue and stay valid for future renewals.
This tutorial will show you how to successfully install and configure Account Synchronization For WHMCS.
We will guide you step by step through the whole installation and configuration process.
|
| 1. Log in to our client area and download the module.
|
2. In the downloaded file you might find one or two packages that support different PHP versions.
In the most recent versions of the module, you will find only one package that supports PHP 7.2 and later.
|
Previous updates of the module may contain two packages dedicated to various PHP versions.
The first one that supports PHP 5.6 up to PHP 7.1, and the second one addressed to PHP 7.2 up to PHP 7.4.
Note: Keep in mind that PHP versions 5.6 up to 7.1 are no longer officially supported and their security issues are not fixed or released any more. Find more info here.
|
| Note: You can check the current PHP version in your WHMCS. To do so, proceed to 'Utilities' → 'System' → 'PHP Info'.
|
3. Extract the package and upload its content into the main WHMCS directory.
The content of the package to upload should look like this.
|
4. When you install Account Synchronization For WHMCS for the first time you have to rename 'license_RENAME.php' file.
File is located in 'modules/addons/accountSynchronization/license_RENAME.php'. Rename it from 'license_RENAME.php' to 'license.php'.
|
5. In order to configure your license key, you have to edit the previously renamed 'license.php' file.
Enter your license key between quotation marks as presented on the following screen. You can find your license key in our client area → 'My Products'.
|
6. Now you have to activate the module in your WHMCS system.
Log in to your WHMCS admin area. Go to 'Setup' → 'Addon Modules'. Afterwards, find 'Account Synchronization' and press 'Activate' button.
|
7. In the next step you need to permit access to this module.
To do so click on 'Configure' button, tick 'Access Control' near desired admin role groups and press 'Save Changes'.
|
| 8. You have just successfully installed Account Synchronization For WHMCS!
|
Management
In this section we will show you the possibilities of Account Synchronization For WHMCS.
Our module allows you to synchronize account on your WHMCS with cPanel and DirectAdmin servers.
|
Synchronize
To start manual synchronization process, go to 'Addons' → 'Account Synchronization' → 'Synchronize' .
Important: To do the synchronization with external server, you need to install provisioning module using that server at your WHMCS.
For example, to synchronize with cPanel server, you need cPanel or cPanel Extended module at your WHMCS.
|
| Afterwards, choose a server from a dropdown menu and press 'List Accounts'.
|
Depending on the quantity of accounts on the synchronized server, the process of listing accounts may take up to a few minutes.
As soon as the request is processed, the full list of accounts will be displayed, as shown on the following screen.
As you can see, you can overwrite default settings for current server.
Set up desired options for this server and press 'Update Settings' .
|
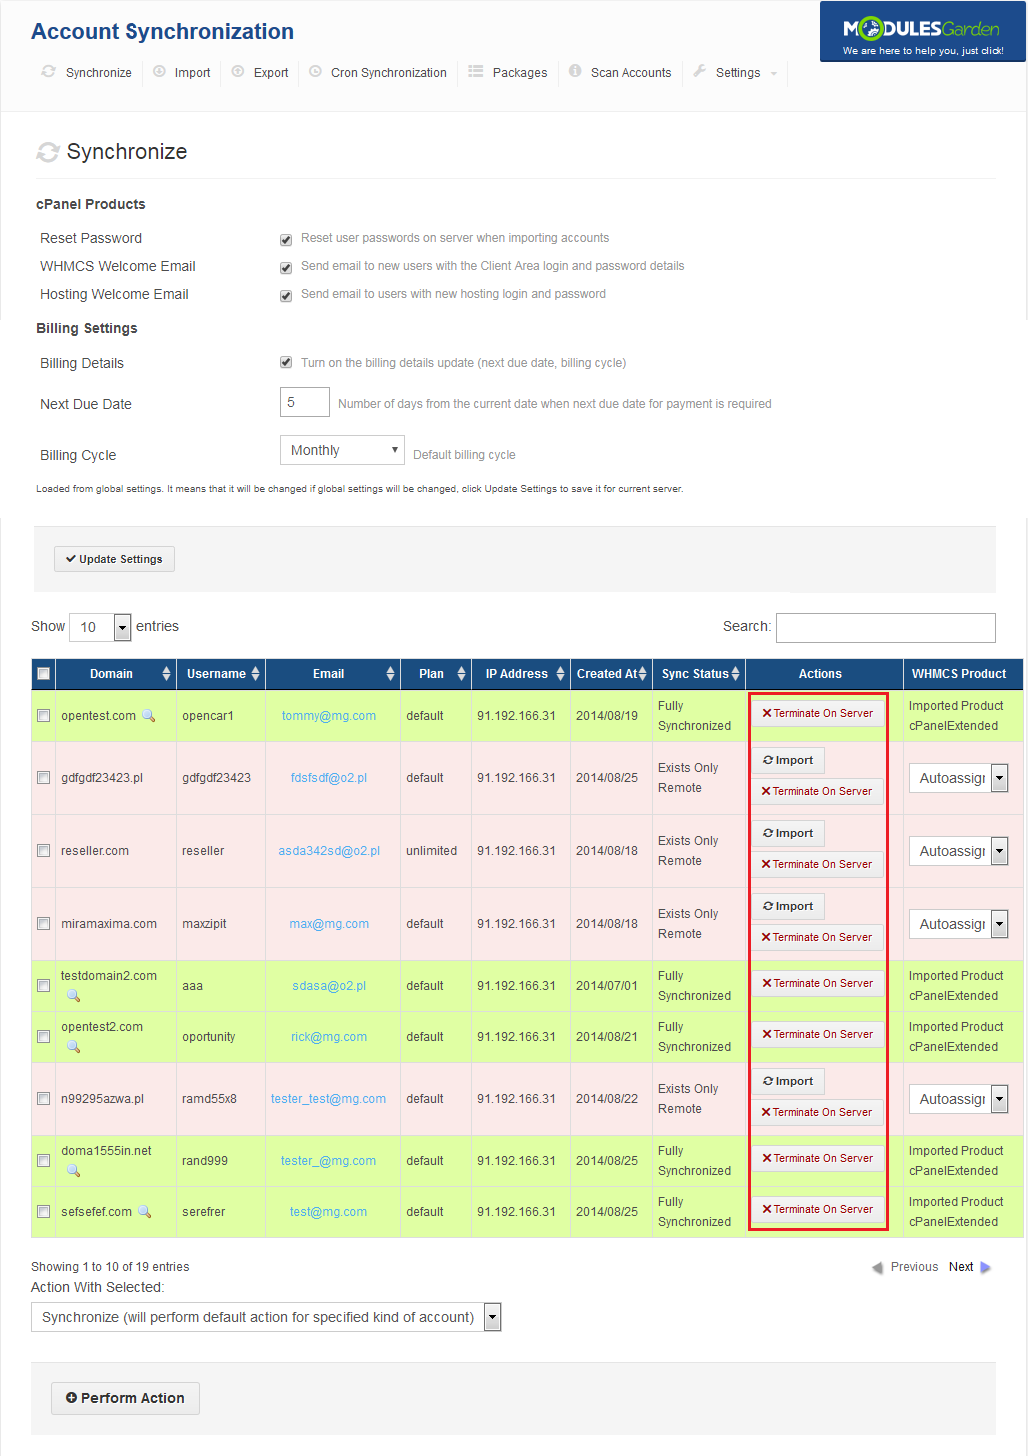
You can synchronize/terminate each account separately through using buttons in the 'Actions' column.
Additionally, if a selected account's package does not have a defined relation to WHMCS product, you can define here the product to which the account will be assigned.
Note: You can set up automatic behavior of assignment at the 'Package' tab, for more information visit this section.
If no behavior is set for package, a new, hidden product will be created for the accounts using that package.
|
|
Our module allows you to synchronize/terminate multiple accounts at once.
To do so, mark checkboxes next to chosen accounts, select desired action from 'Action With Selected' and press 'Perform Actions' button.
Synchronize - If accounts exist only in WHMCS, they will be created on an external server. If accounts exist only on external server, they will be created in WHMCS.
Terminate On Server - Accounts will be terminated on external server, but only if they already exist in WHMCS.
Create On Server - Accounts will be created on external server, but only if they already exist in WHMCS.
Create In WHMCS - Accounts will be created in your WHMCS, but only if they already exist on the external server.
Terminate In WHMCS - Accounts will be terminated in your WHMCS, but only if they already exist on the external server.
|
| Synchronization progress is dynamically updated as shown on the following screen.
|
Management of List
| When default amount of account displayed per page is 10, you can easily change it using dropdown menu marked on the following screen.
|
Owing to searchbox you are able to search desired text in any column.
As you can see on the screen below, we have found all accounts using 'unlimited' package through typing 'unlimited' into searchbox.
|
| Press 'Next' / 'Previous' to display next/previous group of accounts.
|
Import & Export - Quick Actions
'Import' and 'Export' tabs allow you to quickly command import and export actions on multiple accounts.
This is due to the display of accounts available only for selected action.
Select a server to import from and press 'List Accounts' .
|
As shown on the screen below, the list of accounts in the 'Import' tab displays only accounts available to import.
You can modify settings of module for selected server similarly as settings at the 'Synchronize' tab.
To import accounts, mark checkboxes next to the desired accounts and press 'Import Selected' .
|
Alike the previous tab, in the 'Export' tab you can quickly export all accounts available for such an action.
Press 'List Accounts' to display accounts available for export.
|
As we have mentioned earlier, only accounts available for export are displayed. Owing to this, you can easily and quickly export them.
Select desired accounts and press 'Export Selected' to export them.
|
Cron Synchronization - Automatic Synchronization
You can easily set up automatic synchronization of accounts between WHMCS and chosen servers.
Proceed to the 'Addons' → 'Account Synchronization' → 'Cron Synchronization' .
Set up one of them, depending on how often you want to do your synchronization.
|
| Afterwards, choose a server to do the synchronization with and press 'Create A New Job' .
|
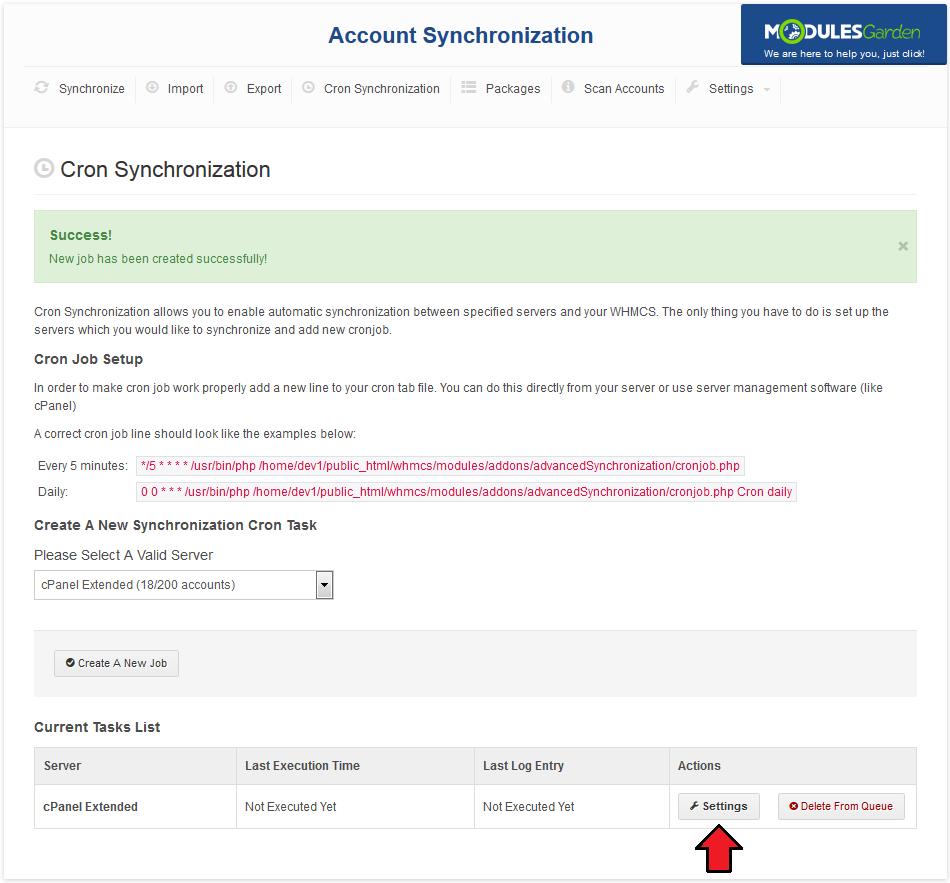
Cron job created at the previous step is using default settings.
Press 'Settings' to modify them.
|
|
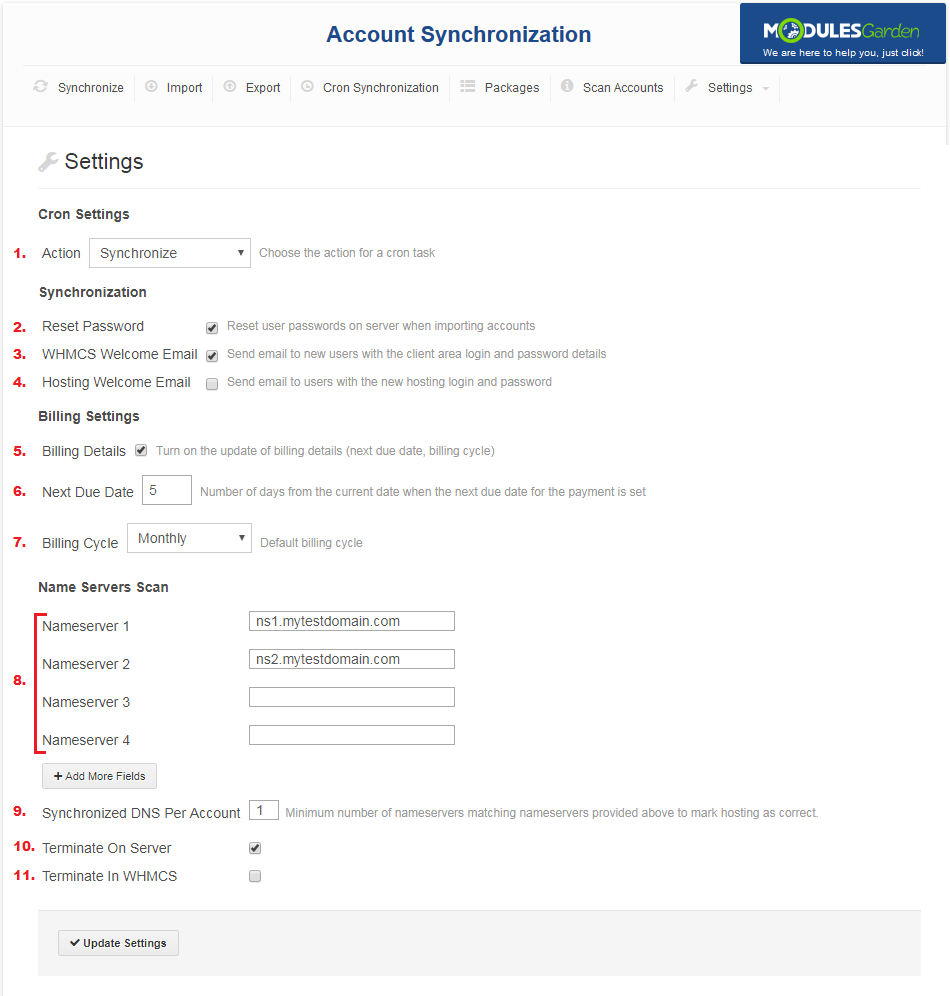
As you can see on the following screen, this is the place to define cron job settings.
Here you can decide whether to reset account's password, or send emails.
Additionally, you can define action for this cron job. You can choose from synchronization, importing accounts and exporting them.
1. Cron job action to perform. You can choose from synchronization, importing accounts, exporting accounts or nameservers check.'
2. Reset user password upon importing account
3. Send email to a new user with their client area access details
4. Send email to user with new hosting access details
5. Check to enable the synchronization of billing details. If disabled, services will marked as free.
6. Define the number of days following the synchronization date that will be set for the service's next due date.
7. Define which billing cycle will be set for the synchronized service.
8. List of correct nameservers.
9. Amount of nameservers to acknowledge hosting as correct.
10. Terminate hosting on server if it exists and uses incorrect nameservers.
11. Terminate hosting in WHMCS if it does not exist on external server.
Press 'Update Settings' to save changes.
|
|
Removing previously scheduled synchronization is as easy as creating one.
Press 'Delete From Queue' to remove synchronization job.
|
Packages - Package Assignment To WHMCS Product
'Package' tab allows you to create dependencies between packages at the external server and WHMCS product prepared by you.
This way you can define accounts assignment during synchronization/importing process at your WHMCS system.
All accounts using packages without any corresponding dependency will be assigned to a new, hidden product.
Therefore we advise to create dependency for all packages.
|
To start creation of a dependency, select a server.
The list of packages available on the server will be displayed in the form of a dropdown menu.
Select desired package and a product in your WHMCS system from dropdown menus.
Press 'Save Dependency' button to add it to the dependencies list.
|
| Now, all imported accounts using the 'unlimited' package will be assigned to the cPanel Premium product in your WHMCS.
|
Scan Accounts
This page allows you to check whether hostings use correct nameservers.
Start by choosing the external server to perform the check with.
|
| Afterwards, fill out the list of correct nameservers and choose required amount of synchronized nameservers.
|
Now, you can perform check, press 'Refresh' to apply settings you have just made.
Now, you will be able to perform terminate action on all hostings which do not pass the check.
Note: This tool also display all accounts which do not exist on external server.
|
Settings
| 'Settings' contains pages which allow you to define module settings and view synchronization logs.
|
General - Alter Module Behavior
General tab allows you to define Account Synchronization For WHMCS module behavior.
Default Settings:
1. Reset the password of an account upon synchronization/import action.
2. Module sends a welcome email to a client upon creating new account in your WHMCS system for him/her.
3. Client receives the email containing new access details to his product.
4. After finishing cron job, admin receives an email containing the summary of an automatic synchronization.
5. Define the maximum quantity of synchronized accounts per cron job run.
|
| Billing Settings::
1. Toggle to enable the synchronization of billing details. If disabled, services will be marked as free and thus the billing cycle and the next due date fields will not be updated.
2. Define the number of days following the synchronization date that will be set for the service's next due date.
3. Define which billing cycle will be set for the synchronized service.
|
| DNS Settings enables you to define default DNS check settings:
1. List of correct nameservers.
2. Amount of correct nameservers to acknowledge hosting as correct.
3. Terminate hosting on server if it exists and uses incorrect nameservers.
4. Terminate hosting in WHMCS if it does not exist on external server.
|
Logs - Recorded Events
Both manual and automatic synchronizations output is reported at the 'Log' tab.
As you can see, logs contain the list of actions, storing information about action type, server for which action was made and date.
But that is not all, press 'Details' button to view even more.
|
Here you can view the quantity of actions successfully completed as well as those, for which an error occurred.
New clients' accounts created during synchronization are also counted here.
Below, you can find the list of actions made by the module.
|
Email Templates
Each of email templates sent to your clients can be easily edited.
In order to alter any of them, proceed to 'Setup' → 'Email Templates' and press its name.
|
Tips
1. If you encounter notification: 'You reached the maximum number of account synchronization! Buy a full version of addon to synchronize more.'
- It means that you have reached the limit number of allowed account synchronization for Trial Version, buy Full Version to enjoy unlimited functionality of the module.
|
Update Instructions
Essential guidance through the process of updating the module is offered here.
Ensure successful completion of the module update by carefully following each step, thereby preventing data loss or any unforeseen issues.
Additionally, you will find a current list of supplementary actions necessary for a smooth update process there.
|
Migration
Our module allows you to easily migrate existing accounts between several modules in WHMCS.
Currently, you can migrate between cPanel and cPanel Extended as well as DirectAdmin and DirectAdmin Extended.
Below we will show you how to migrate your client accounts from cPanel to cPanel Extended.
Note: Product price and its configuration at 'Module Settings' will not be migrated.
|
| 1. Go to 'Setup' → 'Products/Services' → 'Servers' and press 'Add New Server' .
|
| 2. Configure server to use cPanel Extended module.
|
3. Proceed to 'Addons' → 'Account Synchronization' → 'Import' .
Choose previously created server from 'Please Select A Valid Server' dropdown menu and press 'List Account' .
|
| 4. Select all listed accounts and press 'Import Selected' .
|
| All previously existing accounts using cPanel module will now be reassigned to use cPanel Extended module.
|
Upgrade Guide
Seeking a solution that offers greater flexibility, customization tailored to your precise needs, and unrestricted availability?
There is an option that not only proves to be cost-effective in the long run but also includes prioritized support services, making it a truly valuable investment.
Opt for the Open Source version of your Account Synchronization For WHMCS module to unlock these benefits.
Simply click on either the Get Source Code or Upgrade To Lifetime button found on the product's page in our client area to complete the one-step upgrade process, with a dedicated discount already applied.
Follow a comprehensive guide covering the transition process, the advantages it brings, and step-by-step instructions on what to do next after the order has been successfully finalized.
|
Common Problems
| 1. When you have problems with connection, check whether your SELinux or firewall does not block ports.
|
2. Accounts DNS scan returns one of the following messages:
- Tld ".tld" is not supported
- Unable to check name server
- Unable to obtain whois
- Error: 110 - Connection timed out
Those messages refer to WHMCS whois settings and are not caused by Account Synchronization For WHMCS.
|


