Domains Reseller For WHMCS allows you to resell TLDs as well as manage obtained income and resellers. All these in a single pane of glass.
The module facilitates its own API which can be used by your resellers to offer domains within various systems like WHMCS, HostBill, Blesta and others.
Just generate your own registrar module with just a couple of clicks, hand it over to your resellers and admire the sales they generate.
|
| ✔ View Resellers And TLDs Income Statistics
|
| ✔ View Most Profitable Resellers And Latest Invoices
|
| ✔ Create And Manage Resellers:
|
| ✔ Assign To Dedicated Group
|
| ✔ Assign Client's Account
|
| ✔ Generate Access API Key
|
| ✔ Restrict Access To Specific IP Addresses
|
| ✔ Define API Limits Interval And Requests
|
| ✔ View Reseller's Orders And Income
|
| ✔ Automatically Create Resellers From Clients Using Provisioning Module
|
| ✔ Create And Manage Groups:
|
| ✔ Allow API Access With Defined Permissions
|
| ✔ Allow Access To API Documentation
|
| ✔ Select Pricing Method For Reselling TLDs:
|
| ✔ Override With Own Pricing Slab
|
| ✔ Use Default WHMCS Pricing Slab
|
| ✔ Provide Promotion Code With WHMCS Pricing Method
|
| ✔ Send Low Credit Notification
|
| ✔ Define Payment Collection Type:
|
| ✔ After Domain Registration
|
| ✔ Define Refund Policy Upon Unsuccessful Domain Registration:
|
| ✔ Allow Reseller Debit Within Defined Unpaid Invoices Limit
|
| ✔ Define Default Domain Registrant
|
| ✔ Define Tech/Admin/Billing Domain Contact Details
|
| ✔ Define Domain Contacts To Be Edited By End Clients
|
| ✔ Create Domain Registrar Integration Modules For Resellers:
|
| ✔ Choose Dedicated Platform:
|
| ✔ Define Name And Description
|
| ✔ Attach Additional Fields Integration File
|
| ✔ Assign Offered TLDs For Resellers
|
| ✔ Define Pricing For Each TLD Extension:
|
| ✔ For Register, Transfer And Renew Action
|
| ✔ Create Response Templates To Overwrite Registrars Messages Displayed To End Clients
|
| ✔ Configure Default Settings:
|
| ✔ Toggle Global API Status
|
| ✔ Toggle Global API IP Restriction
|
| ✔ Toggle Global API Requests Restriction
|
| ✔ Define Default Group Settings
|
| ✔ View API Request And Response Logs
|
| ✔ Access Dedicated Reseller Area
|
| ✔ View And Assign Bought Domains
|
| ✔ Access Reseller Settings:
|
| ✔ View Available Account Credits
|
| ✔ View Available Credentials
|
| ✔ View/Modify IP Addresses Restrictions
|
| ✔ Download Domain Registrar Integration Module
|
| ✔ Download Provider Documentation
|
| ✔ Download Additional Fields Integration File
|
| ✔ View API Request And Response Logs
|
| ✔ Manage Contact Information
|
| ✔ Manage Email Forwarders
|
| ✔ Register/Manage Private Nameservers
|
| ✔ Enable/Disable ID Protection
|
| ✔ Register/Transfer/Renew Domain
|
| ✔ Get Cart TLDs Register/Renew/Transfer Pricing
|
| ✔ Get/Modify Contact Details
|
| ✔ Get/Modify Registrar Lock Status
|
| ✔ Get/Register/Modify/Delete Nameservers
|
| ✔ Get/Save Email Forwarding
|
| ✔ Check Domain And Transfer Synchronization
|
| ✔ Check Domain Availability
|
| ✔ Transactions Between Resellers And Provider Settled With Credits
|
| ✔ Supports PHP 8.1 Back To PHP 7.4
|
| ✔ Supports WHMCS Themes "Six" And "Twenty-One"
|
| ✔ Supports WHMCS V8.9 Back To WHMCS V8.6
|
| ✔ Requires Database With InnoDB Storage Engine
|
| ✔ Requires ionCube Loader V12 Or Later
|
Installation
This tutorial will show you how to successfully install and configure Domains Reseller For WHMCS.
We will guide you step by step through the whole installation and configuration process.
|
Please be aware that when updating from version 1.x. to 2.0.0 of the module no data are migrated!
All the resellers and their configuration will need to be set up from the beginning.
Note: If you are using Domains Reseller For WHMCS in any version prior to v2.x, follow these instructions.
| 1. Log in to our client area and download the module.
|
2. In the downloaded file you might find one or two packages that support different PHP versions.
In the most recent versions of the module, you will find only one package that supports PHP 7.4 and later.
|
Previous updates of the module may contain a package dedicated to other PHP versions, that are no longer officially supported. Find more info here
Note: You can check the current PHP version in your WHMCS. To do so, proceed to 'Utilities' → 'System' → 'PHP Info'.
|
| 3. Extract the package and upload its content into the main WHMCS directory.
The content of the package to upload should look like this
|
4. When you install Domains Reseller For WHMCS for the first time you have to rename the 'license_RENAME.php' file.
File is located in 'modules/addons/domainsReseller/license_RENAME.php'. Rename it from 'license_RENAME.php' to 'license.php'.
|
5. In order to configure your license key, you have to edit a previously renamed 'license.php' file.'
Enter your license key between quotation marks as presented on the following screen. You can find your license key in our client area → 'My Products'.
|
6. In the next step, set up the 'storage' folder as recursively writable.
This folder is available at 'yourWHMCS/modules/addons/DomainsReseller/'.
|
7. Now you have to activate the module in your WHMCS system.
Log in to your WHMCS admin area. Go to 'System Settings' → 'Addon Modules'. Afterwards, find 'Domains Reseller' and press 'Activate' button.
|
8. In the next step you need to permit access to this module.
To do so click on 'Configure' button, tick 'Full Administrator' and press 'Save Changes'.
|
9. You have just successfully installed Domains Reseller!
You can access your module at 'Addons' → 'Domains Reseller'.
|
Configuration and Management
| Domains Reseller For WHMCS allows your customers to resell domains on their own WHMCS.
|
Dashboard
Dashboard page includes some truly valuable graphs and summaries on income generated from reselling TLDs.
The 'Income' section presents your income which is converted into USD basing on 'Base Conv. Rate' in System Settings → Currencies.
|
| You may easily change the graph settings by changing the time scope and selecting TLDs you are interested in.
|
| Most Profitable Resellers & Latest Invoices summaries:
|
To allow more flexibility. you are given a chance to freely customize your dashboard and turn off/on single elements visible on it.
To do so, find and open the "dashboard.yml" configuration file located at: (...)modules\addons\DomainsReseller\app\Config\UIElements\AdminArea directory.
There manage the dashboard elements' status by changing it from on to off according to your needs.
|
General Settings
'Settings' tab allows you to access general settings of your Domain Reseller API.
Here you may set up general options but still, you will be able to change them per single group. If you skip group settings, this configuration will be taken into account.
|
We will describe these options below.
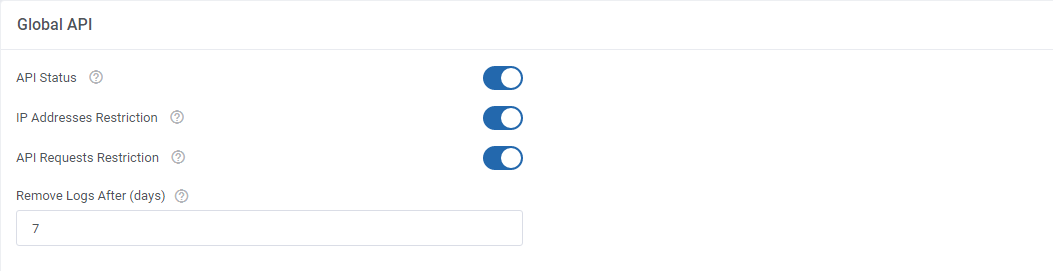
Global API related section:
- 'API Status ' - enable/disable Domains Reseller API.
- 'IP Addresses Restriction' - enable/disable restricting connection to Domains Reseller API only for IP addresses specified in the 'Allowed IP Addresses' field.
- 'API Requests Restriction' - enable option to restrict the number of API requests.
- 'Remove Logs After (days)' - define the number of days, log records older than the provided here number will be automatically deleted.
|
|
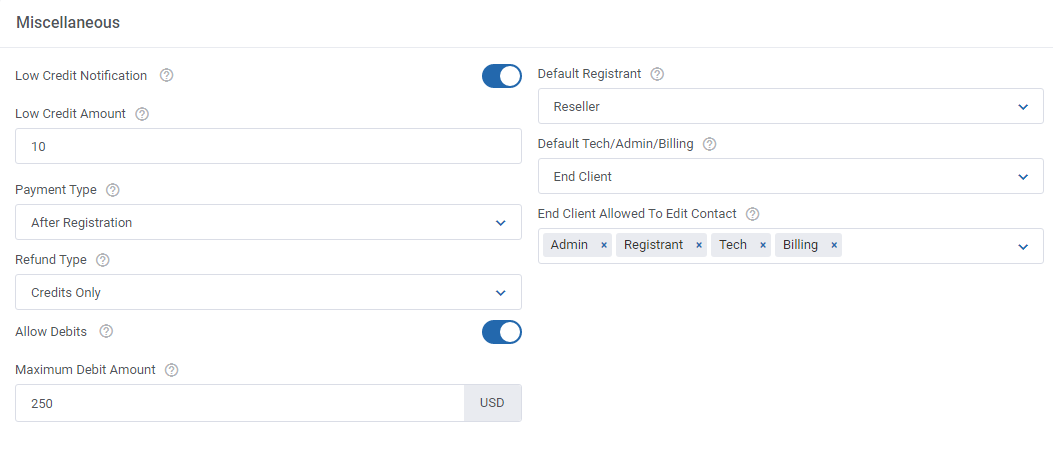
Miscellaneous:
- 'Low Credit Notification' - a notification to your client will be sent when credit balance on client's account falls below entered value.
You may view and edit the "Low Credit Notification" custom email template sent to clients at 'WHMCS' → 'System Settings' → 'Email Templates'. This email message is sent with the main WHMCS cron job.
- 'Low Credit Amount' - the number of credits, when reached a notification will be sent.
- 'Payment Type' options:
- 'Pay After Registration' - resellers must have sufficient credits amount, but he is charged only after a domain has been successfully registered.
- 'Pay After Order' - resellers must settle the payment just after the order, the amount due is taken from their account instantly.
- 'Refund Type' - defines behavior of the module upon unsuccessful domain registration.
- 'Credits Only' - if selected, refunds are granted in form of credits only.
- 'Refund Invoice' - if selected, refunds are delivered in form of credits along with a newly generated invoice.
- 'Disabled' - if selected, refunds are not accepted.
- 'Allow Debits' - if enabled, resellers with no credits on their account will be allowed to order domains. In such a case, an invoice with 'Unpaid' status will be created for the ordered domain.
- 'Maximum Debit Amount' - define the amount the reseller may use to order domains without credits.
Important: The provided here amount is a total sum on all invoices with 'Unpaid' status that exist in your system.
- 'Default Registrant' - select default contact that will be used during registration. This option is available only if registrant contact uses WHMCS details.
- 'Default Admin/Tech/Billing' - select default admin that will be used for contact. This option is available only if Admin/Tech/Billing contact uses admin details from WHMCS.
- 'End User Allowed To Edit Contacts' - select which of the End Clients will be allowed to edit contact details. You may choose more than one.
Remember to submit the changes, once you have finished.
|
|
Groups
At the 'API Users' tab you can manage all aspects related to your resellers who will be assigned to these groups later on.
Start by creating the first group for your resellers. Use either of the buttons marked on the screen below.
|
Then, simply type in a unique name of your group.
Create as many groups as you will need and set up different configuration to adjust them and then assign resellers to adequate groups.
|
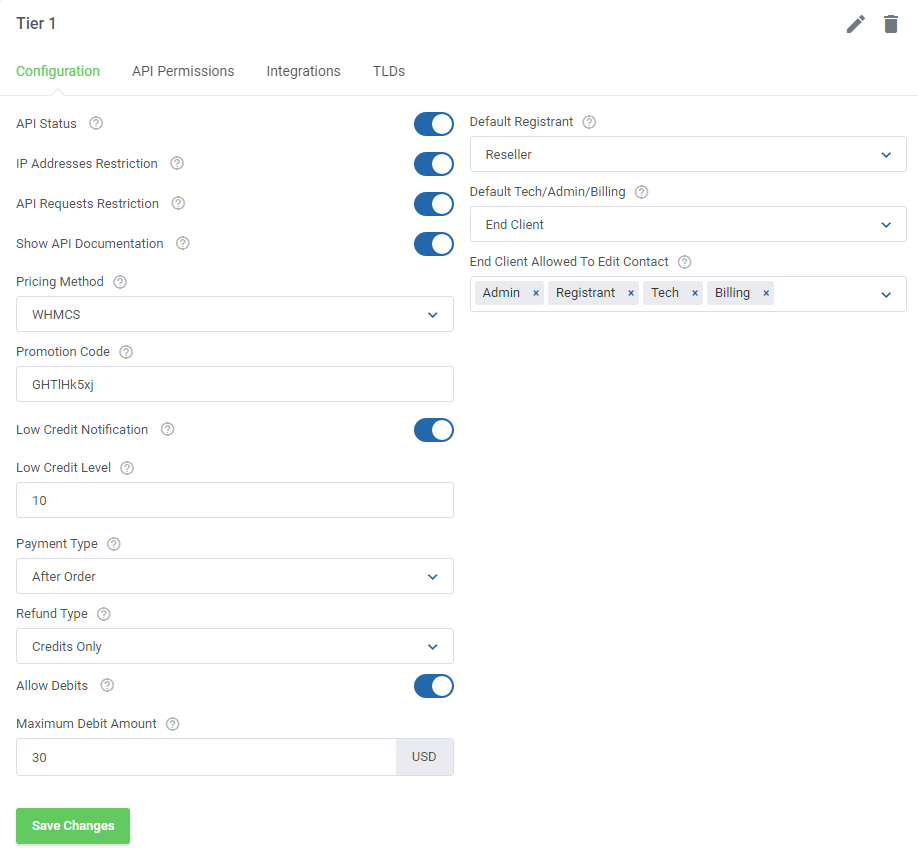
Configuration Per Group
You can set up configuration for resellers who are assigned to this very group only.
These settings will overwrite the general settings defined in the previous step.
- 'API Status' - enable/disable Domains Reseller API for Resellers assigned to this very group only.
- 'IP Address Restriction' - enable/disable restricting connection to Domains Reseller API only for IP addresses specified in the 'Allowed IP Addresses' field.
- 'API Requests Restriction' - enable the option to restrict the number of API requests.
- 'Show API Documentation' - toggle to allow resellers access to API documentation directly from their Reseller Area.
- 'Pricing Method' - choose the preferred pricing method from the two available:
- 'Override' - you will be able to set pricing in the TLD's Tab.
- 'WHMCS' - pricing is copied from that one set in WHMCS and you will not be able to set pricing in the TLD's Tab.
- 'Promotion Code' - provide a WHMCS promo code if you own one, the discount will be applied to every order covering pro code restrictions (WHMCS pricing method only.)
- 'Low Credit Notification' - turn on sending notifications to your client when credit balance on client's account falls below entered value.
You may view and edit the "Low Credit Notification" custom email template sent to clients at 'WHMCS' → 'System Settings' → 'Email Templates'. This email message is sent with the main WHMCS cron job.
- 'Low Credit Level' - amount of credits, when reached a notification will be sent.
- 'Payment Type' options:
- 'Pay After Registration' - resellers must have sufficient credits amount, but he is charged only after a domain has been successfully registered.
- 'Pay After Order' - resellers must settle the payment just after the order, the amount due is taken from their account instantly.
- 'Refund Type' - defines behavior of the module upon unsuccessful domain registration.
- 'Credits Only' - if selected, refunds are granted in form of credits only.
- 'Refund Invoice' - if selected, refunds are delivered in form of credits only.
- 'Disabled' - if selected, refunds are not accepted.
- 'Allow Debits' - resellers with no credits on their account will be allowed to order domains, invoice with 'Unpaid' status will be created for such order.
- 'Maximum Debit Amount ' - define the maximum amount a reseller may spend on new domains (if there are no credits on the account).
Important: This amount is a total of all the 'Unpaid' invoices created in your system.
- 'Default Registrant' - select default contact that will be used during registration. This option is available only if registrant contact uses WHMCS details.
- 'Default Tech/Admin/Billing' - select default admin that will be used for contact. This option is available only if Admin/Tech/Billing contact uses admin details from WHMCS.
- 'End Client Allowed to Edit Contact' - select which of the End Clients will be allowed to edit contact details. You may choose more than one.
Save the changes when ready.
|
|
API Permissions
| Toggle options that resellers will be allowed to use via API. Select single options or use 'Switch All' button to toggle all permissions.
|
Integrations
In this section you can create and manage integration modules which resellers will need to upload and activate to be able to resell domains you offer them.
Press 'Add Integration' to begin.
|
To generate a new integration module you need to provide following data:
- Select the target platform for the submodule: WHMCS or Blesta
- Enter your module unique name
- Toggle on to allow downloading a file with additional fields required by the provider's registrar to register domains.
Data typed in by End Clients will be correctly delivered by the provider to the domains' registrar. Learn more here.
- Type in a short description of the module, it will be visible on the activation page of the registrar
- Upload logo image, it will be visible on the activation page of the registrar
- Upload file with documentation if you have prepared any - you may use any format.
|
Newly created Integration will appear on the list. You may:
- Edit its details (change logo, description etc.) at any time
- Download domain additional fields
- Download documentation if any has been provided
- Download the integration package
- Delete the integration
|
| In order to delete numerous integration at once, use the mass action button.
|
TLDs
Create a list of TLDs with their custom pricing details that resellers assigned to this group will be allowed to offer to their clients.
Press 'Assign TLD' button to begin.
|
Select TLDs from the available and press 'Confirm'.
To learn more about available TLDs, please refer to the official documentation here.
|
Assigned TLDs will appear on the list, you may also preview here the registrar name of the TLD extension and pricing details.
Press the 'Pricing' icon to set up your custom prices per TLD for resellers assigned to this group.
|
In the Set Pricing tab, you can set the domain pricing for each of the registration periods in each available currency per every active TLD for resellers.
In addition, if you put:
- -1 (minus one) value in the chosen field, then it will be treated as disabled. E.g. provide -1 for transfer pricing to completely disable the possibility of domain transfers with that TLD.
Important: If you provide -1 value for registration pricing, then the whole TLD will be treated as disabled, including transfer and renewal pricing.
- 0 (zero) value in the chosen field, then it will be treated as free. E.g. provide 0 for registration pricing if you want to offer the selected TLD for free, but with paid transfers and renewals.
- any value above 0 (zero) will be of course treated as paid.
|
If you want to set up the same prices for all TLDs in this group, simply use the mass action button to do it almost with one click.
In the same way you may unassign numerous TLDs from the group.
|
You can also set up pricing and margins with WHMCS Registrar TLD Sync.
Your group configuration is now ready. If you have more groups, repeat these steps for each of them.
Remember that you may always edit the single group name or delete it if no longer needed. Just press adequate buttons to do so.
|
Keep in mind that you may never delete a group if there are any resellers assigned to the group.
Before deleting it, you must choose an alternative group to which the resellers will be reassigned.
|
Important: In the case of integration with Blesta you also have to manually add all the TLDs to the registrar's "config" file, otherwise they will not be available in the dedicated platform.
The 'config' file is located in: /Registrar_Name/components/modules/registrarname/config/registrarname.php. Open the file, at the bottom you will find a section: "All available TLDs" with a few examples added by default, fill in the list with your TLDs.
Below you can see what an exemplary list of TLDs may look like.
|
Resellers
| In this section you will find a list of your active Resellers. Press 'Add Reseller' to make one of your clients a reseller.
|
- Select one of your previously created groups, to which the reseller will be assigned.
- Then select one of your clients from the dropdown, start typing to see a list of clients
- Generate an API Key for the Reseller, it will be necessary when configuring the integration module with the Reseller's platform
- Prepare a list of allowed IP addresses, use comma or a space to separate - note that this option must have been enabled previously in the module general settings here
- API Status - toggle to allow reseller generate the API key in the Reseller area
- API Limits - toggle to be able to define precise limits
- API Interval [Min] - enter a time interval in minutes in which a provided below number of API requests can be called
- API Requests Limit - maximum number of API requests in the time interval
|
Instead of adding single resellers one by one, you may use the 'Add Resellers In Bulk' option.
Then all your remaining users will be converted into resellers.
|
| Select a group to which the newly created resellers will be assigned.
|
Reseller Details
API Configuration
Here you may easily alter the settings that you have defined when creating the reseller.
Apart from them, you may preview the API Email Address and API Key required to activate and configure the integration module.
|
Orders
This section includes a list of orders placed to purchase a domain with offered to this reseller TLDs.
Take a look at any crucial details on the orders.
|
Income
'Income' tab contains a current list of invoices that generate any income for the reseller.
Press the invoice ID and you will be redirected to the invoice summary.
|
Response Templates
In 'Response Templates' section you may add and edit new templates with text messages/information that are sent to clients instead of defined here system responses.
In order to add a new response template press the 'Create Template' button and then follow the below instructions.
|
Provide the pattern for search and replace in the system response depending on the type.
- For Text type, simply provide a string like 'Error Response'.
- For Regular Expression type, you need to provide a regular expression which will be replaced.
For example, if you want to replace any dollar price in the response provide '\$\d+\.\d+', in this case it will replace strings like '$8.25'.
- If you want to replace any response, simply type '.+' in here.
|
In the second step Replace With you need to enter a text message that will be sent to a client when the above entered pattern is found.
The two messages will be replaced with one another.
|
Define Priority. The higher number you enter, the higher priority will be assigned.
Important! All active patterns within the same group found with different priorities are performed starting from the higher to lower priority.
|
Finally,
- choose 'Text' or 'Regular Expression' from Type dropdown menu.
It will specify if provided text in the first field should be treated as a text or a regular expression while searching for a pattern.
- Registrar Action - must be chosen from dropdown menu as well to specify upon which action provided patterns will be searched for.
Remember, to finish successfully you need to press 'Confirm' button.
|
Now you can see a newly configured response is visible on the list. You may edit the added response or remove it any time you need.
Just use action buttons marked on the screen.
|
Module Logs
| In 'Logs' section you may preview a list of API requests and responses, including errors with the most important details on them.
|
| Use action buttons to delete selected logs or just single entries.
|
| You can also delete all logs by using the "Delete All Logs" function.
|
Documentation
API Documentation
Under 'Documentation' tab you will find two subsections. The first one is dedicated to API.
This API documentation has been prepared to allow you to write your own integration modules for platforms other than WHMCS and Blesta (included by default).
'Information' subtab contains:
- Endpoint - URL to which all the API requests are directed
- Authorization - Username and token parameters to authenticate the client in the API request
- Example - exemplary request to API to renew a domain
|
'Calls' subtab contains information about actions supported by the API.
Note: The screen below does not capture all the supported functions.
Full API functionality can be found on the module features list at the top of this documentation.
|
| The last section includes 'Models' details.
|
Module Documentation
| 'Module Documentation ' is a hyperlink. It leads to the 'Domains Reseller For WHMCS' wiki article you are currently reading.
|
Reseller Area
Resellers can manage API connection credentials directly from the provider WHMCS client area as well as see any details on its TLDs offer.
Go to 'Domains' → 'Reseller Area' to access them.
|
Orders
| As you can see, 'Orders' section includes a detailed list of orders placed on domains with offered TLDs, with any payment details and date.
|
Pricing
| 'Pricing' section includes a list of the Reseller's TLDs with the option to preview its pricing set up by the provider.
|
Domains
The 'Domains' section allows Resellers to manage their domains.
If you want to assign any domains that were bought previously, simply click on the following button.
|
| Now you can select one or more domains from the dropdown menu.
|
There is also the possibility to unassign the particular domain.
Note: Please remember that once a domain is unassigned, you are not able to manage it until it is assigned again.
|
Settings
| Under 'Settings' section you will find any API details necessary to install and activate the integration module.
|
Underneath the API details you will find a list of generated integrations.
Depending on the provider, you may download the packages, download the additional fields and documentation per Integration.
|
Logs
| Preview a list of logs on API requests and responses, including errors stored in the module.
|
API Documentation
Access API documentation details with basic information and API Calls and Models.
This API documentation has been prepared to allow you to write your own integration modules for platforms other than WHMCS and Blesta (included by default).
'Information' tab contains:
- Endpoint - URL to which all the API requests are directed
- Authorization - Username and token parameters to authenticate the client in the API request
- Example - exemplary request to API to renew a domain
|
Available 'Calls' list:
Note: The screen below does not capture all the supported functions.
|
| Available 'API Models' list:
|
Domains Reselling Workflow
Installation Of Integration Module
Below you can find instructions for installation of the integration module on the reseller's WHMCS.
Please refer to section Integrations to learn how to generate an integration module for your resellers.
|
| An exemplary flow of installation and configuration of the integration module to resell TLDs on Blesta, can be found in Blesta official documentation.
|
1. Upload and extract the registrar module into your WHMCS.
Once you have extracted the module, you should find a new folder with the registrar in 'resellerWHMCS/modules/registrars/' directory.
Important: The folder and module name, logo and description of the extracted integration module is customized by the provider and will be different than the one presented in the example below.
|
| 2. Go to 'System Settings' → 'Domains Registrars' , find the module you have just uploaded and press 'Activate' next to it.
|
3. Now, press 'Configure' button, enter 'User Email' and 'API Key' provided along with the module.
You can find these data in your Reseller Area in the Provider's Client Area.
Afterwards, press 'Save Changes'.
|
5. To continue, go to 'System Settings' → 'Domains Pricing'.
Set up TLD your provider allows you to resell, select additional features, choose registrar you have just installed from a dropdown menu and save it through pressing 'Save Changes'.
|
6. Afterwards, set pricing for your TLD. To do so, press 'Open Pricing' text.
It will open in a new window, so make sure your browser does not block it.
|
| 7. Next, enter prices for specific actions. Press 'Save Changes' to confirm.
|
8. Congratulations, you have just successfully installed your registrar!
|
Domain Orders Extended For WHMCS allows quick and easy management of multiple TLDs that may turn out to be a fundamental tool for your resellers!
In this part we are going to present how fluently these two modules may work together to gain the most from the integration.
|
| The provider in 'Domains Reseller' module must have previously configured and set up the pricing for domains he wants to offer to a reseller.
|
| Open your Domain Orders Extended For WHMCS addon module, move to 'Predefined TLD Sets' section and install the ones the provider has offered you to resell.
|
| Come back to the 'TLDs Configuration', find your group with newly assigned TLDs and define pricing for each of them. To make it faster, select all TLDs and use a mass action button.
|
It is time to quickly set up the pricing, do not forget to define higher prices that the provider has stated in your Reseller Area to assure incomes! Save the changes once ready.
You can find more information about the pricing in Domain Orders Extended For WHMCS here.
|
Select all TLDs the same way you did earlier and 'Edit TLDs Configuration'.
There, find 'Overwrite Registrar' option and toggle it. A dropdown menu with available registrars will appear. Select the integration module delivered by your provider.
|
Most importantly, the offer can be now extremely client-friendly due to a high range of selection of Domain Orders Extended domain registration forms including:
- Lagom theme
- General Category View
- Multi Category View
- List View
|
There is surely a solution for resellers who do not own Domain Orders Extended module yet.
They will simply have to add and set up each TLD separately at the 'System Settings' → 'Domain Pricing', which may be time consuming.
That is why we highly recommend using the modules together to manage the time optimally.
|
As you can see, integrating of Domains Resellers For WHMCS with Domain Orders Extended For WHMCS allows you to offer vast array of TLDs with ease.
A win-win situation with benefits for all: you expanding and perfecting your offer, your resellers managing the TLDs and surely for the end-clients enjoying the final outcomes!
|
End Client Area
Domains Reseller integration module allows end clients to register, transfer and renew domain as well as run standard actions on domains.
WHMCS Client Area view with an ordered domain via integration module.
|
| Blesta Client Area view with an ordered domain via integration module.
|
Sample Workflow
In this section we will present to you a sample workflow of the module.
In a basic workflow 3 users take part:
Provider – a person with Domains Reseller For WHMCS installed on the WHMCS system.
Reseller - a provider's client who aims at reselling TLDs offered to him by the provider.
The reseller must own a system with integration module generated for him by the provider with Domains Reseller For WHMCS.
End Client – a person with a client account in the Reseller's system (WHMCS, Blesta or others).
Provider's Part
Let us start from the beginning. Provider installs Domains Reseller For WHMCS in the system.
He already has some TLDs in the offer and wishes to allow the reseller to resell them.
Now, the provider configures Domains Reseller For WHMCS, creates groups, configures them and assigns TLDs and defines their pricing for the reseller who is assigned to one of the groups.
Finally, selects which of the clients will become resellers, assigns them to previously created groups and generates access details.
Reseller Part
The Reseller has access to the Reseller Area once logged into the provider's client area.
There, he can download both the integration module and its documentation as well as generate and copy any API details required to activate the integration module in his own system.
Then, the reseller needs to set up TLDs that the provider allows him to resell with the integration module delivered by the provider. Defines the pricing (prices must be higher than the ones the provider has set up to generate any income).
There is one step that separates the reseller from offering the domain from his system.
The reseller must add funds to his credit balance in the provider system to be able to pay off the charges and settle the amounts owed to the provider for his resold TLDs .
Provider creates an 'add funds invoice' for the Reseller, the Reseller pays the invoice and then again the Provider adds the same amount to Reseller's credit balance.
From now on, any domain can be ordered.
End Client
End Client orders a domain from his client area in the Reseller's system.
Last Word About Payment
Now, that the End-Client has ordered and paid the reseller for the domain, at the provider's system a new invoice for that domain is created automatically (on behalf of the reseller).
Depending on the selected "Payment Type" configuration the invoice will be paid with credits and domain attempted to be registered or attempt to register the domain and if successful, the invoice will be paid with credits.
In case the reseller does not have sufficient credits on his account to pay for the domain registration the process is stopped until the invoice is manually paid by the reseller.
The reseller's income is the difference between the price of the sold domain to the End-Client and the price he paid to the provider.
|
Domains Reseller Product
Domains Reseller For WHMCS module may also be configured as a provisioning module. You will have to create a new product that will be offered to purchase for resellers.
This simple trick will allow you to skip the manual configuration of all resellers. The process will be automatized once the reseller orders such product.
Follow the steps below to create and configure the Domains Reseller product:
1. In order to create a new Domains Reseller product, go to 'Setup' → 'Products/Services' → 'Products/Services'.
Press 'Create New Group' to add a new one.
|
| 2. Fill in a product group name and press 'Save Changes'.
|
| 3. Next, add a new product in the previously created group.
|
| 4. Set the product type to 'Other', name the product and assign it to the Domians Reseller module.
|
5. Now, go to the 'Module Settings' section and choose one of the previously created in the addon groups of resellers from dropdown menu. Press 'Save Changes' .
Note that there is no server that shall be selected. Your product is ready to order!
|
Allowed actions on the product:
- Create - once a client orders the product, go to Client's Products/Services and run the 'Create' action.
When successful, the client appears on the list of resellers in your addon (see the screen below).
- Suspend - after successful Suspend action in the Client's Products/Services, the ' API Key Status ' of this reseller is switched off.
- Unsuspend - run 'Unsuspend ' command to again switch on the reseller's 'API Key Status.'
- Terminate - when the product is terminated, the Reseller's 'API Key Status' is again switched off.
|
Once any of your clients orders this product, they will automatically become resellers.
They will get access to the 'Reseller Area', from where they can resell the domains, that belong to their pricing group.
|
Tips
| 1. If your reseller gets an error 'Unable to register domain, please contact administration (license problem).', that means your license is invalid or expired.
|
| 2. Make sure that you are not blocking access to the 'api' catalog by your '.htaccess' file.
|
3. Domains Reseller For WHMCS enables you to resell your domains not only to WHMCS and Blesta systems.
You are able to easily prepare registrar module for any system (HostBill, Clientexec, BoxBilling and many more) using Domains Reseller For WHMCS API.
All you need is knowledge of for example PHP programming language and our module's API.
|
4. If a client buys a domain from the reseller and pays in a different currency than the reseller's default currency
then the amount will be converted into the reseller's default currency basing on the 'Base Conv. Rate' (your WHMCS → System Settings → Currencies).
|
Update Instructions
Essential guidance through the process of updating the module is offered here.
Please be aware that when updating from version 1.x. to 2.0.0 of the module no data are migrated!
All the resellers and their configuration will need to be set up from the beginning.
|
Upgrade Guide
Seeking a solution that offers greater flexibility, customization tailored to your precise needs, and unrestricted availability?
There is an option that not only proves to be cost-effective in the long run but also includes prioritized support services, making it a truly valuable investment.
Opt for the Open Source version of your Domains Reseller For WHMCS module to unlock these benefits.
Simply click on either the Get Source Code or Upgrade To Lifetime button found on the product's page in our client area to complete the one-step upgrade process, with a dedicated discount already applied.
Follow a comprehensive guide covering the transition process, the advantages it brings, and step-by-step instructions on what to do next after the order has been successfully finalized.
|
Common Problems
| 1. When you have problems with connection, check whether your SELinux or firewall does not block ports.
|
2. In the case of problems with connection between the main WHMCS and the reseller's module, make sure the firewall does not interfere with:
- the reseller's WHMCS server
- the provider's server
|
| 3. Error 'Function Not Supported by Registrar Module' means that registrar on main WHMCS does not support the operation you were trying to do.
|
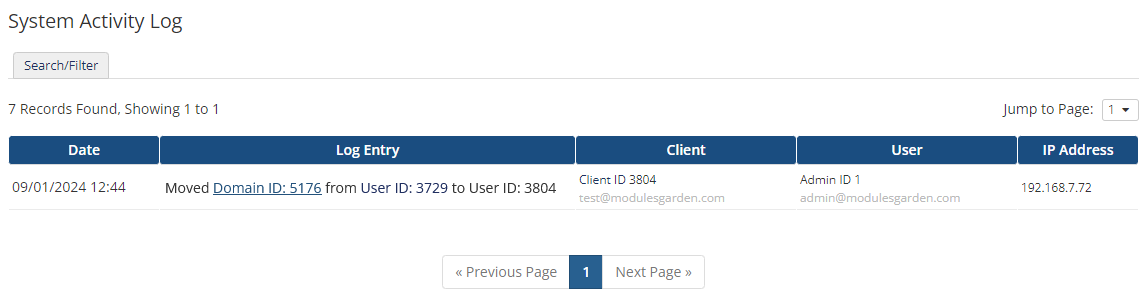
4. Error: 'Provided domain has not been found in reseller account'
Explanation: The Domains Reseller For WHMCS module does not support the "Transfer Ownership" action. If you attempt to transfer a domain between WHMCS clients (resellers), the above error will appear.
Solution: Transfer the domain between resellers manually at the database level. To do so, execute the following command:
UPDATE `DomainsReseller_ResellerRelations` SET `resellerid` = (SELECT id FROM `DomainsReseller_Resellers` WHERE `clientid` = :newClientID) WHERE relid = :domainId and type = 'domain';
Where:
- clientid - ID number of a WHMCS client (a reseller) to which a domain has been transferred
- relid - ID number of the transferred domain
based on the data from WHMCS system activity log.
For example:
UPDATE `DomainsReseller_ResellerRelations` SET `resellerid` = (SELECT id FROM `DomainsReseller_Resellers` WHERE `clientid` = 3804) WHERE relid = 5176 and type = 'domain';
Based on system activity log data:
|
|
5. Error: 'Provided domain has not been found in reseller account'
Explanation: When the above error is returned by the API for any reseller domain action, it means that the order for this domain was added by default by WHMCS and not by the API of the module (reseller functionality).
Solution: The domain should be additionally imported to the reseller manually.
|
| 6. Do not upload any non ".php" files into the 'modules/addons/DomainsReseller/app/Libs/Resources/Submodules/Types ' folder, as it might cause certain issues with the functioning of the module.
|


