Time And Task Manager For WHMCS
From ModulesGarden Wiki
(Difference between revisions)
|
|
| Line 254: |
Line 254: |
| | Invoice Description Format (Mileage):<br/> | | Invoice Description Format (Mileage):<br/> |
| | ''{$entry_mileage}''<br/> | | ''{$entry_mileage}''<br/> |
| − | ''{$mileage_value}''<br/><!-- | + | ''{$mileage_value}''<br/> |
| − | Please note that you can use single '-' character in the '' 'Invoice Description Format' '' field in order to hide the description from the generated invoices.<br/> --> | + | Please note that you can use single '-' character in the '' 'Invoice Description Format' '' field in order to hide the description from the generated invoices.<br/> |
| | |} | | |} |
| | {| | | {| |
Revision as of 15:05, 17 January 2020
Time & Task Manager For WHMCS will let you add various tasks, track their development basing on the time spent on their execution and charge your customers accordingly.
The module enables your clients to order and monitor products with a chosen number of hours that can be spent on performance of your services.
Additionally, you can offer your customers prepaid hours and incidents as well as manage tasks connected to specific support tickets.
|
| ✔ Add/Edit/Remove Support Clients
|
| ✔ Add/Edit/Remove Predefined Tasks
|
| ✔ Add/Edit/Remove Time Entries - Time Spent On Task
|
| ✔ Create/Edit Custom Tasks Connected To Specific Tickets
|
| ✔ Create/Edit Tasks With Default Rates, Status And Urgency From Tickets
|
| ✔ Define Billable Time Entries
|
| ✔ View List Of Billable Time Entries
|
| ✔ Generate Invoices Automatically Or Manually
|
| ✔ Add Invoice Creation To Cron Queue
|
| ✔ Bill For Time Spent On Solving Tickets
|
| ✔ Define And Bill For Mileages Traveled
|
| ✔ Send Email Notifications - New Task/New Time Entry
|
| ✔ Generate And View Fully Configurable Reports On Your Clients And Administrators
|
| ✔ Choose The Type Of Configurable Permissions - Full Privileges And Operator Privileges
|
- Provisioning Module Features:
| ✔ Create Support Client Accounts Upon Module Activation
|
| ✔ Add Defined Number Of Prepaid Hours To Your Clients Automatically
|
| ✔ Supports One Time & Recurring Payment Types
|
| ✔ View Lists Of Opened And Closed Tasks
|
| ✔ View Current Task Status, Worked Hours And Hourly Rate
|
| ✔ View Purchased Prepaid Hours
|
| ✔ View Balance Of Available Or Exceeded Hours
|
| ✔ Predefined/Custom Charge Per Hour
|
| ✔ Custom Charge Per Extra Hour
|
| ✔ Mileage Type - Billable / Visible For Client And Administrators / Visible For Administrators Only
|
- Available Cron Job Behavior Settings:
| ✔ Generate Invoices For Queued Time Entries Only
|
| ✔ Generate Invoices For All Time Entries From Previous Week
|
| ✔ Generate Invoices For All Time Entries From Previous Month
|
| ✔ Generate Zero Invoices For Prepaid Entrie
|
| ✔ Enable Auto Credit Application On Invoice Generation
|
| ✔ Supports PHP 5.6 Up To PHP 7.3
|
| ✔ Supports WHMCS Template Six
|
| ✔ Supports WHMCS V7.7 And Later
|
Installation and Configuration
This tutorial will show you how to successfully install and configure Time & Task Manager For WHMCS.
We will guide you step by step through the whole installation and configuration process.
|
Installation
| 1. Log in to our client area and download the module.
|
2. In the downloaded file you might find one or two packages that support different PHP versions.
In the most recent versions of the module, you will find only one package that supports PHP 7.1 and later.
If you need a package for the previous versions of PHP, please contact our support.
|
Previous updates of the module may contain two packages dedicated to various PHP versions.
The first one that supports PHP 5.6 up to PHP 7.0, and the second one addressed to PHP 7.1 up to PHP 7.3.
Note: Keep in mind that PHP versions 5.6 up to 7.0 are no longer officially supported and their security issues are not fixed or released any more. Find more info here.
|
Important: This situation does not affect the open source version of this module which can be applied to any PHP from version 5.6 and later.
Note: You can check the current PHP version in your WHMCS. To do so, proceed to 'Utilities' → 'System' → 'PHP Info'.
|
3. Once you have chosen the package with the right PHP version, extract it and upload its content into the main WHMCS directory.
The content of the chosen PHP version files to upload should look like this.
|
4. When you install Time & Task Manager For WHMCS for the first time you have to rename 'license_RENAME.php' file.
File is located in 'modules/addons/TimeTaskManager/license_RENAME.php'. Rename it from 'license_RENAME.php' to 'license.php'.
|
5. In order to configure your license key, you have to edit a previously renamed 'license.php' file.
Enter your license key between quotation marks as presented on the following screen. You can find your license key in our client area → 'My Products'.
|
Configuration of Addon
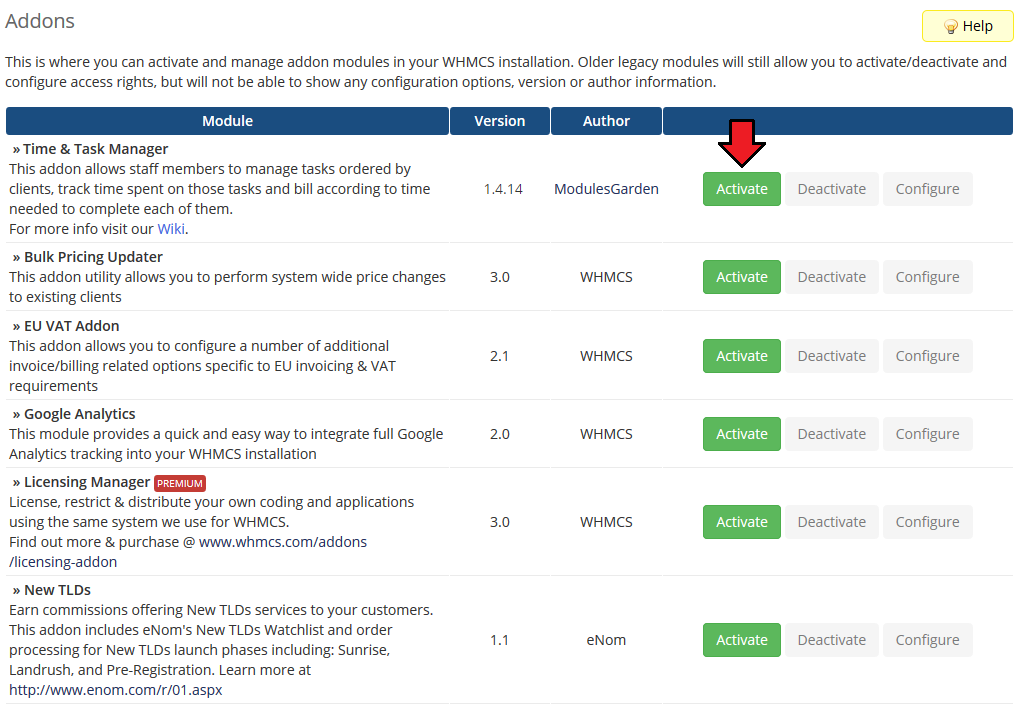
6. Now you have to activate the module in your WHMCS system.
Log in to your WHMCS admin area. Go to 'Setup' → 'Addon Modules'. Afterwards, find 'Time & Task Manager' and press the 'Activate' button.
|
|
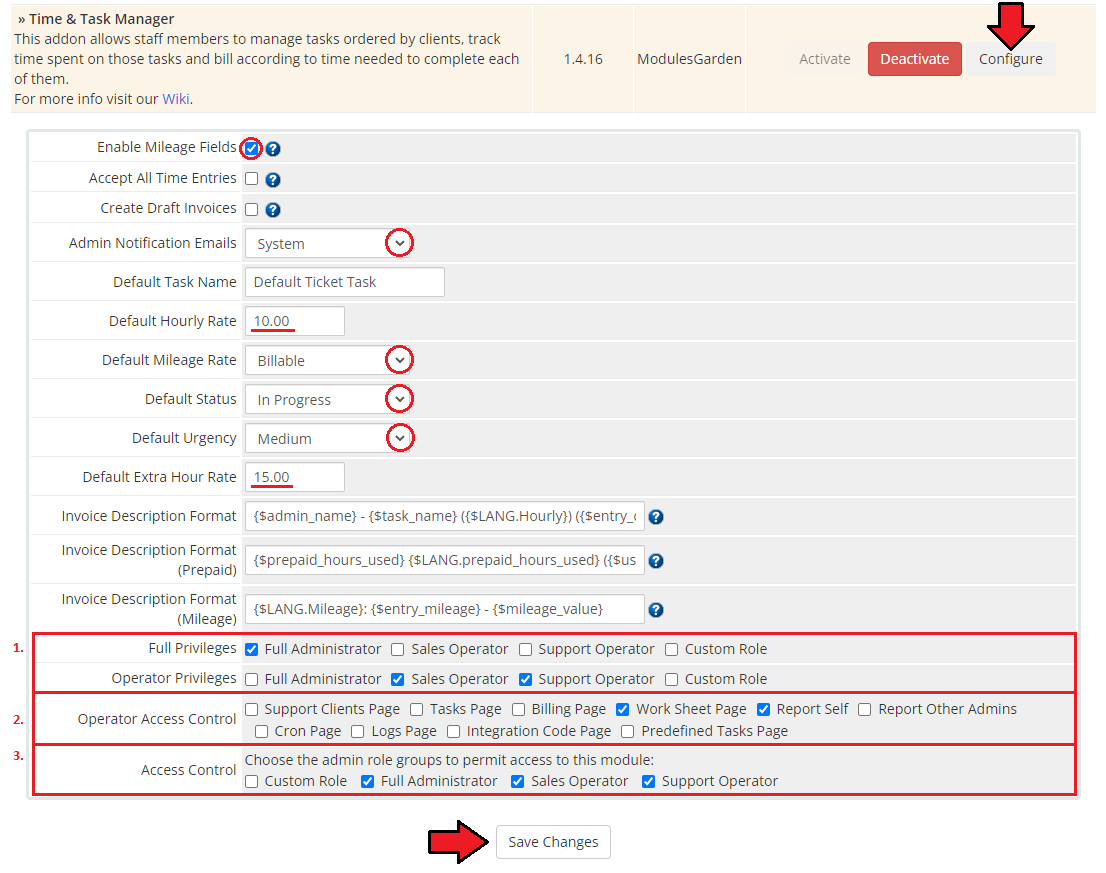
7. In the next step you need to permit access to this module and set up basic configuration.
To do so, click on 'Configure' .
Afterwards, choose whether to allow billing for mileage and decide to whom emails should be sent by defining their type (System/Account/Support/None).
You can also set default settings for a task time entry created directly from ticket - these are the hourly rate, mileage rate, status, urgency, and the extra hourly rate.
This way your support operator will need neither to have access to the module nor to create a task with custom settings and rates.
Next, assign permissions to admin roles in your system, you can grant 'Full Privileges' and 'Operator Privileges'.
'Full Privileges' (1) grant access to all tabs of Time & Task Manager addon.
'Operator Privileges' (1) grant access for the admin roles to the tabs chosen in the 'Operator Access Control'.
'Operator Access Control' (2) defines tabs to which operator should have access to.
Afterwards, give 'Access Control' (3) to required admin role groups and press 'Save Changes'.
|
|
8. Additionally, here you can set up invoice description format and predefined price per hour.
You can use variables listed under the help sign to define invoice description, each invoice description allows different set of variables.
|
Invoice Description Format:
{$admin_name}
{$task_name}
{$entry_date}
{$entry_hours}
{$entry_description}
{$entry_raw_hours}
{$entry_raw_description}
Invoice Description Format (Prepaid):
{$prepaid_hours_used}
{$used_prepaid_hours_value}
{$prepaid_raw_hours_used}
{$prepaid_raw_minutes_used}
Invoice Description Format (Mileage):
{$entry_mileage}
{$mileage_value}
Please note that you can use single '-' character in the 'Invoice Description Format' field in order to hide the description from the generated invoices.
|
9. You have just successfully installed Time & Task Manager For WHMCS!
You can access your module in 'Addons' → 'Time & Task Manager'.
|
| Remember to clear templates_c folder when migrating to Time & Task Manager 1.3.0 version or a newer one!
|
Management
In this section we will show you how to properly set up and use Time & Task Manager For WHMCS.
Our module allows you to easily add and track progress of the tasks ordered by your clients while your staff members are able to easily report time spent on each of them.
Additionally, you can manually bill your clients for the time already spent on their tasks or use cron job to do it automatically.
Owing to integration code, you can even display current status of tasks assigned to clients in their client area, as well as show them the amount of prepaid hours & incidents they own.
|
Predefined Price And Prepaid Hours
You can easily set up predefined price per hour using Custom Client Fields.
Afterwards, you can sell those hours to your clients using provisioning module.
|
Setting Up Custom Field
First of all, set up Custom Client Fields visible only from the admin area.
To do so, proceed to 'Setup' → 'Custom Client Fields'. Fill in its name, choose 'Text Box' as your 'Field Type' .
Additionally, you can ensure that only numerical values will be placed there.
Copy the regular expression shown below into the validation field as presented on the following screen.
^[0-9]*$
Note: Only the following values can be used to specify a predefined price: Installation Hours, Support Hours, Development Hours, Incidents.
Now, mark the 'Admin Only' checkbox and press 'Save Changes'.
|
You can set up prepaid incidents the same way.
The only difference is placing 'incident' into the 'Select Options' field.
|
Predefined Price
Once you have created a custom client field, proceed to 'Setup' → 'Addon Modules' and press 'Configure' next to 'Time & Task Manager'.
Afterward, fill in a predefined price per hour for the previously created custom field and press 'Save Changes'.
|
Prepaid Hours & Incidents
Owing to our module, you can even offer prepaid hours and incidents to your clients as a product in your system.
To set up your first product, proceed to 'Setup' → 'Products/Services' → 'Products/Services'.
Press 'Create a New Group' to create a new product group or use existing one instead.
|
| Fill in a product group name and press 'Save Changes'.
|
| Now, create a new product, press 'Create a New Product' to proceed.
|
| Fill in a product name, choose the previously created group and press 'Continue'.
|
| Uncheck the 'Require Domain' checkbox and proceed to the 'Pricing' tab.
|
Choose a payment type, enable wanted billing cycles and fill in a price for each of them.
Now, go to the 'Module Settings' tab.
|
Choose the 'TimeTrackingPrepaid' module from the 'Module Name' dropdown menu.
Afterwards, fill in the amount of prepaid hours and incidents this product will grant to clients and press 'Save Changes'.
If you select option 'Delete Hours On Renew' - unused hours from a past billing period will be deleted.
In other words, if a client does not use all the purchased hours they are not added to the hours purchased from the renewed period, their number is reset instead.
Note 1: Prepaid hours can be used to pay for the tasks using the same prepaid hour type.
Note 2: Prepaid incidents can be used to offer one time support services.
Once a task using Incidents is created, they are removed from the client's account.
|
Addon
Addon is the main part of the time tracking process. It is here where all the tasks and time entries are made.
Additionally, from here you can create the tasks ordered by your clients, track the time spent on them and bill your clients accordingly.
|
Support Clients
In the 'Support Clients' tab you are able to view the list of clients who bought prepaid hours of work or for whom accounts were created by your staff.
|
| Let's create an account for client Kate Cole, press 'Add Support Client' to proceed.
|
Select a desired client from the 'WHMCS Client' dropdown menu and fill in the name under which the client will be visible in the addon.
Additionally, you can add a note to this client.
Select status 'Active' or 'Inactive' and press 'Add Support Client' to confirm and save this account.
|
| By using the buttons marked on the following screen you can easily remove and edit support clients' accounts.
|
Tasks
All tasks for which your clients can be billed are stored in the 'Tasks' tab.
Press 'Add New Task' to create a new task.
|
New Task
Start by selecting one of the support clients and fill in a task name.
Afterwards, define a payment for each hour spent on this task by selecting from 'Charge From Prepaid Hours' or filling in price into 'Hourly Rate'. Here you can also set up an
'Extra Hourly Rate' to have a wider choice when charging clients. Then you may select special prices to charge for some extra services, these provided in shorter time
or for any other reason you might have.
|
You can also set up pricing for mileage.
You can choose from three types of mileages:
- Billable - client will have to pay for mileages
- Reference - client will be able to see only mileages done, no payment required
- Internal - only administrators will be able to see mileages reported by your staff
|
Now, choose the task's status and urgency level, fill in the description of the task.
In addition, you can also add time entires, or do it later from the 'Work Sheet' tab view.
Press 'Add Task' when ready.
|
Work Sheet
| In 'Work Sheet' your staff members are able to report hours spent on existing tasks or create a new task by choosing one from the predefined tasks.
|
Let's create a new entry for the previously created task.
Each time you enter the 'Work Sheet' tab, a form to create a new entry will be already open.
Start by selecting a support client and a task. As soon as you choose the client, the tasks concerning them will be listed.
Afterwards, fill in the number of hours spent, mileages traveled and a description.
Billable entries can be added to queue so they will be shown on the customer's invoices.
Otherwise, they will not be included until the administrator accepts them from the entries list or by manually changing their 'Billable' status to 'Yes' .
Create an entry through pressing 'Submit New Time Entry'.
|
Below you can find the list of tasks for the current day.
In order to display tasks from the other day, select it in the calendar as shown on the following screen.
|
| All time entries can be afterwards modified, removed and rejected through using buttons marked on the following screen.
|
Billing
Finally, it is time to show you the place where you can generate invoices for the time spent on your clients' tasks.
As you can see, here you can find billing for a single time entry with detailed information about each of them.
You can find specific ones through using the filters marked on the following screen.
Filters allow you to display the time entries from specified time period as well as display only those assigned to a selected support client.
|
Let's generate invoice for client Kate Cole from the time entries created this week.
Start by filling in the correct time period and choose Kate Cole from the 'Support Client' dropdown menu and press 'Refresh Filters'.
|
As you can see, only the desired time entries are displayed.
If you wish to display entries that are not schedulded cron jobs, tick the 'Only Not Queued' box.
Mark the checkbox as shown on the following screen to mark them all at once.
Now, press 'Invoice Now' to generate invoice for the selected time entries.
You can also press 'Add to Queue' which will add the selected entries to the cron queue.
|
Generated invoice records contain information in the format defined at the module configuration.
Note: Prices inside of the addon are displayed basing on the default WHMCS currency.
Invoices are converted to currencies used by your clients basing on conversion rates defined in your WHMCS system.
|
Reports
You can easily generate reports of the work done for your clients.
Proceed to the 'Reports' tab to do so.
Now, fill in a report name, date range and select the client you wish to generate the report for.
Select the order of tasks: by date or according to task order.
Next choose the elements you want to be displayed in the report.
Confirm through pressing 'Generate PDF Report'.
|
| On the following screen you can see the report for client Test Tester.
|
Cron
In the cron tab you can define the behavior of cron, find path to cron, view all queued entries and manually invoice them.
1. To alter cron behavior, choose the desired option from 'Cron Billing Action' as shown on the following screen.
Note 1: If there are at least two time entries bounded to the same client, a single summary invoice for that client will be created.
Note 2: In order to apply tax to such an invoice, mark 'Billable Items' at your tax rule.
2. It is possible to enable the 'Auto Credit Applying On Invoice Generation' option for invoices created by the module, regardless of the WHMCS settings.
3. Enable the 'Zero Invoices For Prepaid Entries' option to generate an invoice with 0.00 total that will serve as the confirmation of prepaid hours utilization.
|
Logs
The 'Logs' tab contains the logs of all the actions made inside of Time & Task Manager For WHMCS.
There are two columns similar to each other, 'Data' and 'Old Data'.
In 'Data' column you can find details referring to the time after ordering logged action.
While 'Old Data' contains the data from the time before ordering logged action if there were such.
|
Integration Code
| Follow the integration code, shown below, to display tasks and prepaid hours in your client area.
|
Here you can also select a product from the list of your available ones that will be by default added to a cart if a client decides to purchase some additional hours.
Read more about this option here.
|
If all the integration codes have been inserted correctly, this is how Client Area home page should look like.
On the screen below you can see a list of open and closed tasks and the button to purchase additional hours.
|
Predefined Tasks
On the 'Predefined Tasks' page you are able to set up predefined tasks.
Those tasks can be used to instantly create new tasks during creation of a work sheet entry.
Press 'Add New Predefined Task' to proceed.
|
Now, fill in a predefined task name, hourly rate and an extra hourly rate, price per mileage and a description.
Additionally, choose prepaid hours (optional), mileage type and the initial status of the task.
Press 'Add Predefined Task' to save it.
|
| You can manage the predefined tasks the same way you manage the regular tasks.
|
| On the following screen you can see how the predefined tasks look in a new work entry form.
|
Support Integration
| Owing to the integration with support department, your staff members can easily create a task that will be assigned to a ticket.
|
Ticket tasks are created in the same manner as the regular tasks.
As you can see on the screen below the only difference is the direct link to the ticket.
|
As soon as you get back to the ticket, you will notice that the 'Create Task' button has changed into 'Edit Task'.
There are also options to 'Start Counter' (if it was not started automatically) , 'Show Report' and 'Add Time Entries' .
This means that a previously created task is assigned to a ticket.
|
| At this point you may also start the counter and begin counting hours spent on solving a given ticket.
|
| Control the time while solving a ticket, when you are done press 'Add Response' and the timer will stop.
|
| Select whether you want to bill the client for the time spent on solving the ticket, choose rate (normal or extra if set up).
|
| You may also preview this task report from this point.
|
| The 'Add Time Entries' button allows the operator to add a new time entry directly from a given task.
|
Note that the entries created in this way will be settled at the default rates set in part 7 of the addon configuration.
In this way, the support operator may still add entries, but without the possibility of modifying the rates or even access to the Time And Task Manager addon.
Moreover, these entries will also have the 'Billable' status set to 'No' by default, so they will be billed on the customer's invoice only after the administrator's approval.
|
Client Area
In the client area your clients can view all the unused prepaid hours and incidents.
In the top right-hand corner of the tab there is also a current balance of either available or exceeded hours.
|
| Additionally, they can see the tasks concerning them with basic information like a current status, hours spent on it and an hourly billing rate.
|
| Underneath, there is also a list of all closed task with the same details on each one of them.
|
As you can see, your client can order provisioning module with additional hours by pressing 'Buy Additional Hours'.
By default, it will move your clients to the order form of the provisioning module selected in the Time & Task Manager For WHMCS addon.
To change it move to the Integration Code section.
|
Sample Workflow
Let's take a look at a sample workflow, starting from setting up prepaid hours through ordering a task to invoice generation.
If any part of this workflow seems unclear to you, please make sure you have read carefully the rest of this documentation firstly.
|
| 1. Configure client custom field 'Development Hours' with 'Admin Only' checkbox marked.
|
| 2. Proceed to the Time & Task Manager For WHMCS addon configuration and set up 40 USD/h for 'Development Hours'.
|
3. Prepare Time & Task Manager For WHMCS provisioning product set up with recurring payment type and name it '10 Development Hours'.
Fill in 10 into 'Development Hours' field in 'Module Settings'.
|
4. Your client Tim Black ordered '10 Development Hours' product from your client area.
As soon as the product was activated, he received 10 prepaid development hours.
|
5. Afterwards, he requested development work inside of his website.
You went to 'Addons' → 'Time & Task Manager' → 'Tasks' and created a new task for this client concerning his request.
The task was named 'Development Work'.
|
6. You have spent on this task 2 hours on the 16th, July and instructed your staff member John Smith to take it over.
Of course you have added time entry at the 'Work Sheet' tab reporting to your client that you have spent 2 hours on the 16th, July.
|
7. In next days John Smith reported three time entries:
- 6 hours spent on 17th, July
- 8 hours spent on 18th, July
- 2 hours and 30 minutes spent on 21st, July
'Note: In order to report for example 2 hours and 30 minutes fill in 2.50 into 'Hours' field at the time entry.
|
8. John finished 'Development Work' task on 21th, July.
You had set up 'Operator Privileges' for John Smith, therefore he could not close the task by himself.
He told you that task was closed, therefore you edited the task and changed its status to 'Closed'.
|
9. Now, you have decided to bill your client for the task.
To do so, you have gone to 'Billing' tab and chosen 'Tim Black' from support client filter.
Additionally, you set up time period filter to be wider than 16th - 21st, July.
4 time entries were shown, so you have marked them all and pressed 'Invoice Now' at the bottom of the page.
|
10. Marked time entries were summarized, 18 and a half were spent on the Tim Black's task.
The task is using 'Development Hours' prepaid hours and Tim has 10 prepaid hours of this type.
Therefore, he still has to pay for 8 and a half an hour of development work.
|
11. Invoice is generated with 4 items, one per each time entry.
- 2 hours on 16.07 - no payment required (8 prepaid hours left)
- 6 hours on 17.07 - no payment required (2 prepaid hours left)
- 8 hours on 18.07 - payment for 6 hours required (0 prepaid hours left)
- 2 hours 30 minutes spent on 21.07 - full payment required
Invoice on 340$ will be generated for Tim Black.
|
This is only sample and simple workflow of our module.
Therefore, it shows only a little part of Time & Task Manager For WHMCS possibilities.
|
Tips
| 1. Prepaid hours can be afterwards used to pay for task using the same prepaid hour type.
|
| 2. If you are manually generating an invoice from at least two time entries bounded to the same client, one summary invoice for that client will be created.
|
| 3. Cron generates one invoice per support client. Of course invoice will not be generated if no time entries exist for invoiced client.
|
| 4. In order to apply tax to such invoice, make sure you marked 'Billable Items' at your tax rule.
|
| 5. As this module supports templates system, any changes made in the module's templates files will be saved after the upgrade process.
|
Update Instructions
Essential guidance through the process of updating the module is offered here.
Keep in mind there is a quick and easy option in our client area that will let you upgrade the license of your module to an open source version at any time - and at a lower price!
To take advantage of it, simply use the License Upgrade button located on the product's page and a discounted invoice will be generated automatically.
|
Common Problems
| 1. When you have problems with connection, check whether your SELinux or firewall does not block ports.
|
| 2. Make sure you have pricing set up in every used in your system currency, otherwise problems may occur.
|
| 3. If you have problems with updating the module to a newer version, please follow the standard Modules Update guide.
|
4. If you encounter a situation that the number of client's remaining prepaid hours is greater that the number of actually bought ones, use the recalculation script to reset them to the number of the actually bought hours.
You can run it by exeuciting the command below:
php -q path_to_whmcs/modules/addons/TimeTaskManager/shell/recalculateScript.php
Note that it will have no effect on the clients whose number of remaining prepaid hours is lower than the purchased hours.
|


