|
|
| Line 168: |
Line 168: |
| | |} | | |} |
| | {| | | {| |
| − | |style="padding: 0px 0px 15px 15px;"|The first section is dedicated to basic product configuration, select email type that will be used to create the service, provide all the required data: | + | |style="padding: 0px 0px 15px 15px;"|The only option is :D |
| − | | + | |
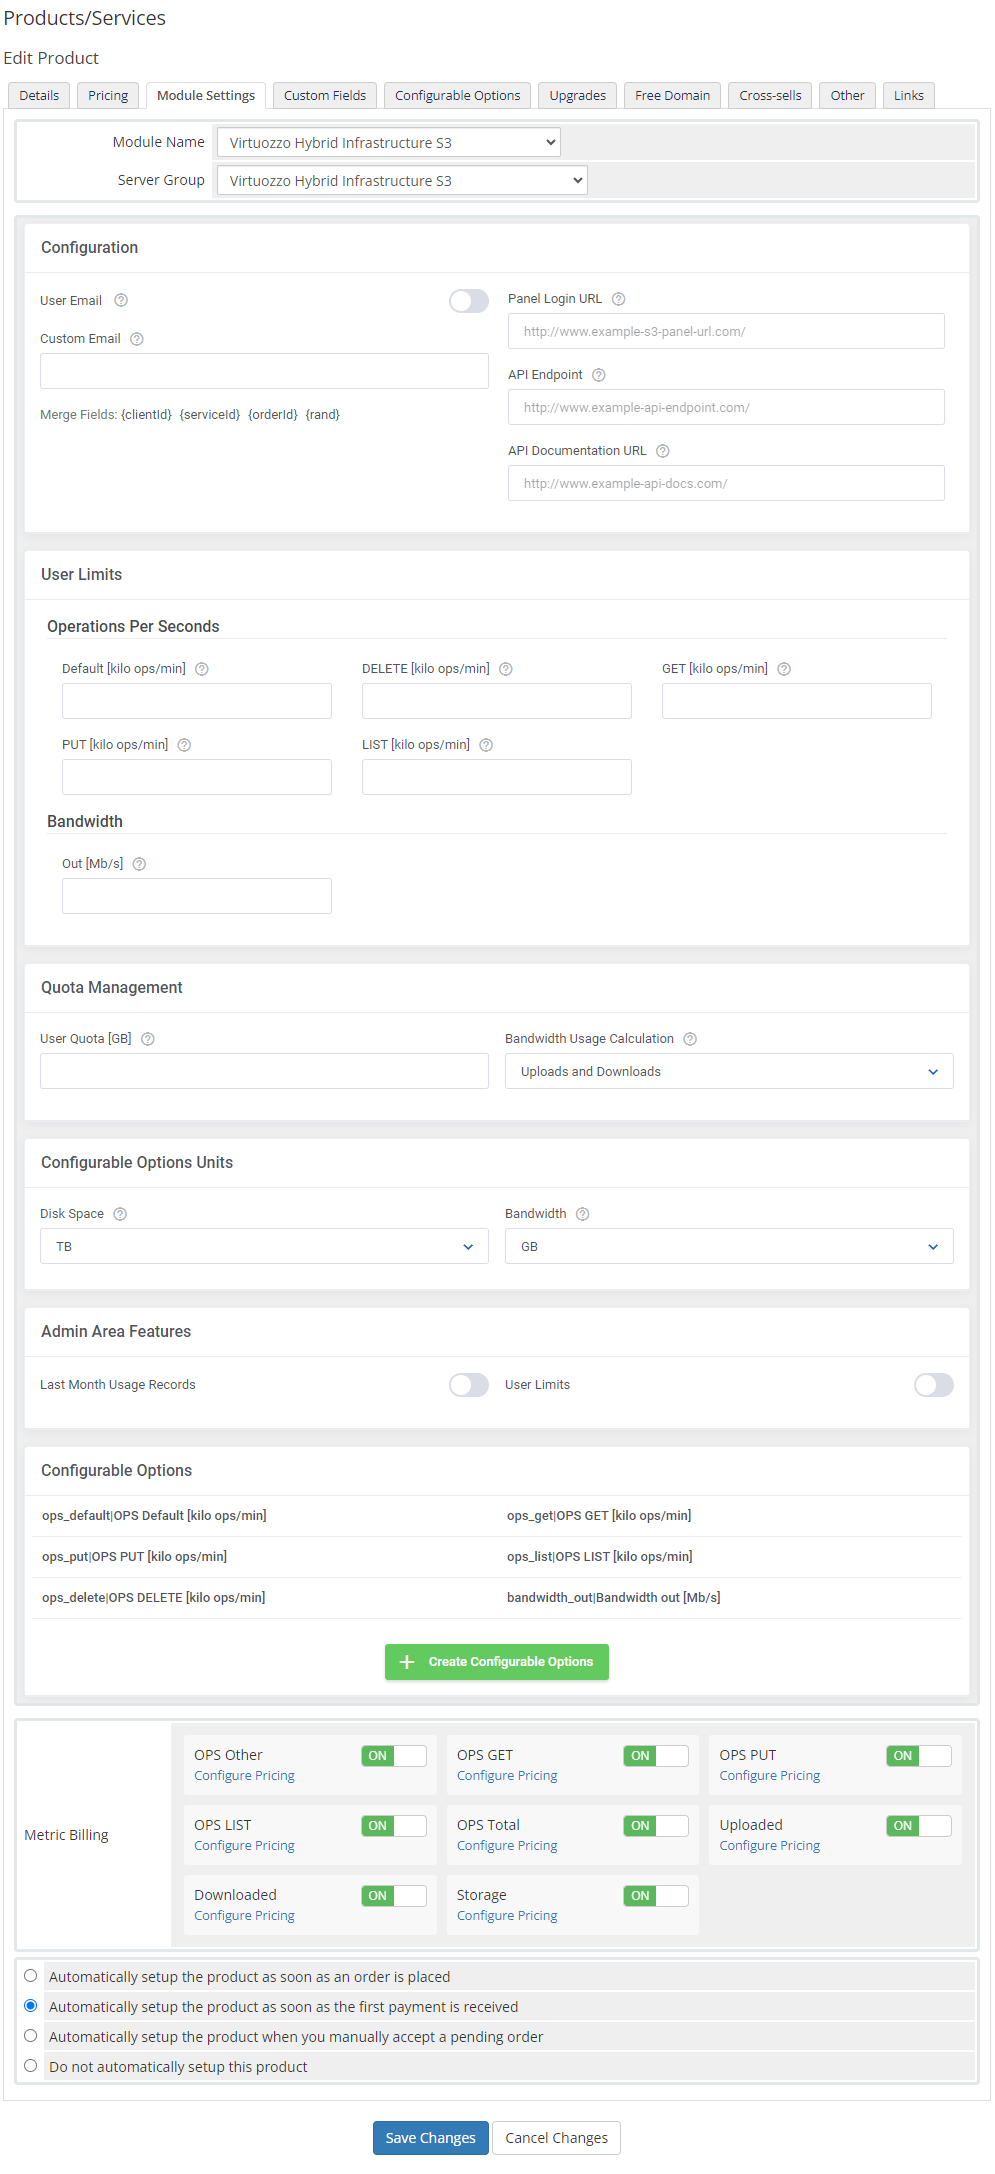
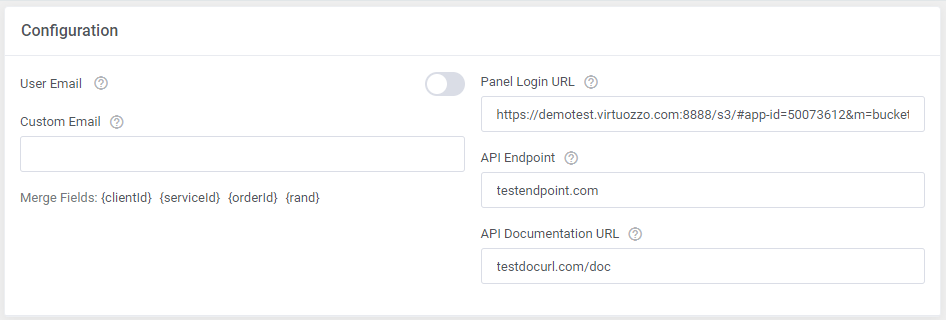
| − | * '''User Email''' - enable this option and the user email address will be used when creating the service
| + | |
| − | * '''Custom Email''' - if '' 'User Email' '' is disabled, the user will be generated in the VHI S3 panel based on the typed in here email address
| + | |
| − | * '''Panel Login URL''' - type in the web address of the Virtuozzo S3 panel. Clients will be redirected to this site when they press the '' 'Log in to Panel' '' button in your client area.<br/> Please remember to provide a valid HTTP protocol
| + | |
| − | * '''API Endpoint''' - enter the API endpoint that will be displayed in your client area
| + | |
| − | * '''API Documentation URL''' - type in the link to the API documentation, it will be visible in the client area as well
| + | |
| | |} | | |} |
| | {| | | {| |
| − | |style="padding: 0px 0px 20px 25px;"|[[File:VHI_16_1.png]] | + | |style="padding: 0px 0px 30px 25px;"|[[File:VHI_16_1.png]] |
| − | |}
| + | |
| − | {|
| + | |
| − | |style="padding: 0px 0px 15px 15px;"|Next move to setting the user limits, define the operations limit and bandwidth.<br/>
| + | |
| − | '''Operations Per Seconds'''
| + | |
| − | * '''Default [kilo ops/min]''' - in this field please enter the value that will be treated as a default one for operations limits.<br/> If provided, all unspecified operation limits will be set to this default value, otherwise they will be set to 0.
| + | |
| − | * '''DELETE [kilo ops/min]''' - enter the value for the DELETE operations limit
| + | |
| − | * '''GET [kilo ops/min]''' - enter the value for the GET operations limit
| + | |
| − | * '''PUT [kilo ops/min]''' - enter the value for the PUT operations limit
| + | |
| − | * '''LIST [kilo ops/min]''' - enter the value for the LIST operations limit <br/>
| + | |
| − | '''Bandwidth'''
| + | |
| − | * '''Out [Mb/s]''' - define an outgoing bandwidth limit
| + | |
| − | |}
| + | |
| − | {|
| + | |
| − | |style="padding: 0px 0px 20px 25px;"|[[File:VHI_17.png]]
| + | |
| − | |}
| + | |
| − | {|
| + | |
| − | |style="padding: 0px 0px 15px 15px;"|The next section is dedicated to quota management:
| + | |
| − | * '''User Quota [GB]''' - define the storage usage limit per user in gigabytes
| + | |
| − | |}
| + | |
| − | {|
| + | |
| − | |style="padding: 0px 0px 20px 25px;"|[[File:VHI_18.png]]
| + | |
| − | |}
| + | |
| − | {|
| + | |
| − | |style="padding: 0px 0px 15px 15px;"|In '' 'Admin Area Features' '' select options that will be visible under the product details:
| + | |
| − | * '''Last Month Usage Records''' - if enabled, the ' ''Last Month Usage Records' '' table will be available
| + | |
| − | * '''User Limits''' - show the '' 'User Limits' '' table
| + | |
| − | |}
| + | |
| − | {|
| + | |
| − | |style="padding: 0px 0px 20px 25px;"|[[File:VHI_19.png]]
| + | |
| − | |}
| + | |
| − | | + | |
| − | {|
| + | |
| − | |style="padding: 0px 0px 15px 15px;"|Now, select which options you want to generate and confirm by clicking '' 'Create' ''.<br/> Note that the configuration for disabled options will still be taken from the configuration of the main product.<br/>More information about how to use configurable options can be found [https://www.docs.modulesgarden.com/General#How_To_Use_Configurable_Options here] or in the official WHMCS [https://docs.whmcs.com/Addons_and_Configurable_Options documentation].
| + | |
| − | |}
| + | |
| − | {|
| + | |
| − | |style="padding: 0px 0px 30px 25px;"|[[File:VHI_20.png]]
| + | |
| | |} | | |} |
| | | | |
