Plesk Key Administrator For WHMCS
From ModulesGarden Wiki
(Difference between revisions)
|
|
| Line 263: |
Line 263: |
| | |} | | |} |
| | {| | | {| |
| − | |style="padding: 0px 0px 15px 15px;"|'''4. Select the required key type from the list of available.'''<br /> The dropdown list includes all types of keys, select according to your needs, either for a standalone license or an additional feature to an already existing license.<br/> | + | |style="padding: 0px 0px 15px 15px;"|'''4. Select the required key type from the list of available.'''<br /> The dropdown list includes all types of keys, select according to your needs, either for a standalone license (marked with a [license] tag) or an additional feature to an already existing license (marked with an [extension] tag).<br/> |
| | Disable IP Binding - if you select this option, IP address will not be bound to the license.<br/> Keep in mind that some addon features may require this option to be disabled. | | Disable IP Binding - if you select this option, IP address will not be bound to the license.<br/> Keep in mind that some addon features may require this option to be disabled. |
| | |} | | |} |
Revision as of 11:15, 21 November 2018
Article update is ongoing on this page, watch out for broken links, unclear descriptions and images!
We are sorry for the inconvenience caused.
Plesk Key Administrator For WHMCS will allow you to provide your clients with various Plesk licenses through your WHMCS.
The module will automatically deliver and activate the licenses for your customers with the help of flexible, fully customizable products.
|
| ✔ Create/Suspend/Unsuspend/Terminate License
|
| ✔ Upgrade/Downgrade License
|
| ✔ Change IP Address Assigned To License
|
| ✔ Choose Key Type Per Product And Product Addon
|
| ✔ Add Multiple Addon Features To Product
|
| ✔ Enable/Disable IP Binding To License
|
| ✔ Order License As Standalone Product Or Product Addon
|
| ✔ Order Additional Extension To Owned Product License
|
| ✔ Upgrade/Downgrade License
|
| ✔ Change IP Address Assigned To License
|
| ✔ Supports Redirection From Plesk Extension Catalog To WHMCS Store
|
| ✔ Supports Key Administrator Partner API 3.0
|
| ✔ Supports Identifiers And License Key Structure Included In Key Administrator Partner API
|
| ✔ Integrated With Product Linker For WHMCS - Resell Licenses In Product Bundles (read more)
|
| ✔ Integrated With Server Allocator For WHMCS - Automatic Assignment Of Specified Servers To Products (read more)
|
| ✔ Supports PHP 5.6 Up To PHP 7.2
|
| ✔ Supports WHMCS Template Six
|
| ✔ Supports WHMCS V7.2 And Later
|
Installation and Configuration
In this tutorial we will show you how to quickly install and configure Plesk Key Administrator For WHMCS.
We will guide you step by step through the whole installation process.
|
| 1. Log in to our client area and download the module.
|
2. In the downloaded file you will find two packages that support different PHP versions.
As presented on the screen below, the first one is dedicated to PHP 5.6 up to PHP 7.0, while the second one is aimed at PHP 7.1 up to PHP 7.2.
It does not apply to open source versions.
Note: You can check the current PHP version in your WHMCS. To do so, proceed to 'Utilities' → 'System' → 'PHP Info'.
|
3. Extract the downloaded file and choose the one with the right PHP version. Upload and extract the PHP file into the main WHMCS directory.
The content of PHP version files should look like this.
|
4. When you install Plesk Key Administrator For WHMCS for the first time you have to rename 'license_RENAME.php' file.
File is located in 'modules/servers/pleskKeyAdministrator/license_RENAME.php'. Rename it from 'license_RENAME.php' to 'license.php'.
|
5. In order to configure your license key, you have to edit a previously renamed 'license.php' file.
Enter your license key between quotation marks as presented on the following screen. You can find your license key in our client area → 'My Products'.
|
Product Configuration
| Now we will show you how to configure a new product.
|
| 6. Go to 'Setup' → 'Products/Services' → 'Servers' and press 'Add New Server'.
|
7. Next, enter your server name and a hostname.
Note: It is recommended to use the officially supported hostname when connecting to API 3.0.
Hostname: https://api.central.plesk.com/30/
|
| Please note that when you move from the older version of the module, it is advisable to refer to the API Upgrade section first.
Afterwards, fill in the username and the password fields with API access details to your Plesk Key Administrator server.
Choose 'PleskKeyAdministrator' from a dropdown menu and confirm through pressing 'Save Changes' button.
|
8. After you configure your server correctly, you will see a following screen.
Now, you need to create a new group for your server. For that purpose press 'Create New Group'.
|
| 9. Enter name, click on your previously created server, press 'Add' then press 'Save Changes'.
|
10. In order to create and configure the product, move to 'Setup' → 'Products/Services' → 'Products/Services'.
If you do not have a product group, press 'Create a New Group'. If you do, simply go to step 12.
|
| 11. Enter product group name and press 'Save Changes'.
|
12. When you have a product group, you can create your product and assign it to Plesk Key Administrator. If you already have a product, go to step 14.
To create a product press 'Create a New Product'.
|
| 13. Afterwards, choose your product type and a product group from the dropdown menus, enter your product name and press 'Continue'.
|
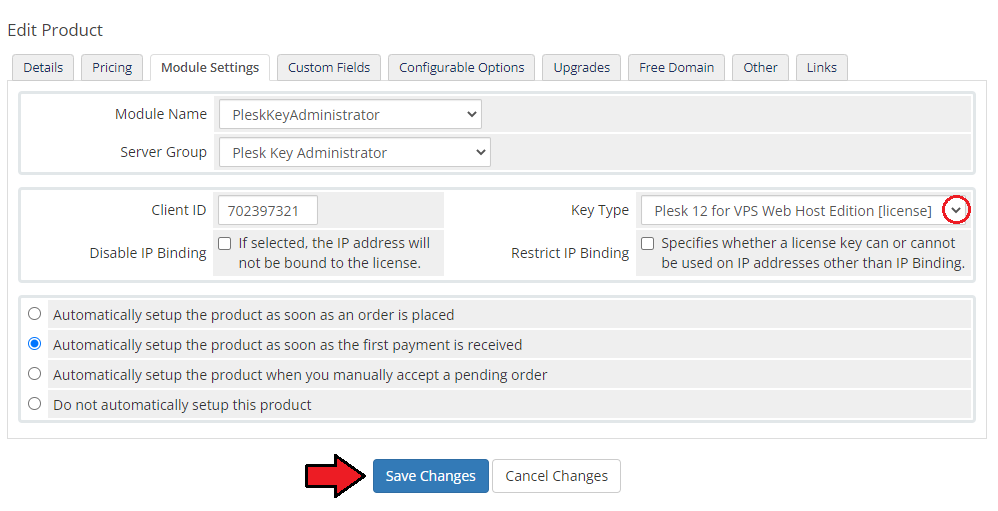
| 14. Now, go to 'Module Settings' section, choose both 'PleskKeyAdministrator' and your previously created server group from the dropdown menu.
|
| 15. Next, fill 'Client ID' textbox with your client ID on Plesk Key Administrator server.
|
16. As soon as you fill out 'Client ID' field, a new 'Key Type' dropdown menu appears.
Choose a key type from the drop down menu. Define whether you wish to disable IP binding. If you select this option, client will not be allowed to change the bound IP address.
Keep in mind that some keys require the IP binding option to be disabled to allow creating a license.
Afterwards press 'Save Changes' button.
|
|
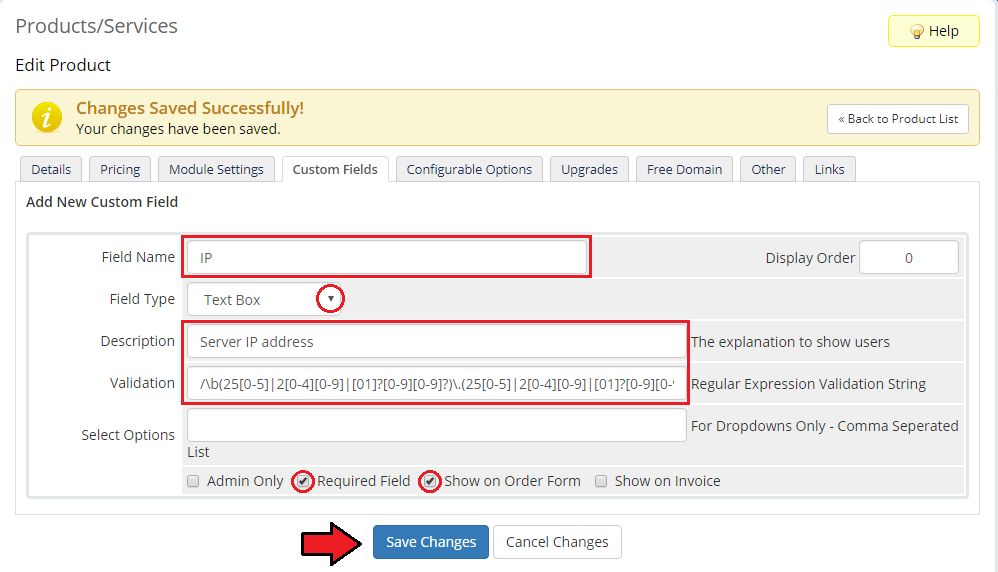
17. After modifying the module settings press 'Custom Fields' located on the right side of the 'Module Settings' button.
In the 'Field Name' enter 'IP', choose 'Text Box' from a field type dropdown menu, enter description and set up validation as:
/\b(25[0-5]|2[0-4][0-9]|[01]?[0-9][0-9]?)\.(25[0-5]|2[0-4][0-9]|[01]?[0-9][0-9]?)\.(25[0-5]|2[0-4][0-9]|[01]?[0-9][0-9]?)\.(25[0-5]|2[0-4][0-9]|[01]?[0-9][0-9]?)\b/
The code is optional for IPv4 validation.
Mark 'Show on Order Form' and 'Required Field' checkboxes and press 'Save Changes' button.
Note1: The IP field will be required if the IP Binding option is enabled only.
Note2: There are two more custom fields generated automatically. Please refer to Tips section to check their configuration.
|
|
18. Optionally, you may assign other packages that will be available for your clients to upgrade their license without the need to purchase a separate product.
Move to 'Upgrades' tab, and select the packages.
Note: Keep in mind that upgradin some of the licenses may cause some conflicts.
For more information regarding a license key modification, please refer to the Plesk official documentation article.
|
That's it. You have just successfully installed and configured Plesk Key Administrator For WHMCS!
On the following screen you can see how a properly configured product should look like on the product details page in the admin area.
|
Addon Configuration
This module can be also alternatively configured as to become a 'Product Addon' that can be ordered additionally next to a given product or as a feature to an already existing license.
There can be two types of licenses configured. One as a standalone license or as a feature to an existing license.
More information concerning "Product Addons" in WHMCS can be found here.
In order to configure your addon follow the steps explained below.
|
1. Proceed to 'Setup' → 'Products/Services' → 'Product Addons' → 'Add New'.
Enter a name and desired description. Then move to the 'Module Settings' tab.
|
2. Now, as your 'Module Name' choose 'PleskKeyAdministrator' and select your previously created server group from the 'Server Group' dropdown menu.
Save the changes, only then the module settings will appear.
|
| 3. Provide your client ID and save the changes.
|
4. Select the required key type from the list of available.
The dropdown list includes all types of keys, select according to your needs, either for a standalone license (marked with a [license] tag) or an additional feature to an already existing license (marked with an [extension] tag).
Disable IP Binding - if you select this option, IP address will not be bound to the license.
Keep in mind that some addon features may require this option to be disabled.
|
5. Finally assign the addon to any product of your choice.
If the addon is configured as an additional feature, then select here a product with a license.
If the addon is configured as a standalone license, then select any of your products.
It will be available to purchase along with the selected products or services.
|
| You have just successfully configured a new Plesk Key Administrator For WHMCS addon.
|
Management
Our module allows you to provide all kinds of Plesk licenses through WHMCS.
These can be licenses for all types of Plesk Panel, Cloud server, Kaspersky Antivirus for Plesk and many, many more.
The diversity of the licenses types entails all kinds of features. Therefore, not every feature can be applied to any license type.
Full list of products for which licenses can be purchased through our module can be found here.
|
Admin Area
You can view all important details of Plesk Key Administrator products ordered by your clients in the admin area.
Additionally, our module allows you to manage your clients' licenses.
|
| View and manage the details of Plesk Key Administrator addon licenses ordered by your clients.
|
Client Area
Product License Details
Our module allows your clients to view information about their licenses in WHMCS client area including its 'Key Number', 'Key Type' Creation' and 'Expiration Dates'.
Additionally, your clients can change their license IP address. To do so, simply type in the IP address manually when using the 'Custom IP' option.
Press the 'Change IP' button when ready.
|
Otherwise, you may select the IP address from the dropdown list - use 'Select IP' button first. When ready, again press ' Change IP' button.
Note: The list of IP addresses is fetched from the 'Dedicated IP' field and 'Assigned IPs' in case of Dedicated/VPS Server.
Keep in mind that the option to change the IP address available only if IP Binding is enabled.
|
Addon License Details
View the license details in addons section if you have ordered any with the product.
Change IP address if IP binding has been enabled for the addon.
The below screen shows an example of two addons active. The first license with IP binding disabled and the second addon has the option to change a bound IP address enabled.
Type in a new IP address or select one from the drop down list ( 'Select IP' button 'ON') and press Change IP button then.
|
Upgrade/Downgrade License
| Clients can easily upgrade their existing licenses to more suitable ones. Simply move to 'Upgrade/Downgrade' section and select a package from the available ones.
|
Tips
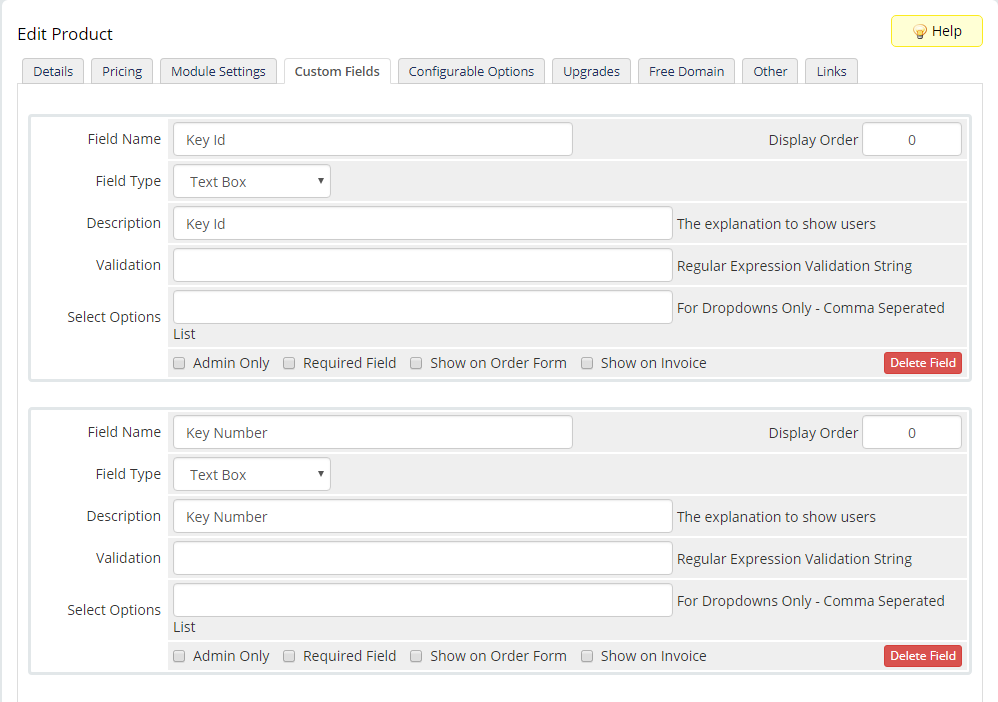
1. Apart from the 'IP' custom field that must be added manually to the product, there are two other custom fields that are generated automatically.
These are 'Key Id' and 'Key Number' fields of the text type. Underneath you can find a preview of these custom fields' correct setup.
|
|
2. The module supports redirection from the 'Buy Now' button in the Extensions Catalog in Plesk directly into the WHMCS cart.
In order to allow such redirection you need to log into Plesk and then modify the panel.ini file. You will find this file at (depending on your OS):
- Linux: /usr/local/psa/admin/conf/panel.ini
- Windows: %plesk_dir%\admin\conf\panel.ini
At the very bottom of that file, add the below snippet with a proper link to your WHMCS site:
[extension]
buyUrl = "your_WHMCS"
for example:
 [extension]
 buyUrl = "https//shop.com"
Limitations:
Forwarding from Plesk is based on two keys: 'extensionId' and 'extensionProductId', whereas the second one is not always delivered.
In case only 'extensionId' is set, then more than one extension for that parameter may be found. In the situation when 'extentionID' is available only,
the module will look through the list of addons and pick the first addon which suits the product.
Please refer to the Plesk official documentation to learn more about 'Forwarding customers to your online store' option.
Here is the list of addons: link.
|
Update Instructions
Essential guidance through the process of updating the module is offered here.
Keep in mind there is a quick and easy option in our client area that will let you upgrade the license of your module to an open source version at any time - and at a lower price!
To take advantage of it, simply use the License Upgrade button located on the product's page and a discounted invoice will be generated automatically.
|
API Upgrade
| 1. Since the release of the 1.0.5 version the old API is not supported. The steps below show how to update it:
|
| 1) Replace the old files with the new ones
|
| 3) Make sure that PleskKeyAdministrator server credential you are using are enabled for API 3.0 on Plesk server side
|
| 4) Make sure that Client ID in product configuration is the same as Internal ID field on Plesk side
|
| Where to find Internal ID field on Plesk? According to documentation:
An ID of a license owner:
You can obtain the ID in Plesk Partner Central: go to the Accounts tab → click the customer's name → the Internal ID field.
|
| Warning: these steps are required if in your WHMCS you have licenses created using old API (before Key Administrator 1.0.5)
|
| If all the above actions are completed, please turn on Module Log in your WHMCS.
You need to run /yourwhmcs/modules/servers/pleskKeyAdministrator/apiUpdate.php script using the command line.
This can take a while depending on a number of licenses assigned to your account and the quality of the connection between your and Plesk API servers.
When the process is completed, a proper message will be displayed.
|
Common Problems
| 1. When you have problems with connection, check whether your SELinux or firewall does not block ports.
|
| 2. Make sure that your custom field name is 'IP'. In other case, the module will not work properly.
|
3. If after installation, you get an ionCube encoder problem (wrong version), please open a support ticket.
We will provide you with a different version of the module encrypted with the older version of ionCube.
|
4. When you have a license error, please make sure you are using a correct license file.
For Plesk Key Administrator For WHMCS 1.0.3 and later a new variable is used:
$plesk_key_administrator_licensekey=
Previous license content (1.0.2 and earlier):
$parallels_key_administrator_licensekey=
In case you still have problems with the license, please refer to the following article.
|


