Plesk Extended For WHMCS
Contents |
About Plesk Extended For WHMCS
| Plesk Extended For WHMCS is a module which allows your customers to manage their web hosting accounts directly from the client area. Our product increases your comfort of management and simplifies web hosting account handling for your customers. |
- Admin Area Features:
| ✔ Create/Suspend/Unsuspend/Terminate Account |
| ✔ Change Package And Password Of Account |
| ✔ Configure Client Area Features Per Product |
| ✔ Define Service Plan Name Per Product |
| ✔ Define Reseller Plan Name Per Product |
| ✔ Enable And Configure Application Auto Installer To Use Per Product - Installatron Or Default Plesk App Installer |
| ✔ View All Plesk Extended Products In One Place |
| ✔ View All Plesk Extended Server Configurations In One Place |
| ✔ Toggle 'Power User' Plesk Panel View |
| ✔ Define Custom URL Of Panel And Webmail |
- Client Area Features:
| ✔ Remote Access And Management Of: |
| ✔ FTP Access |
| ✔ Email Addresses |
| ✔ Email Forwarders |
| ✔ Databases |
| ✔ Subdomains |
| ✔ Addon Domains |
| ✔ Domain Aliases |
| ✔ DNS Records - MySQL And PostgreSQL Databases Support |
| ✔ Applications |
| ✔ Web Users |
| ✔ SSL Certificates |
| ✔ One Click Login To: |
| ✔ Plesk |
| ✔ Webmail |
| ✔ Plesk Single Sign-On |
| ✔ Change Account Password |
- Application Installer Features:
| ✔ Install New Applications With Installatron Or Default Plesk App Installer |
| ✔ View Installed Applications |
| ✔ Installatron Features: |
| ✔ Manage Installed Applications |
| ✔ Backup Installed Applications |
| ✔ View And Manage Created Backups |
| ✔ Restore Applications From Backups |
- General Info:
| ✔ Utilizes Ajax Loaded Pages |
| ✔ Supports SSO Into Panel And Webmail |
| ✔ Integrated With Advanced Billing For WHMCS - Server Resource Usage Billing (read more) |
| ✔ Multi-Language Support |
| ✔ Supports Windows & Linux |
| ✔ Supports Plesk 9 up To Plesk Onyx |
| ✔ Supports PHP 5.3 Up To PHP 7 |
| ✔ Supports WHMCS Templates Five and Six |
| ✔ Supports WHMCS V6 and V7 |
Installation and Configuration
Installation
| This tutorial will show you how to successfully install and configure Plesk Extended For WHMCS. We will guide you step by step through the whole installation and configuration process. |
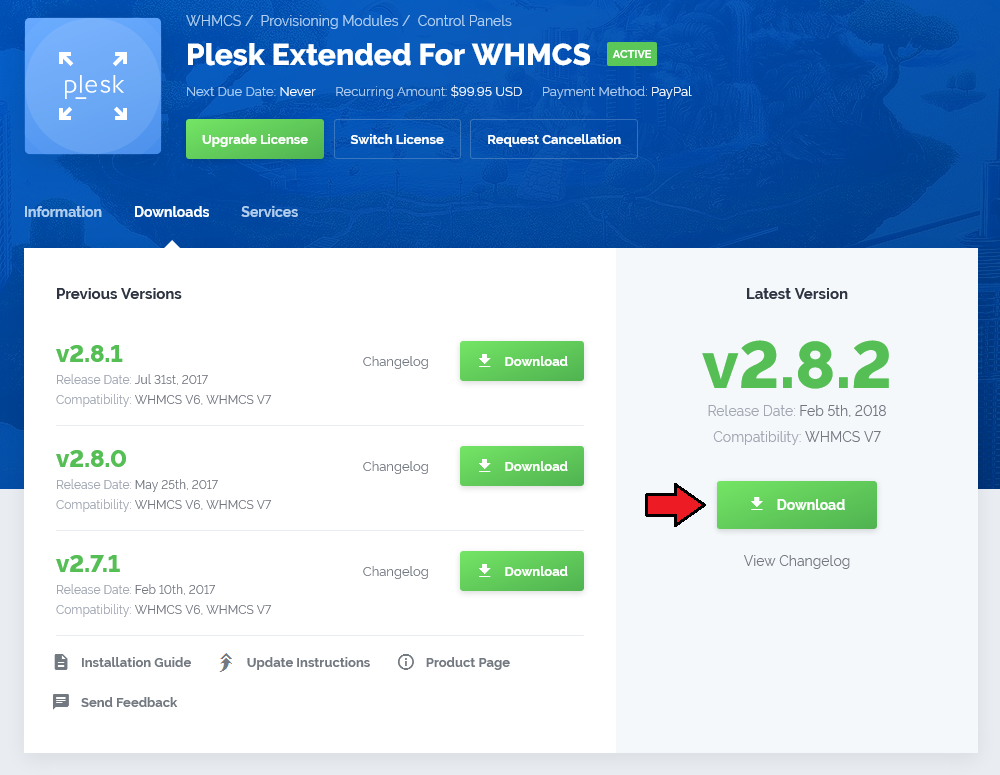
| 1. Log in to your client area and download Plesk Extended For WHMCS. |
|
| 2. Upload and extract the module into the main WHMCS directory. Files in your WHMCS directory should look like these. |

|
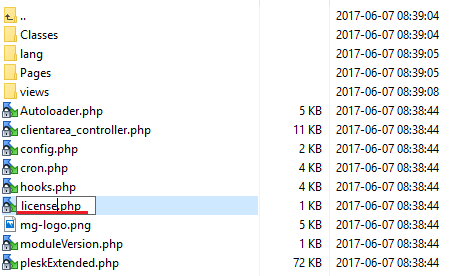
| 3. When you install Plesk Extended for the first time you have to rename 'license_RENAME.php' file. File is located in 'modules/servers/pleskExtended/license_RENAME.php'. Rename it from 'license_RENAME.php' to 'license.php'. |
|
| 4. In order to configure your license key you have to edit a previously renamed 'license.php' file. Enter your license key between quotation marks as presented on the following screen. You can find your license key in your client area → 'My Products'. |

|
Activation of Addon
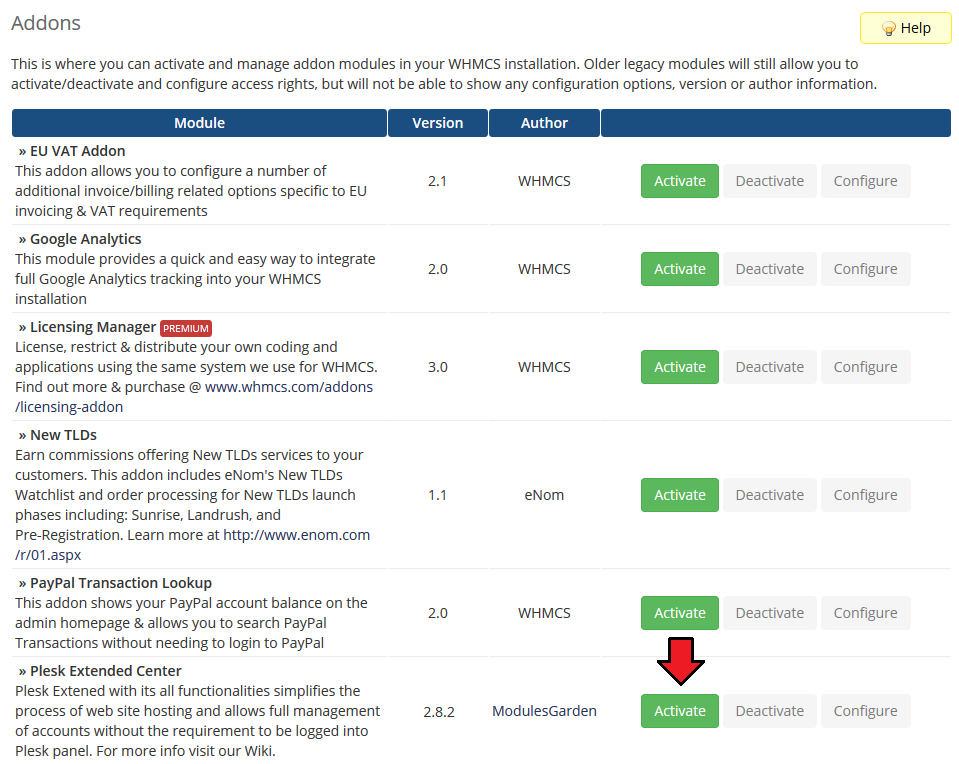
| 5. Now you have to activate the module in your WHMCS system. Login to your WHMCS admin area. Click 'Setup' then choose 'Addon Modules'. |
|
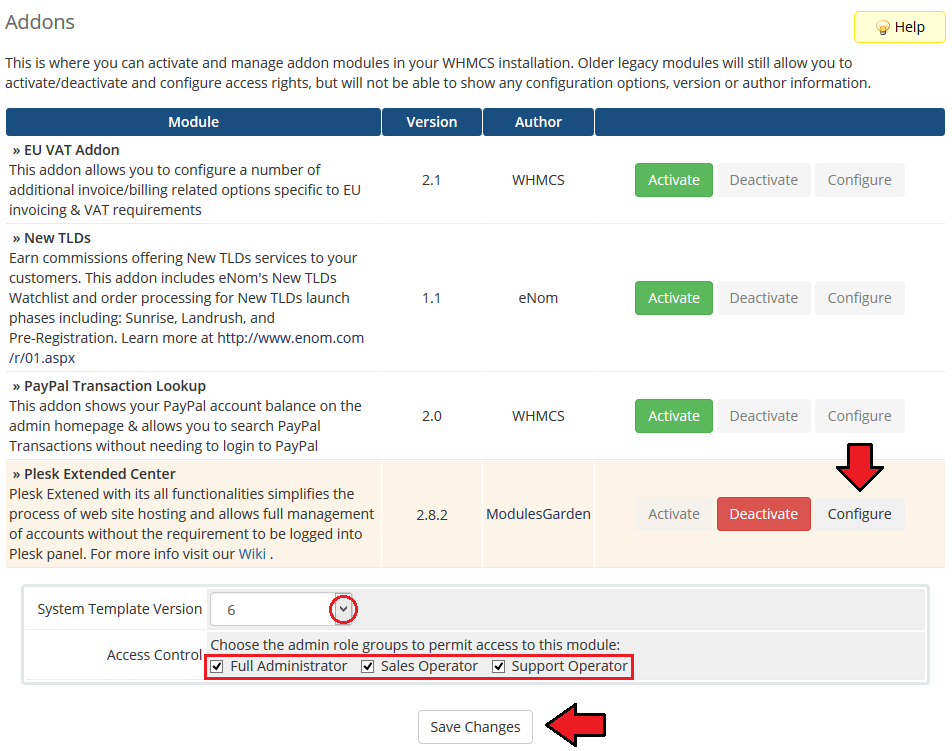
| 6. In the next step you need to permit access to this module. To do so, press 'Configure'. Afterwards, select required administrator roles and press 'Save Changes'. |
|
| 7. You have just successfully installed Plesk Extended For WHMCS! |
Configuration of Server
| 8. Now, we will show you how to configure a new server. To do so, log in into your WHMCS. Press 'Setup' → 'Products/Services' → 'Servers'. Afterwards, press 'Add New Server'. |
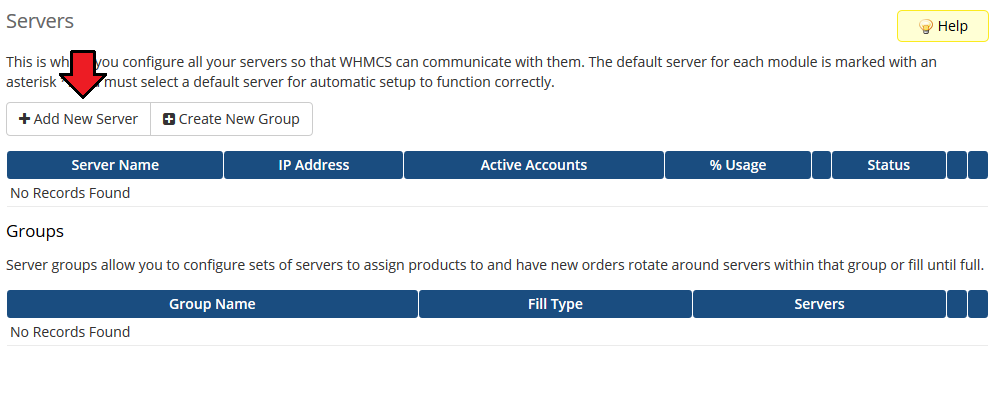
|
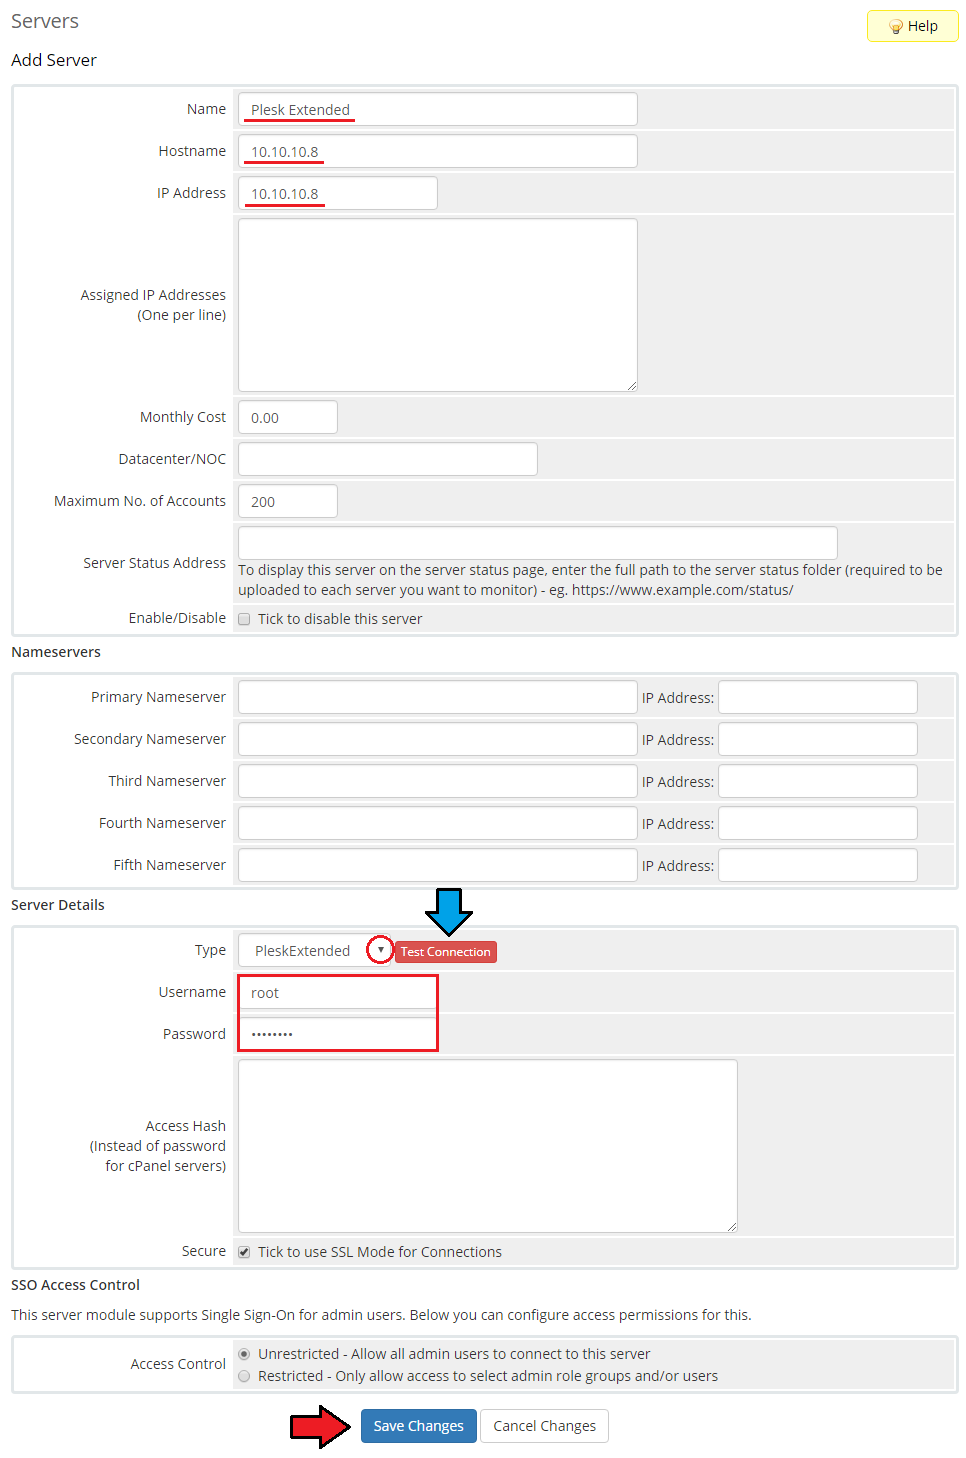
| 9. Next, enter your server name, IP address, username and password. Choose 'PleskExtended' from a dropdown menu and press 'Save Changes'. Here you can also provide other server details like nameservers or maximum number of accounts. |
|
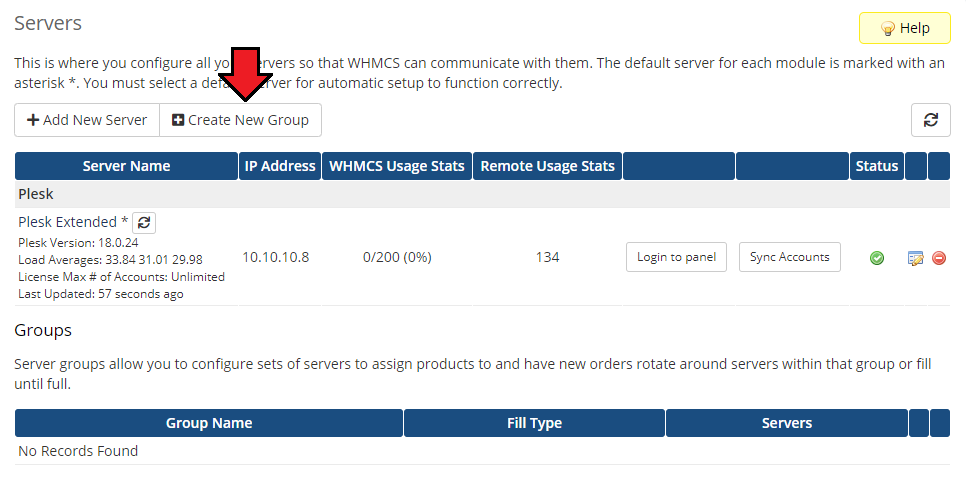
| 10. After you configure your server correctly, you will see a following screen. Now, you need to create a new group for your server. For that purpose press 'Create New Group'. |
|
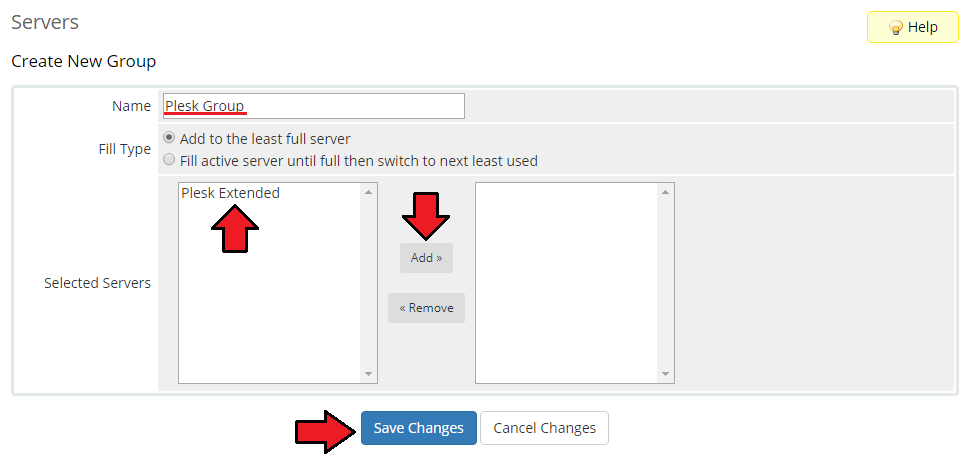
| 11. Enter name, click on your previously created server, press 'Add' then 'Save Changes'. |
|
Configuration of Product
| 12. In order to create and configure the product, click on 'Setup' → 'Products/Services' → 'Products/Services'. If you do not have a product group, 'Create a New Group'. |

|
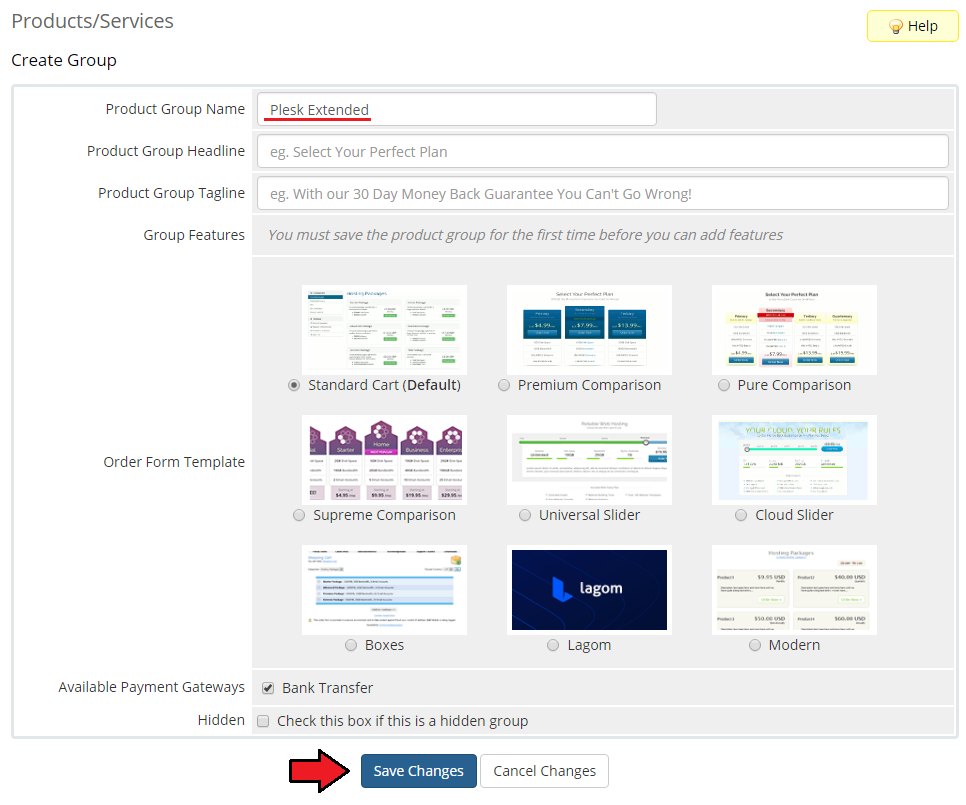
| 13. Enter product group name and press 'Save Changes'. |
|
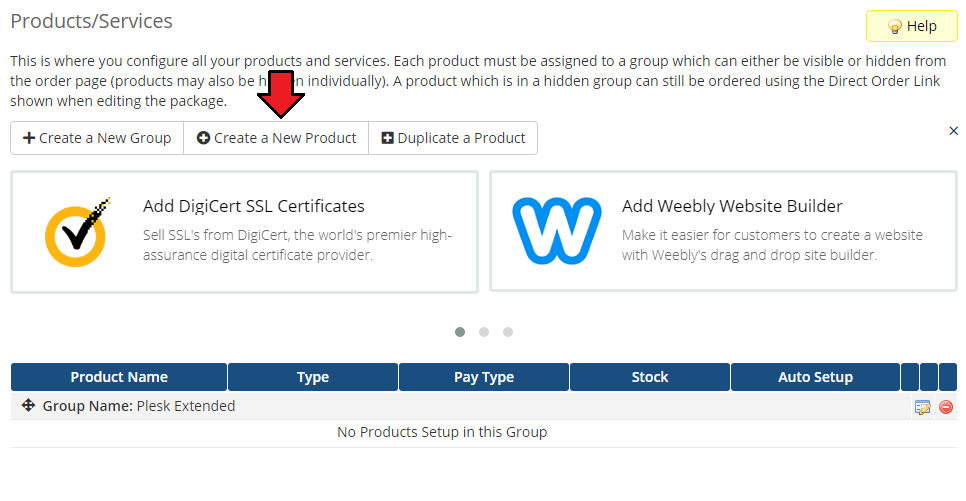
| 14. When you have a product group, you can create your product and assign it to Plesk Extended. To create a product press 'Create a New Product'. |
|
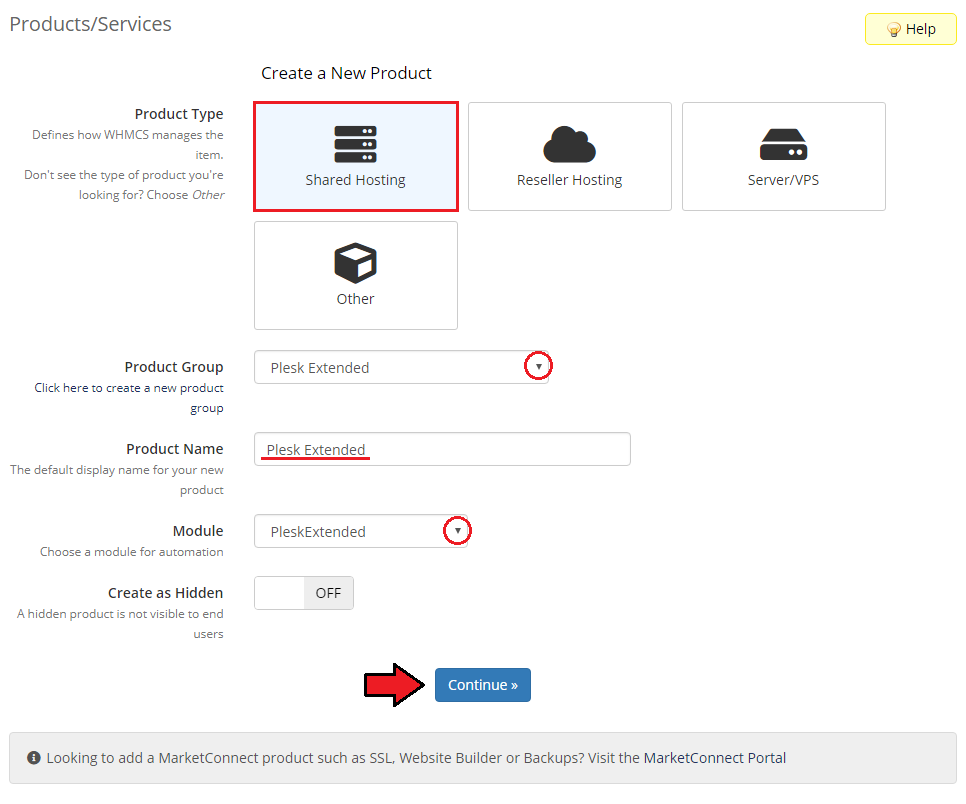
| 15. Afterwards, choose your product type and product group from dropdown menus, enter your product name and press 'Save Changes'. Please note that you may select only between 'Hosting Account' and 'Reseller Account' when choosing the product type as only those are supported by Pelsk module. |
|
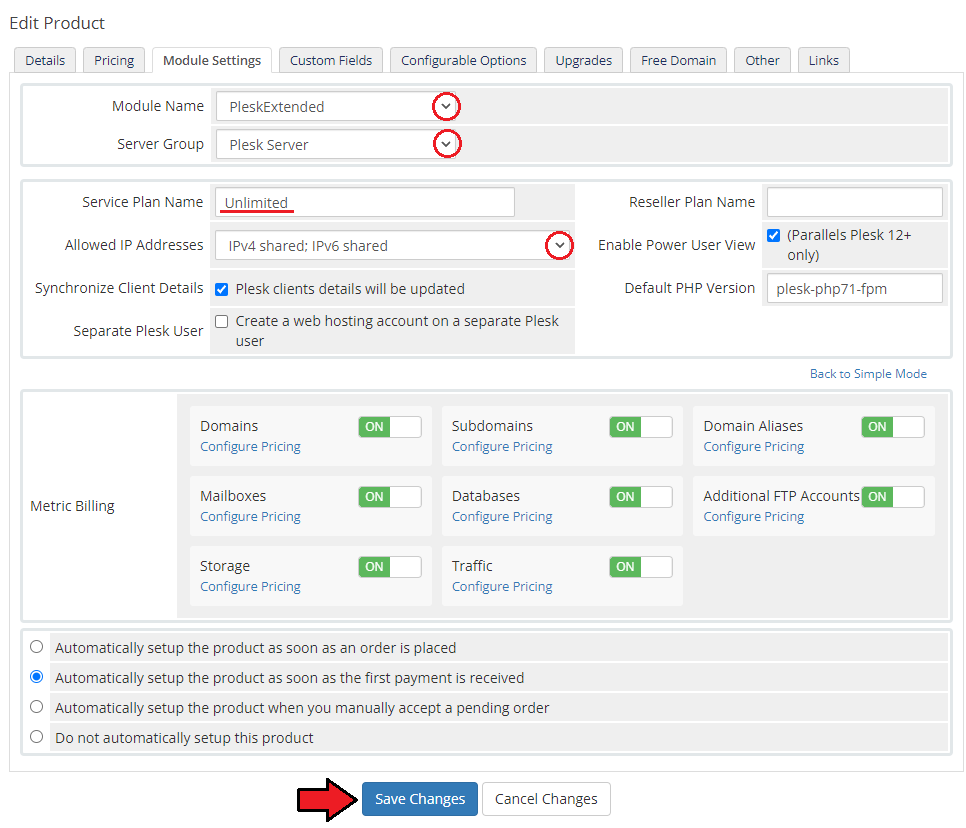
| 16. Now, move to 'Module Settings' section, choose both 'PleskExtended' and your previously created server group from dropdown menus. Remember to add your 'Client Template Name' or 'Service Plan Name'. Plesk Extended will not work properly without specified plan name. Don't forget to 'Save Changes'. |
|
| 17. Good job! You have just correctly created and customized new product which will appear in Plesk Extended Center admin area. |
Configuration of Addon
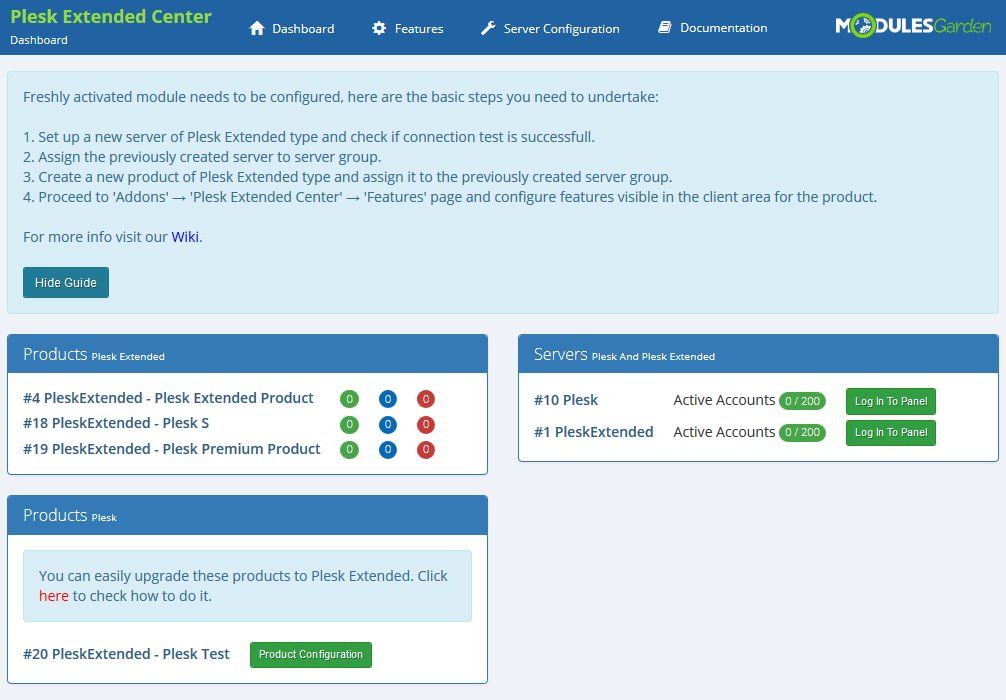
| 18. You have just correctly created and customized a new product. Go to 'Addons' → 'Plesk Extended Center' in your WHMCS.
|
|
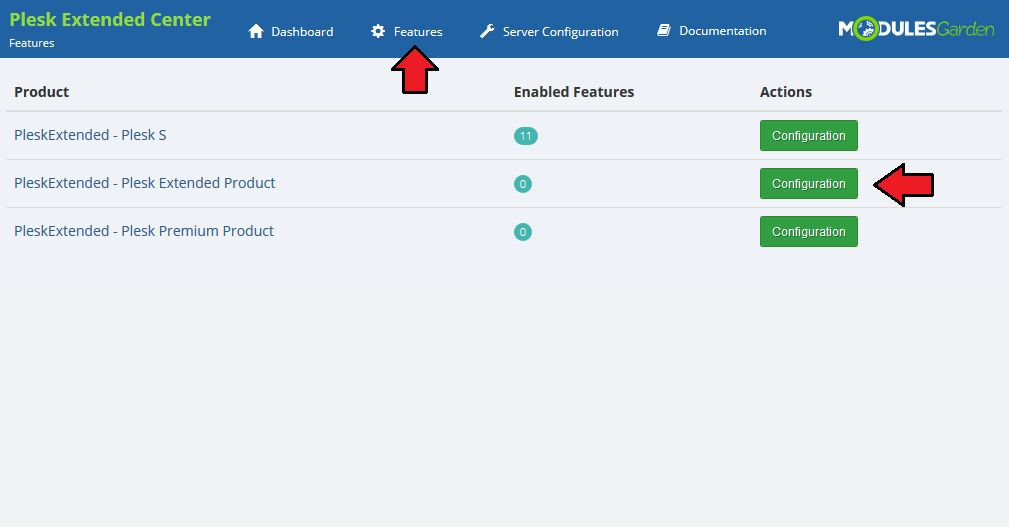
| 19. Proceed to 'Features' section and find the product you are interested in. Press 'Configuration' button next to it to continue. |
|
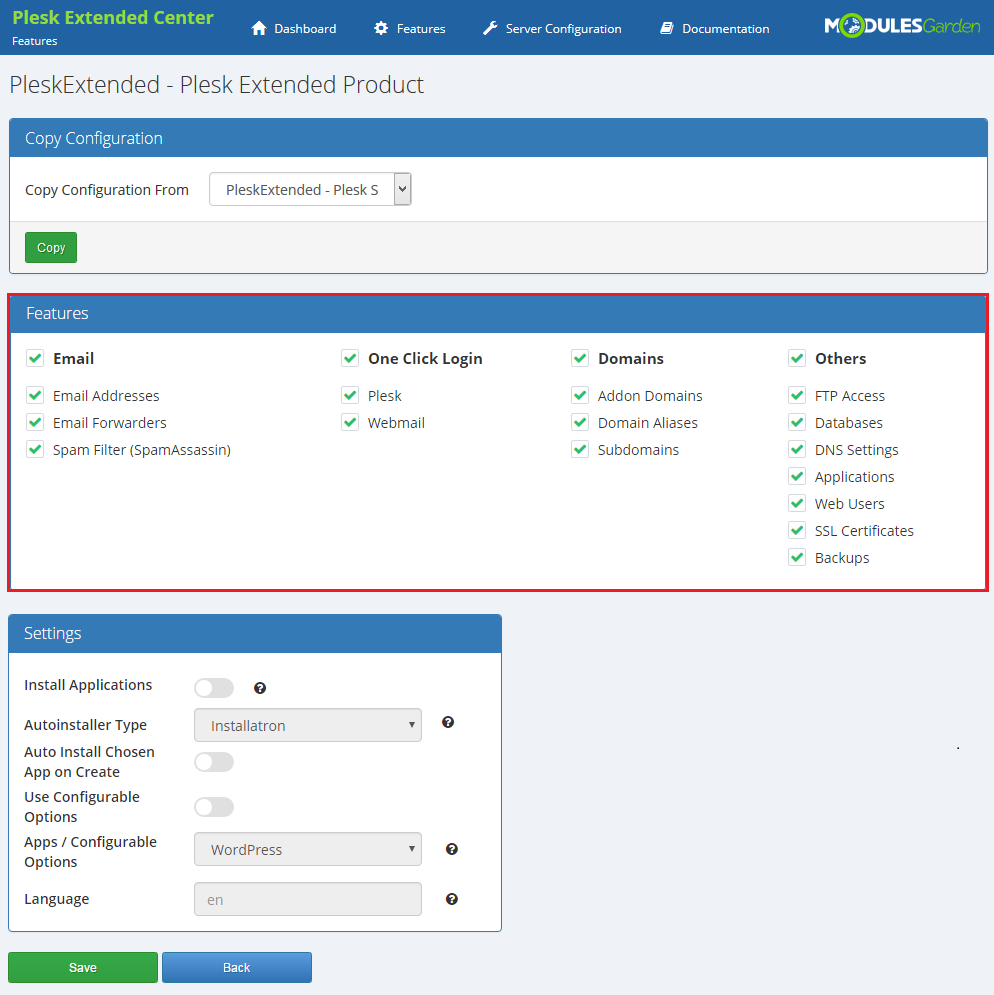
| 20. You should find there a box dedicated to 'Features'. If you have already another product configured, you may copy its configuration now. Find one more box 'Copy Configuration From' and choose product from dropdown menu. |
|
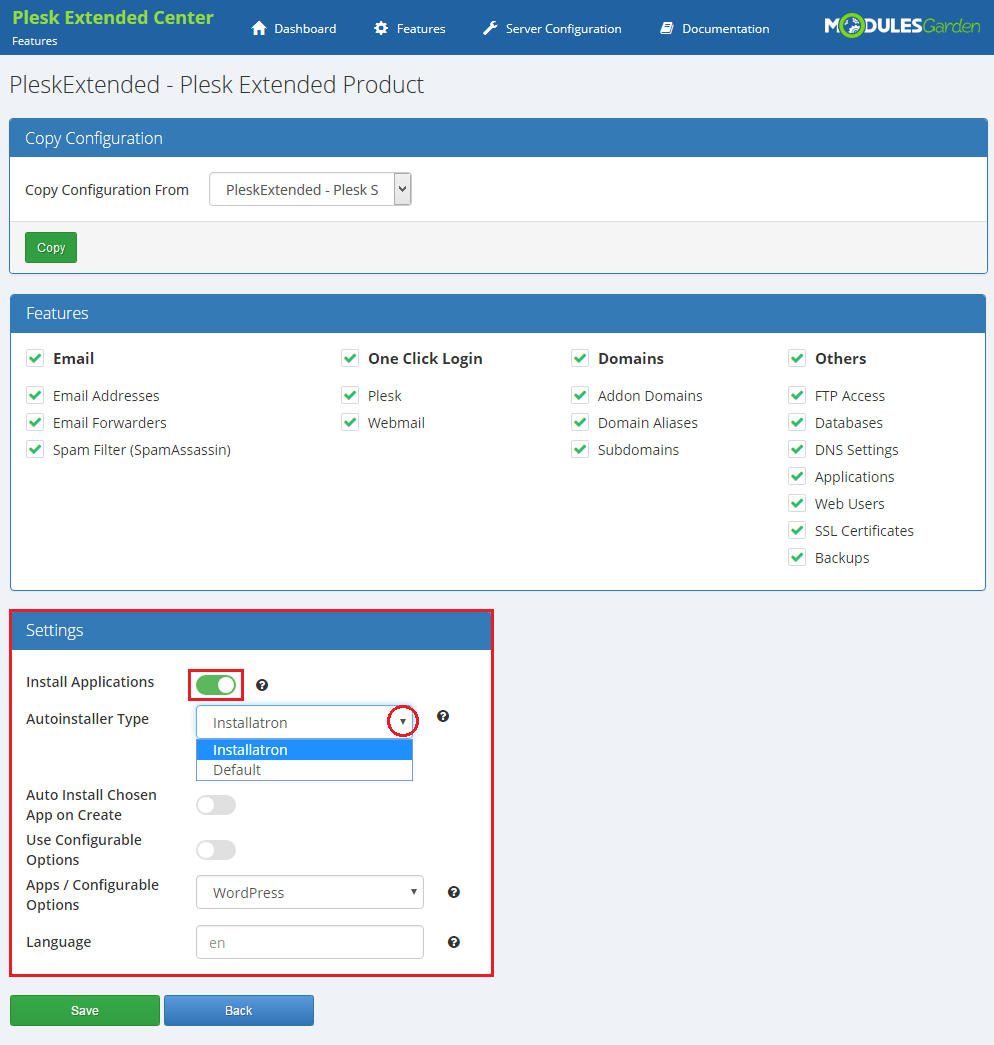
| 21. Define 'Autoinstaller Type' that will be used to install applications. You may choose between 'Installatron' and 'Default' autoinstaller. |
|
| 22. In the next step, move to 'Server Configuration' to set up connection. Press ' Configuration' button next to a desired server. |
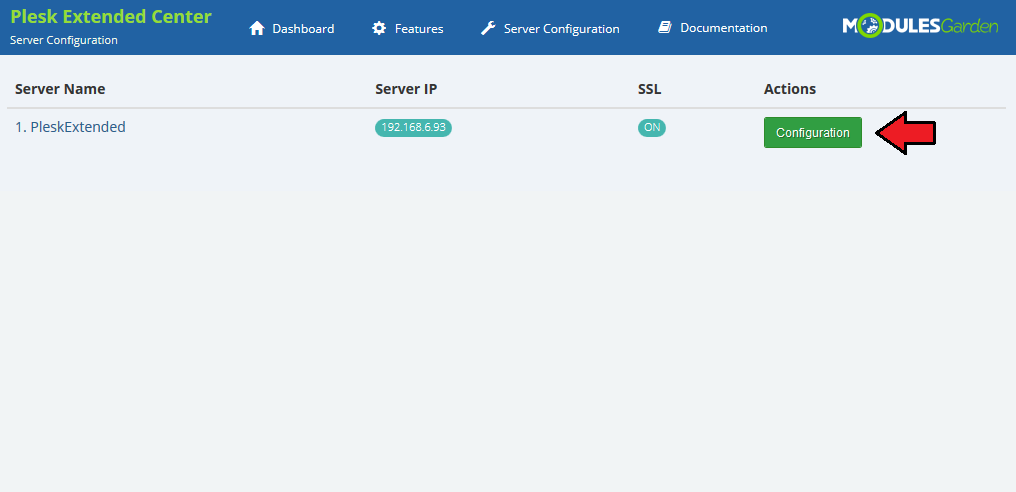
|
| Enter proper domains or IP addresses to allow connection with Plesk panel and Webmail accordingly.
Do not forget to 'Save' changes once it is ready! |
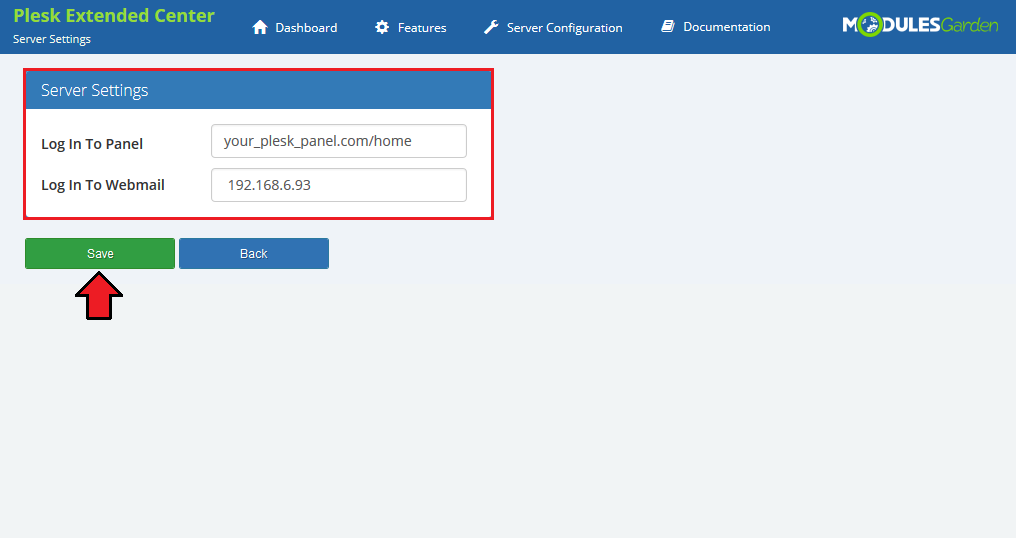
|
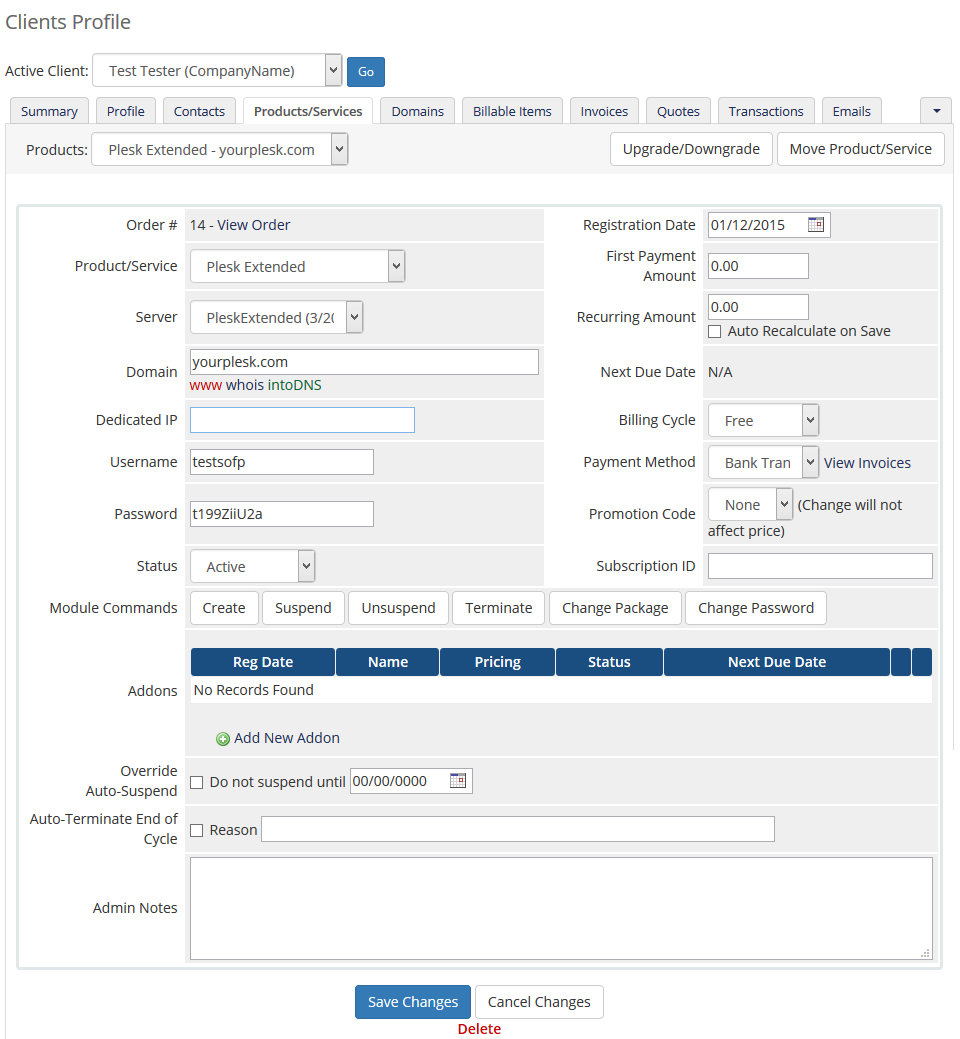
| 23. From now on, all your clients who ordered a previously created product will be able to manage their Plesk accounts via your WHMCS system. Here is a view of the ordered product summary in admin area. Available actions:
|
|
| Client area view: |
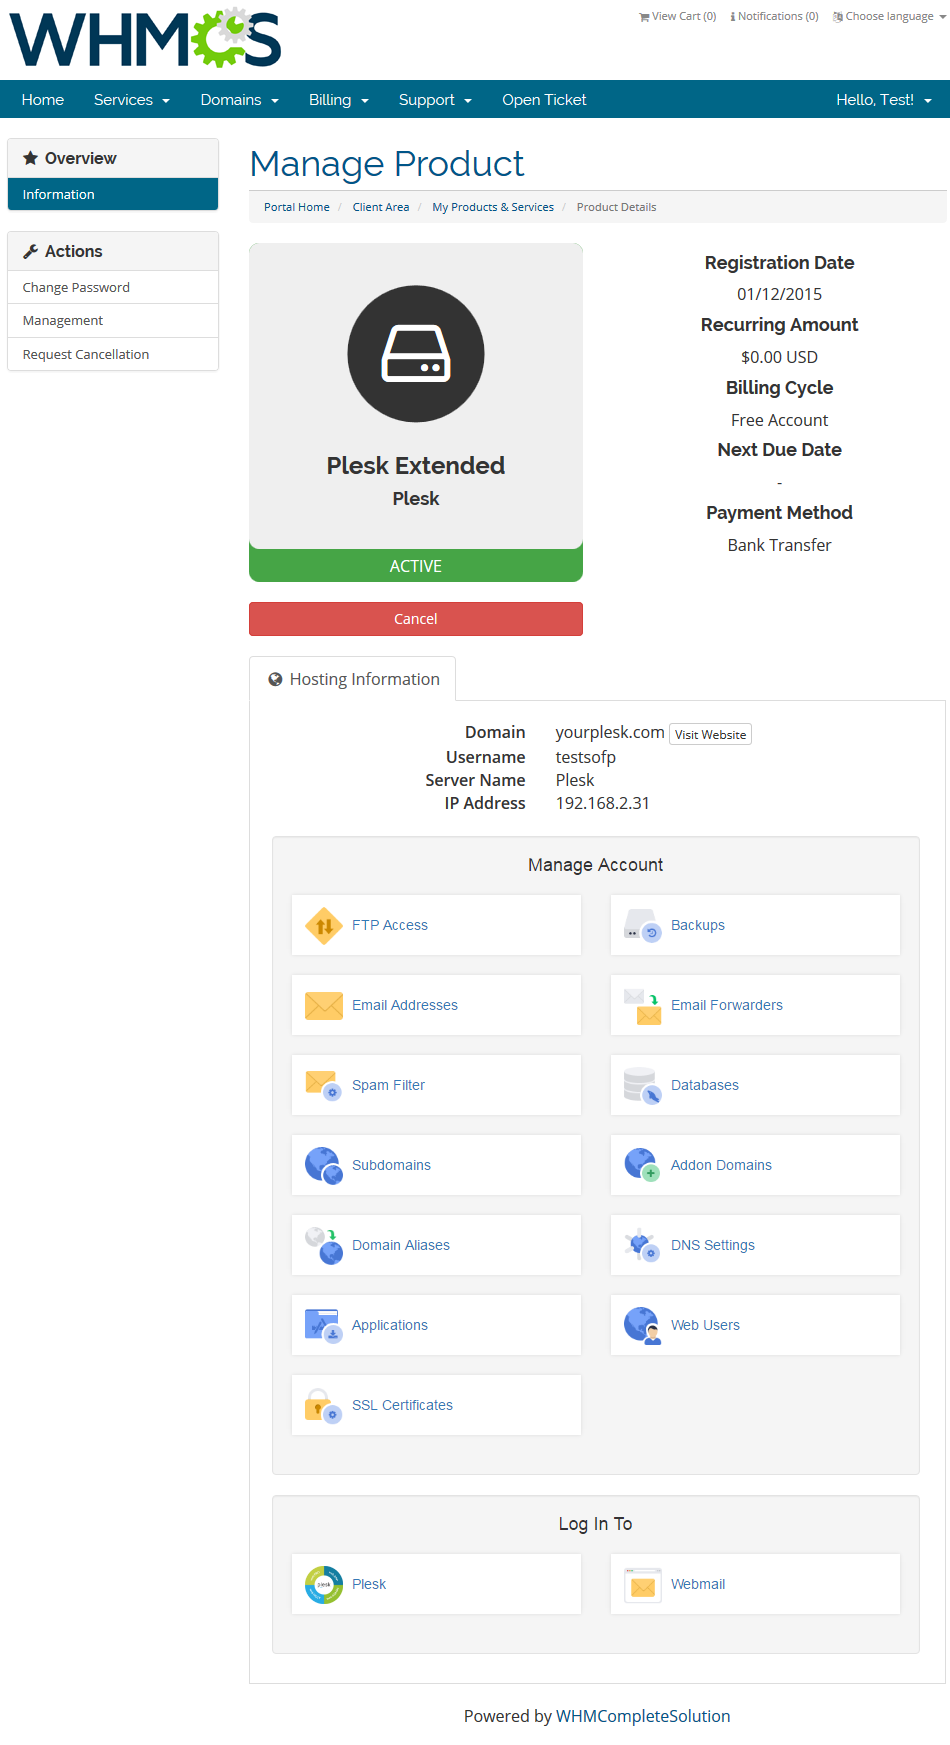
|
Management
| Plesk Extended allows your customers to manage their accounts via client area in your WHMCS system. In this short guide we will present you the management possibilities of our module. |
Client Area
FTP Access
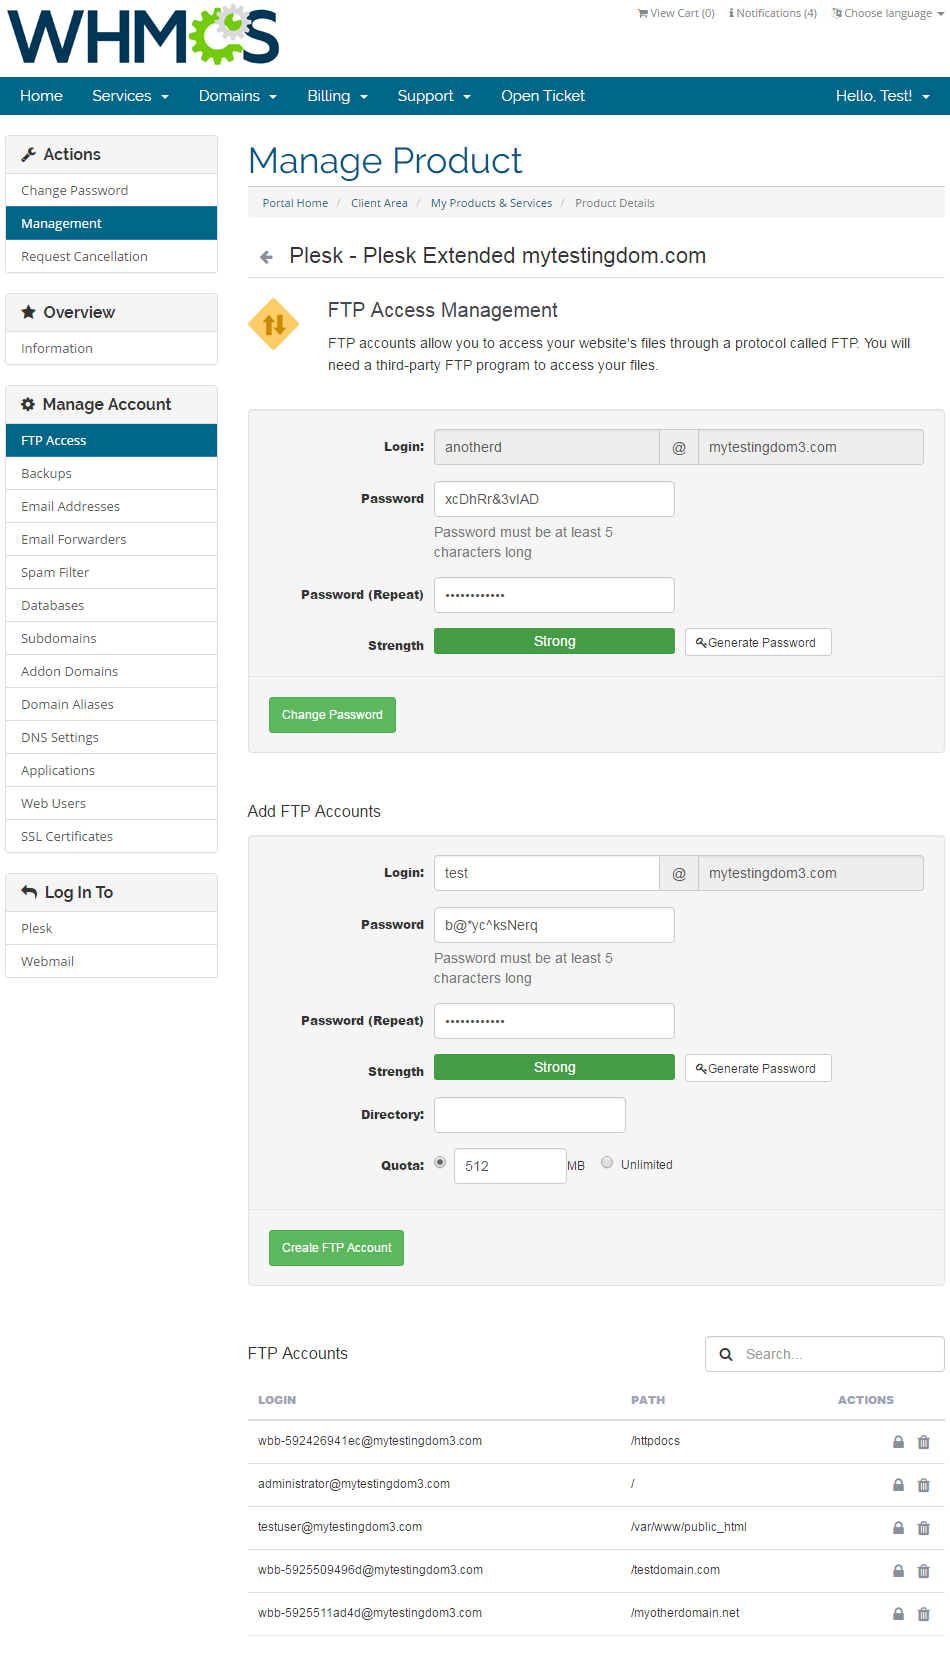
| In the very first section you are given the possibility to manage your FTP access. FTP access management is dependent on the system your Plesk panel is set up on. |
|
Email Addresses
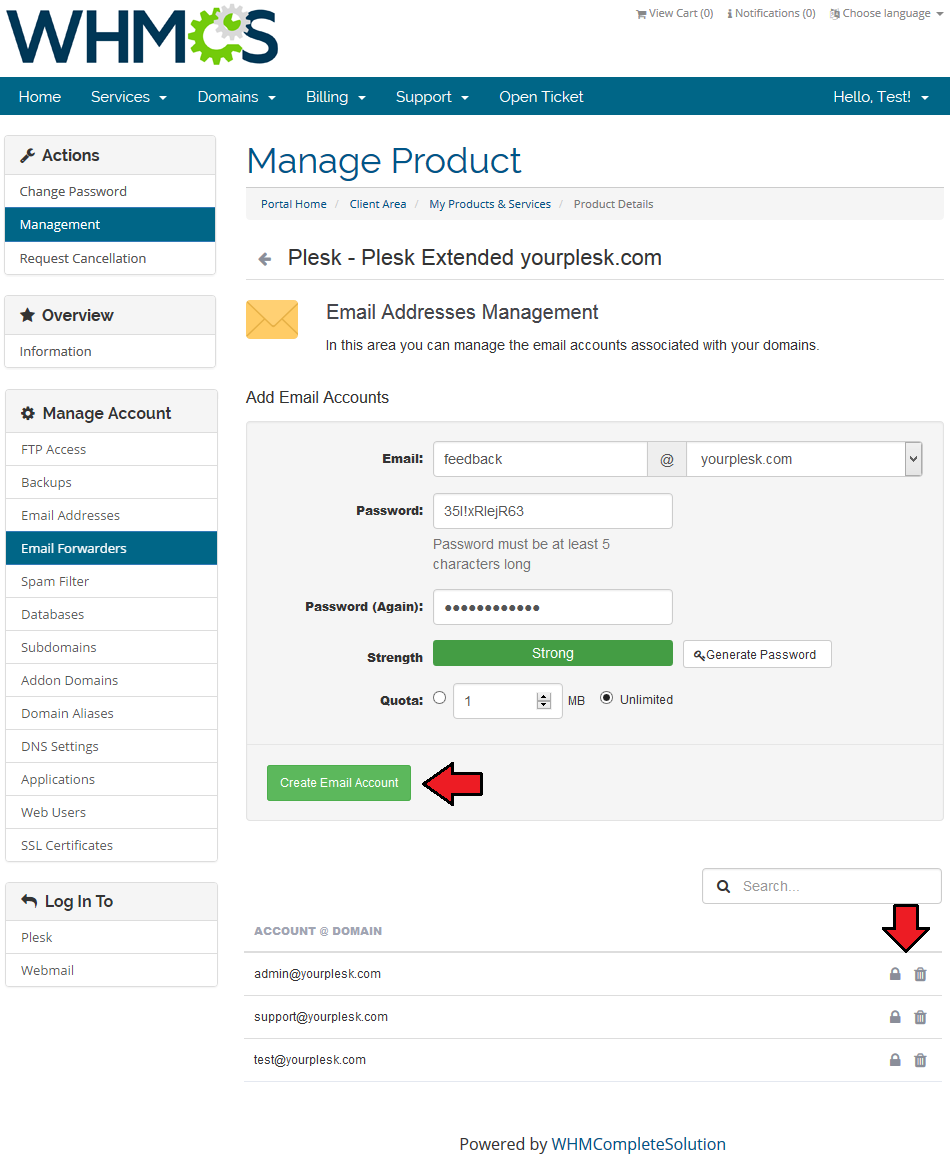
| You can manage all aspects related to e-mail accounts. Add new accounts, search through accounts and remove useless ones. |
|
Email Forwarders
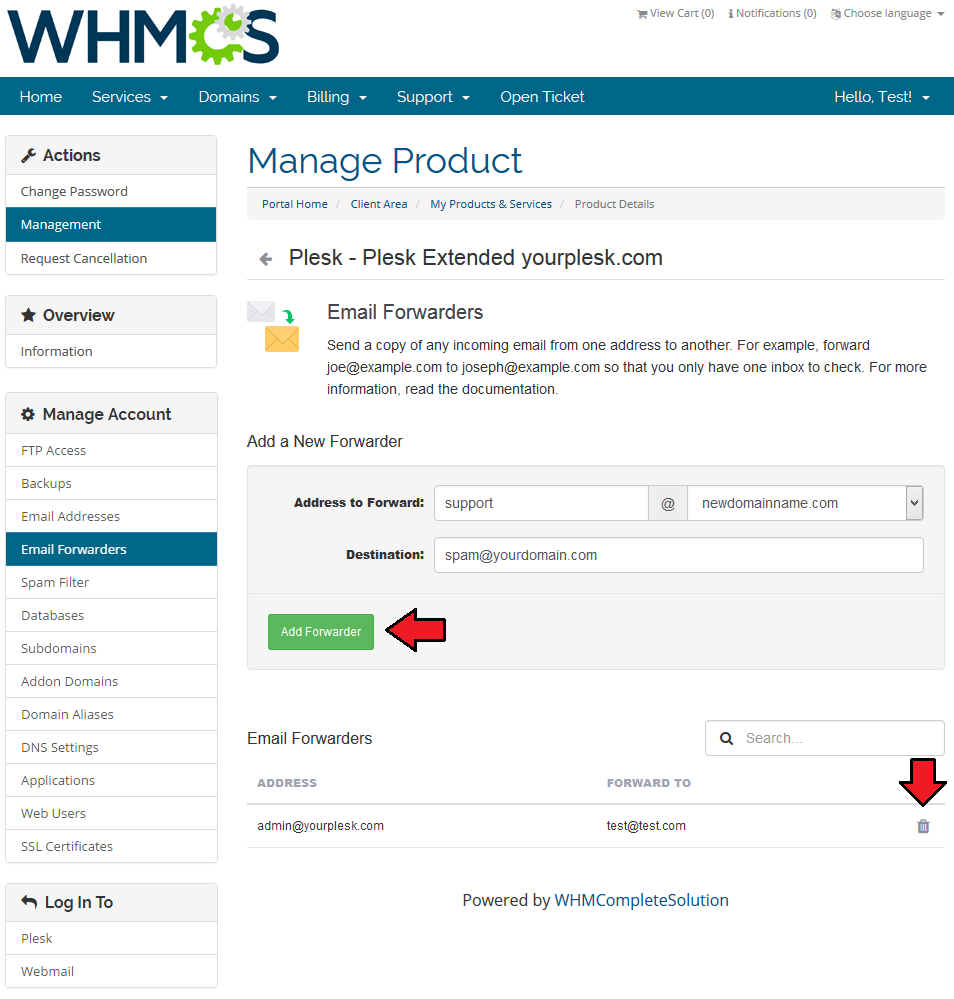
| Take any advantage of 'Email Forwarders' functionality. Send a copy of all mail from one email address to another. |
|
Databases
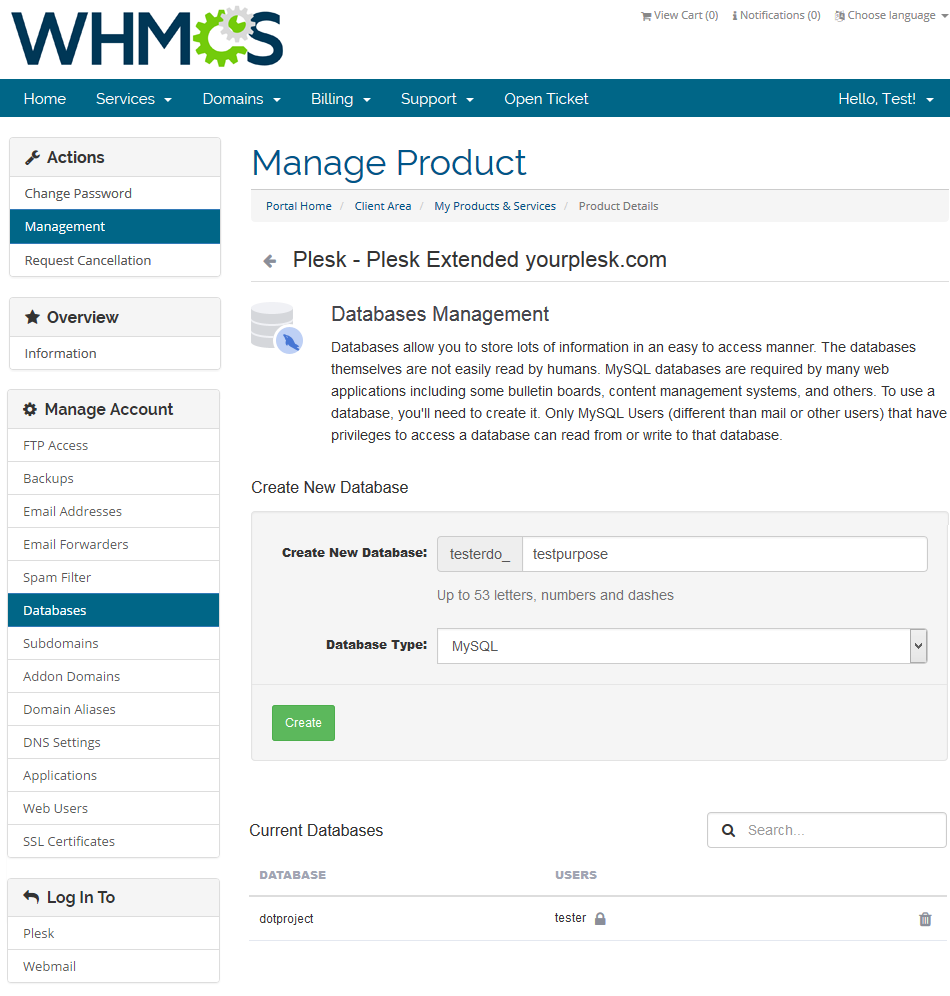
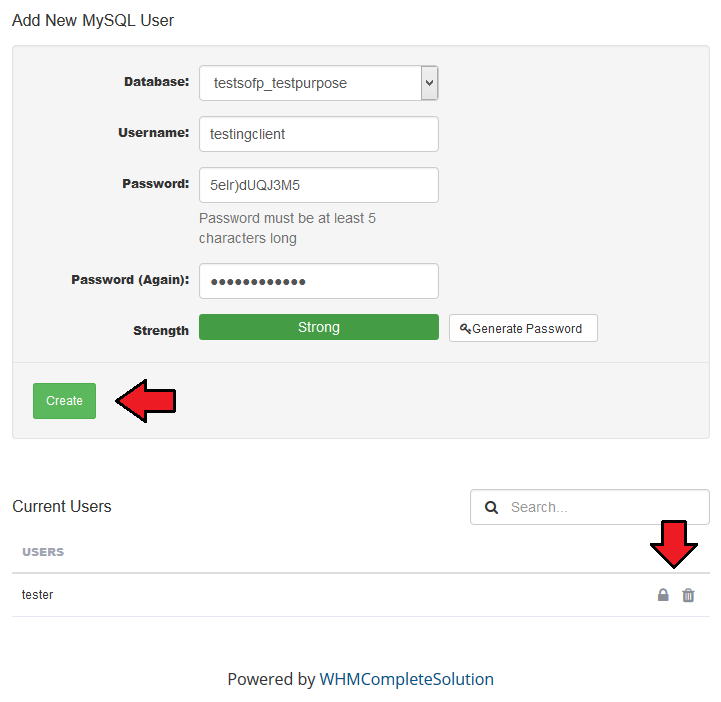
| Owing to 'Databases' management you can create/delete new databases and users. To create a new database, type in its name, into an appropriate field and select its type. Please note that 'MySQL' and 'PostgreSQL' databases are currently supported. |
|
| You can also add users to particular databases. Remember that you may always use secure password generator while creating a user. Use action buttons to delete useless users or change their password. |
|
Subdomains
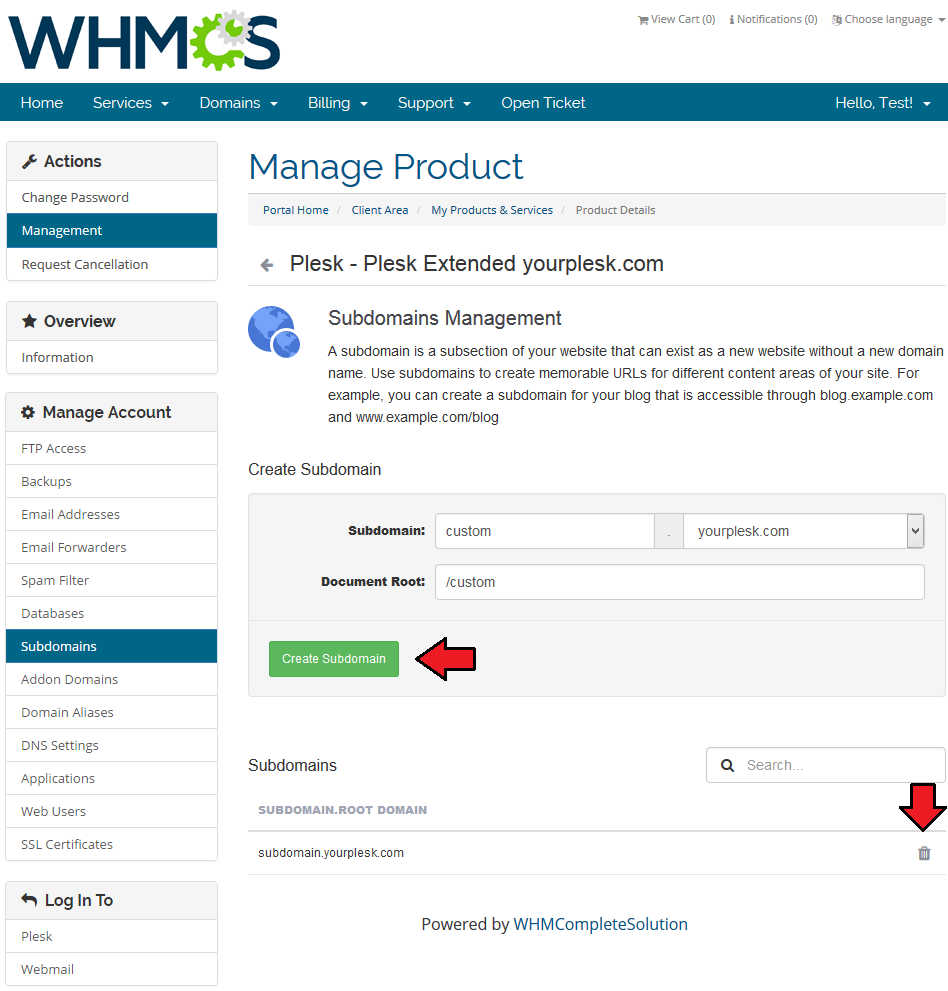
| Create subdomains to access different parts of your website. Choose domain from your list of available and provide document root. You may always remove unused subdomain. |
|
Addon Domains
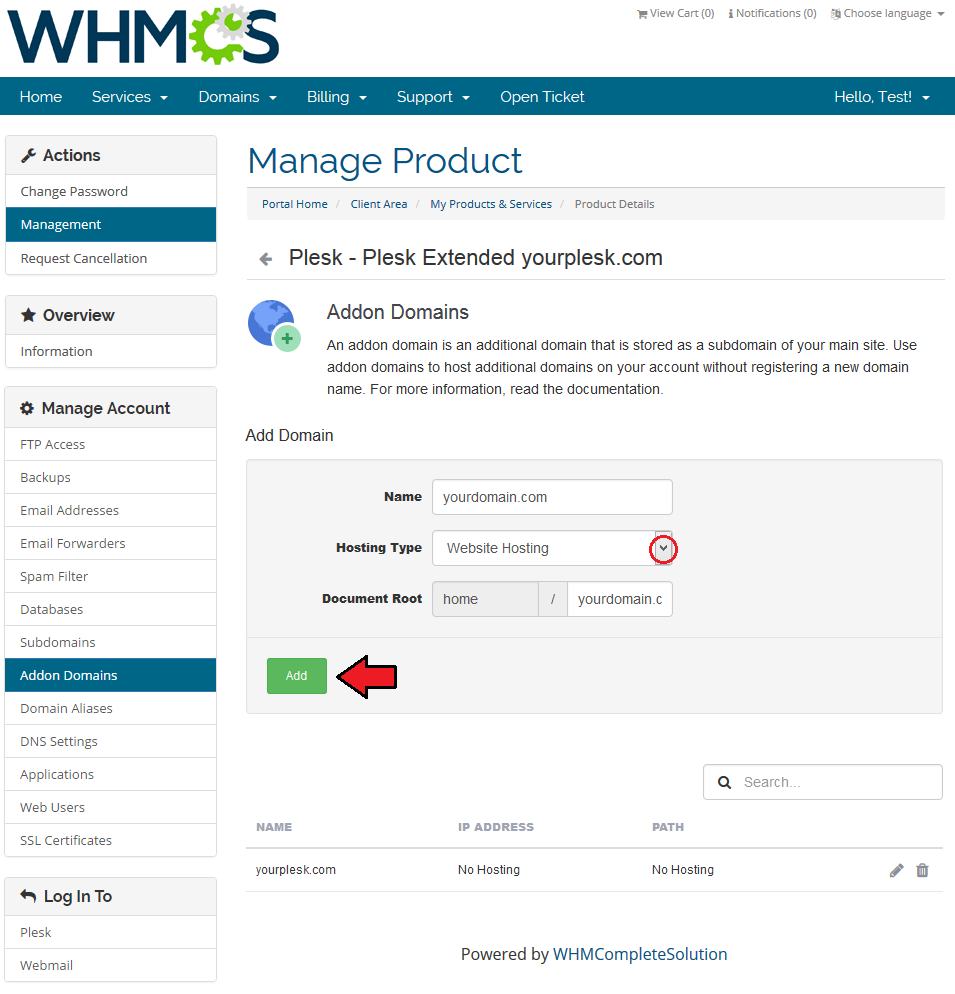
| You can also add and manage addon domains. Choose hosting type (with or without hosting) and press 'Add'. Make sure this feature is allowed for your account before using! |
|
Domain Aliases
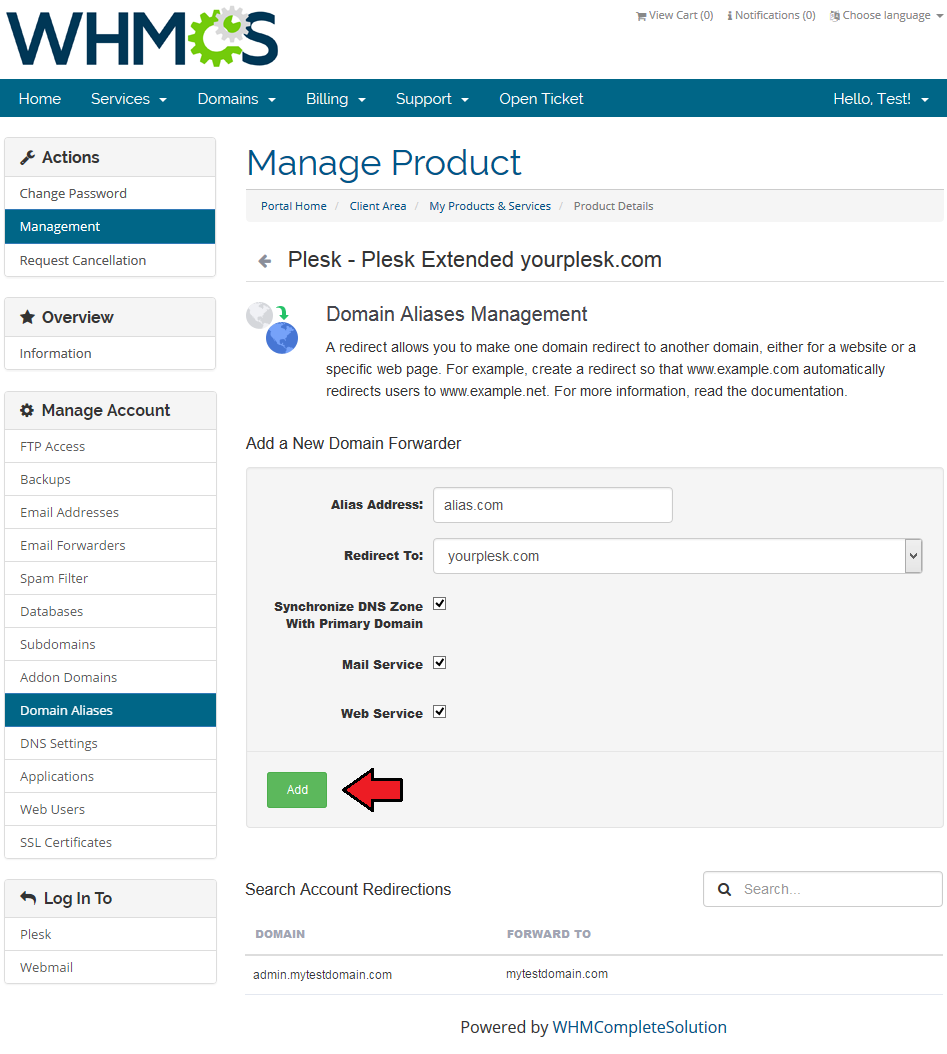
| Add and manage domain aliases to allow redirections of web contents display to other webpage. Select available options and press 'Add'. |
|
DNS Settings
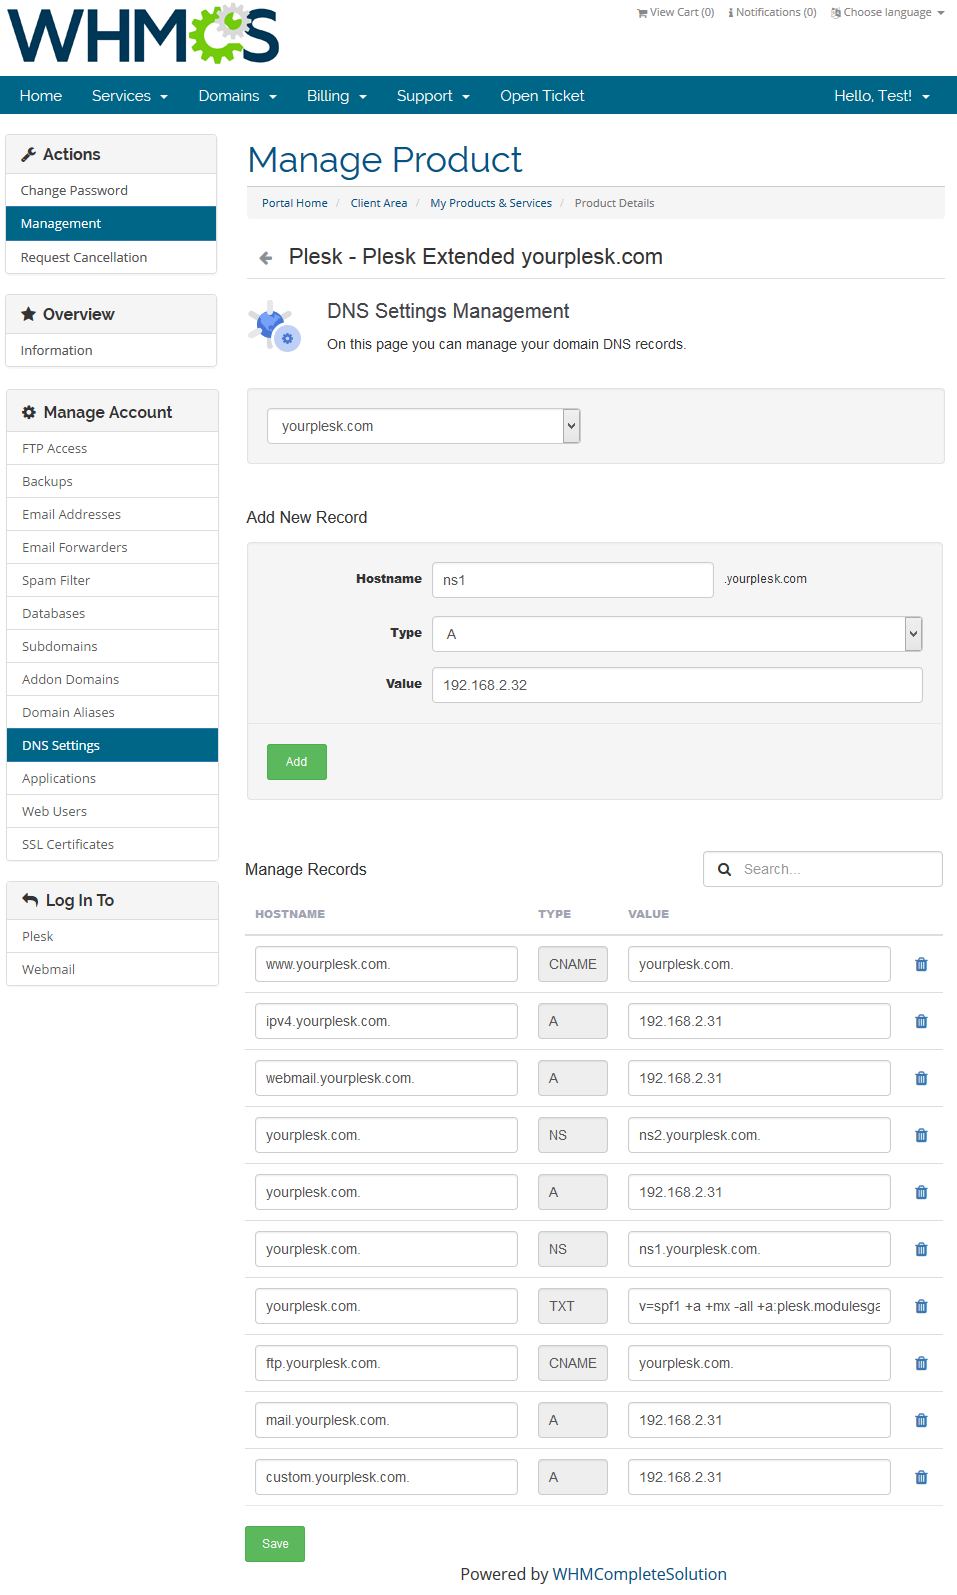
| Add records by providing their hostname and value, select type of such record. Underneath you will find a full list of existing records. |
|
Applications
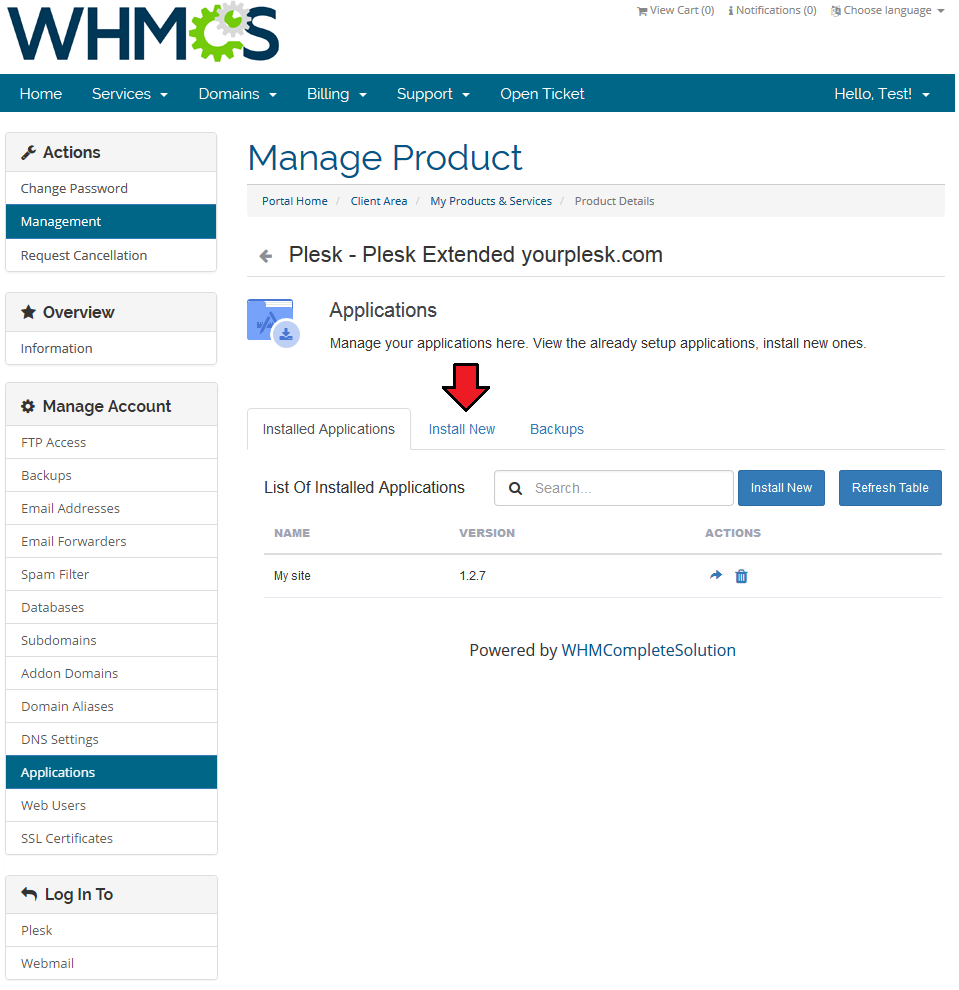
| Use Plesk Extended For WHMCS to install your favorite applications in a few seconds without even accessing Plesk panel! To start, simply proceed to 'Applications' then find 'Install New' section. Important: below we are presenting a sample flow of installing application with an 'Installatron' auto installer. |
|
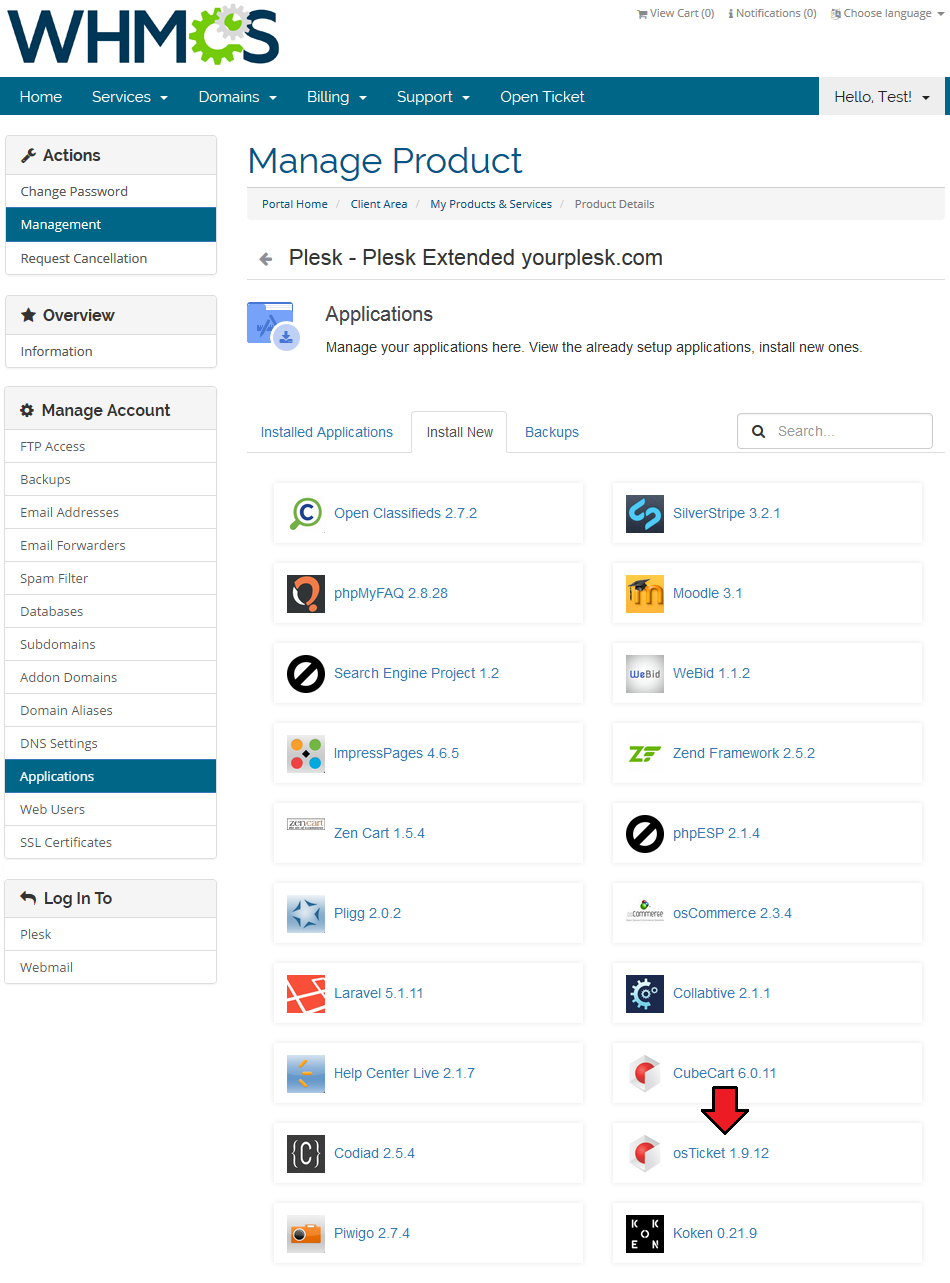
| Afterwards, you will see an extensive list of all applications. For presentation purposes we will install 'osTicket'. Find 'osTicket' and press it. |
|
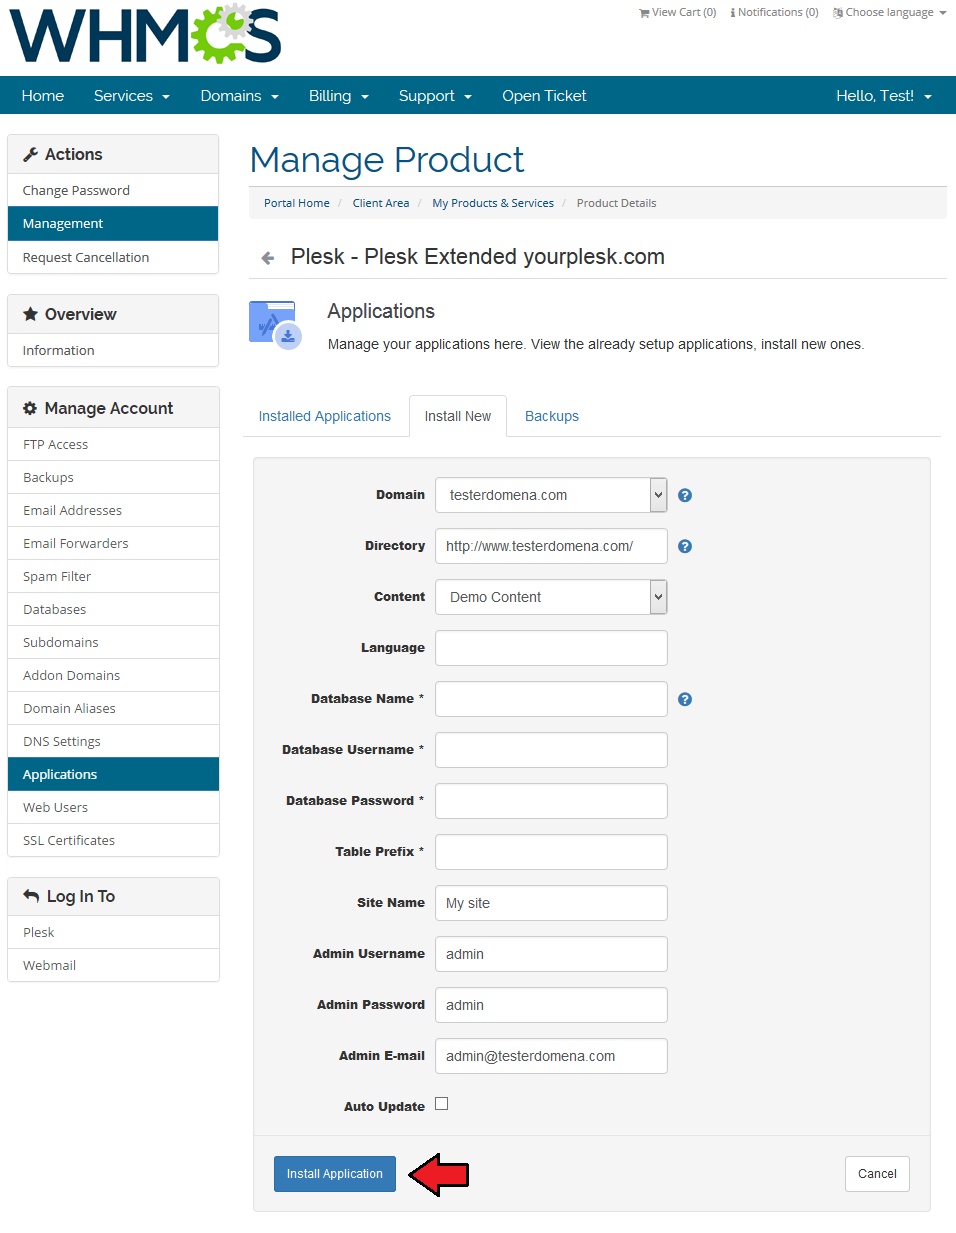
| Now, you have to enter necessary installation details and then press 'Install Application' to follow. Wait for 'Success' message. |
|
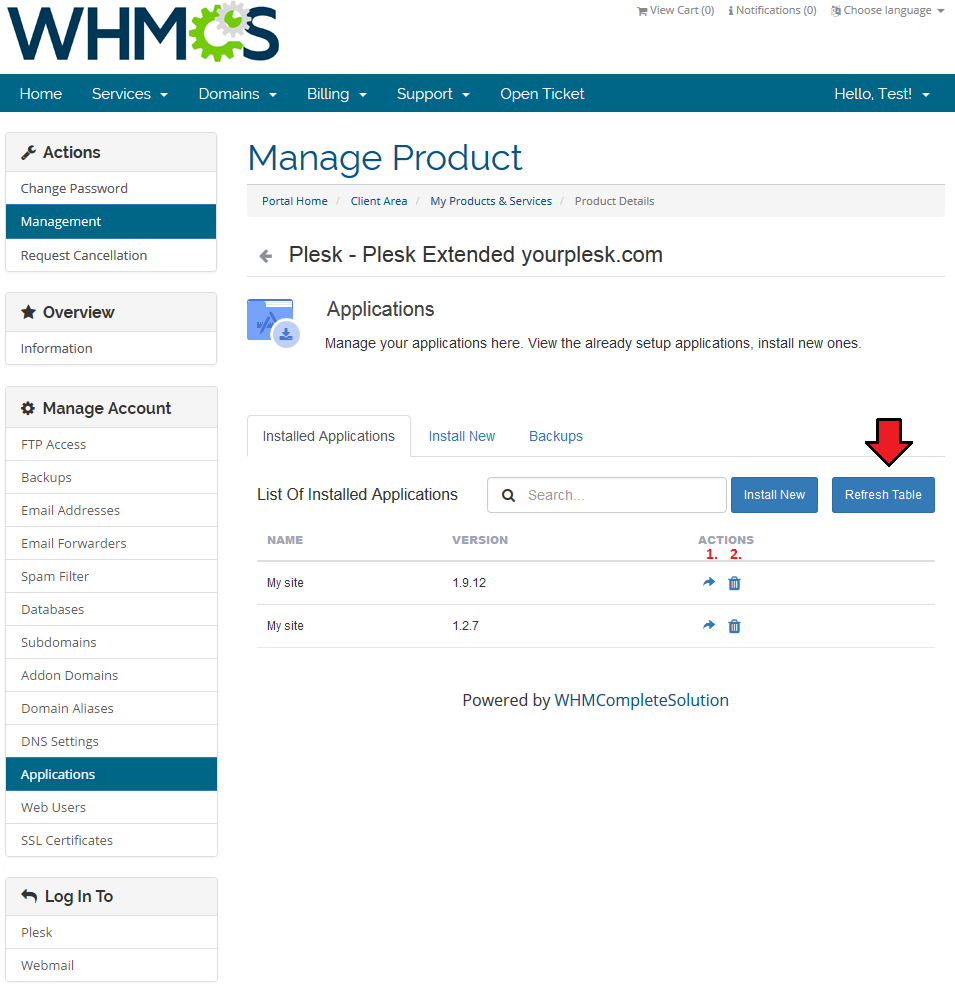
| View the list of your installed applications by clicking 'Installed Applications' tab. Please press 'Refresh Table' button to see the latest installed application! You will see there entered while installing 'Site Name', version of installed app and allowed actions. |
|
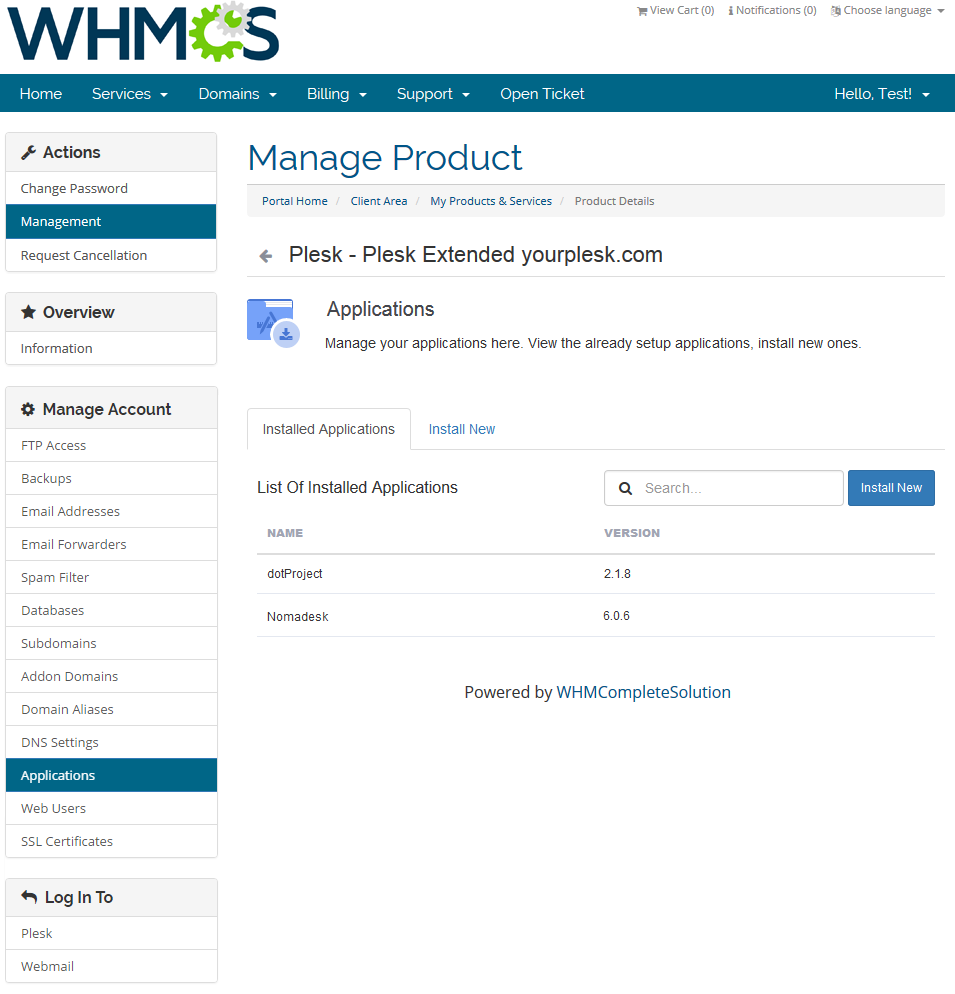
| This is how the list looks like when 'Default' Plesk autoinstaller has been used. Please note that there are no actions allowed on the installed application and there is no 'Backups' option. |
|
Backups
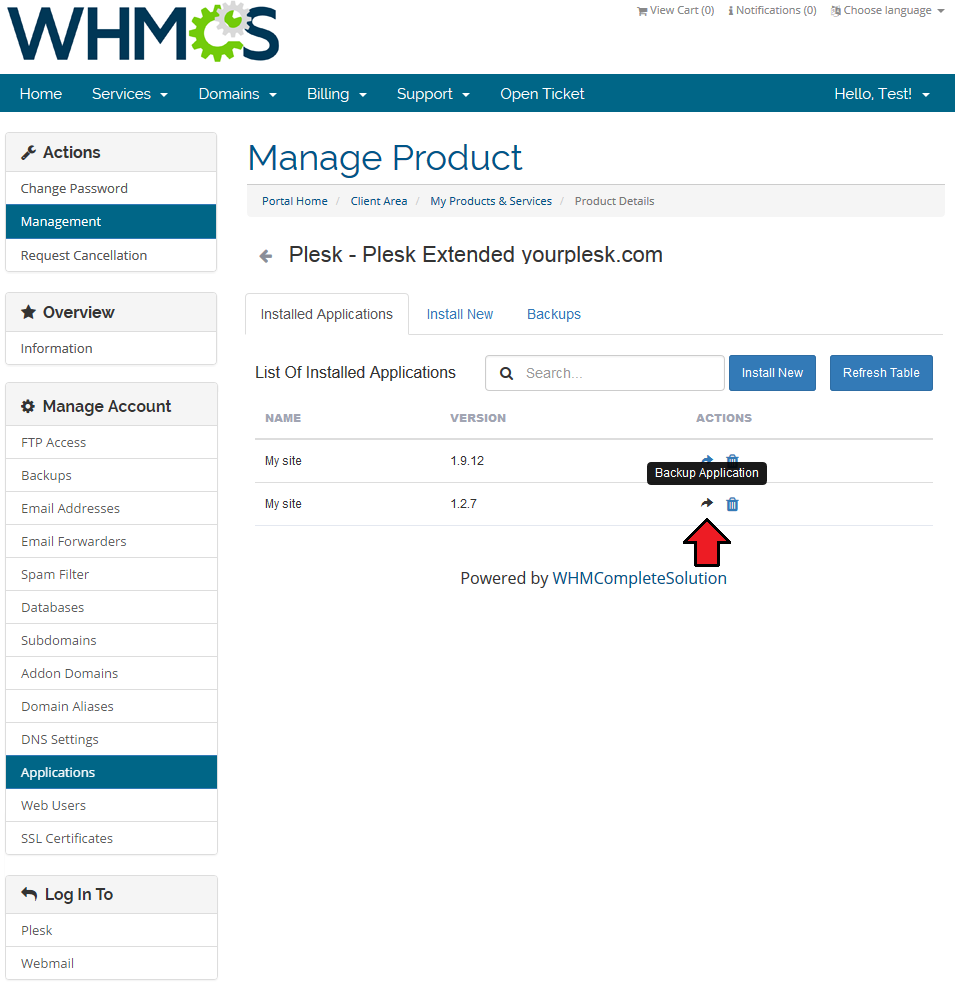
| If 'Installatron' autoinstaller type is used, then 'Backups' option is available. To backup an application simply press adequate action button next to it. |
|
| Confirm the action and wait a moment until your backup is ready. |

|
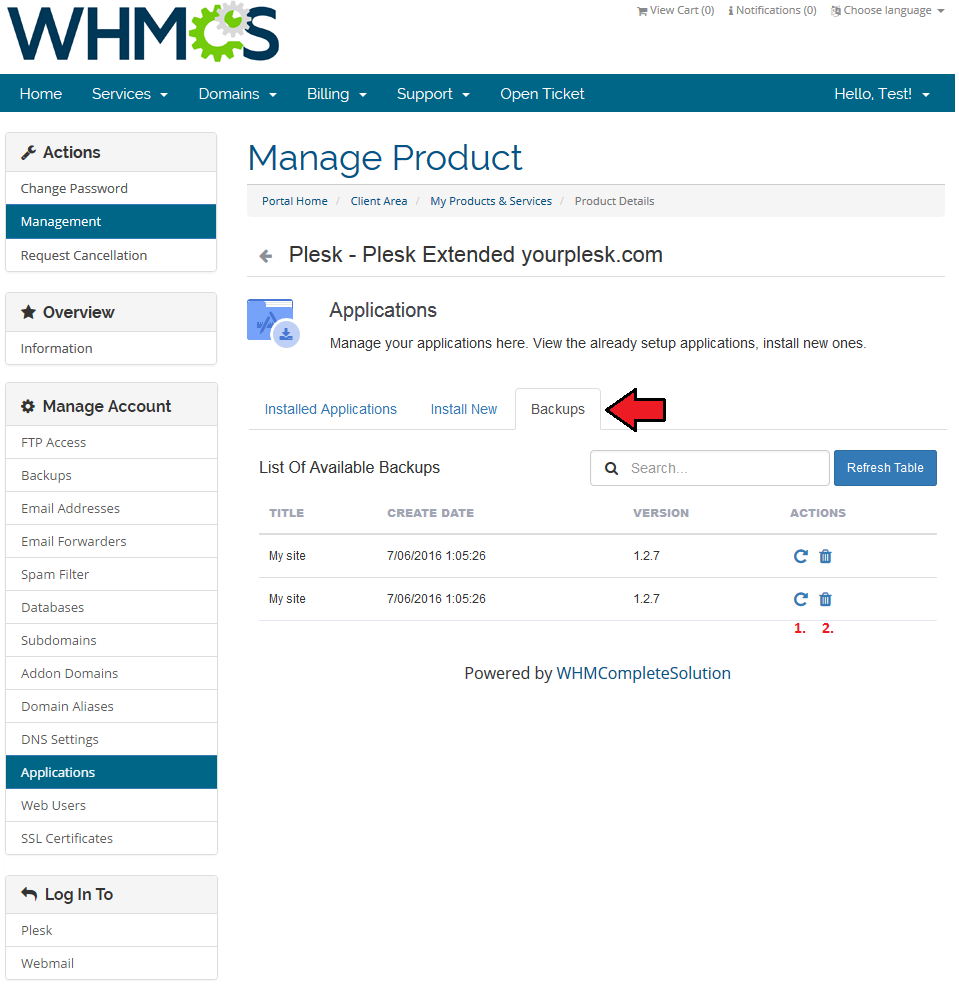
| Move to 'Backups' tab. There is a list of all created backups. Use action buttons to restore (1) backup or to delete (2) it. |
|
Web Users
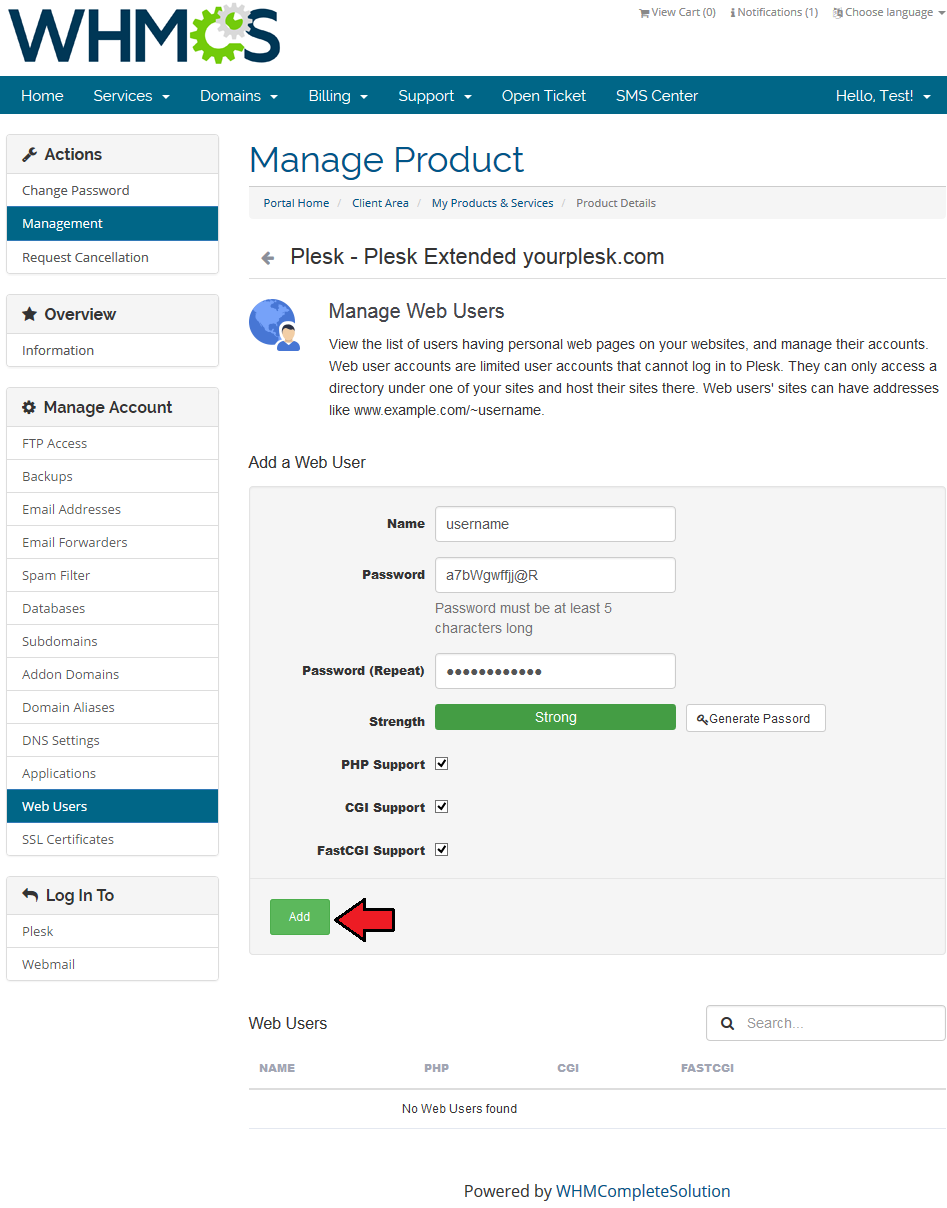
| Add and manage a list of web users that have personal pages on your website. |
|
SSL Certificates
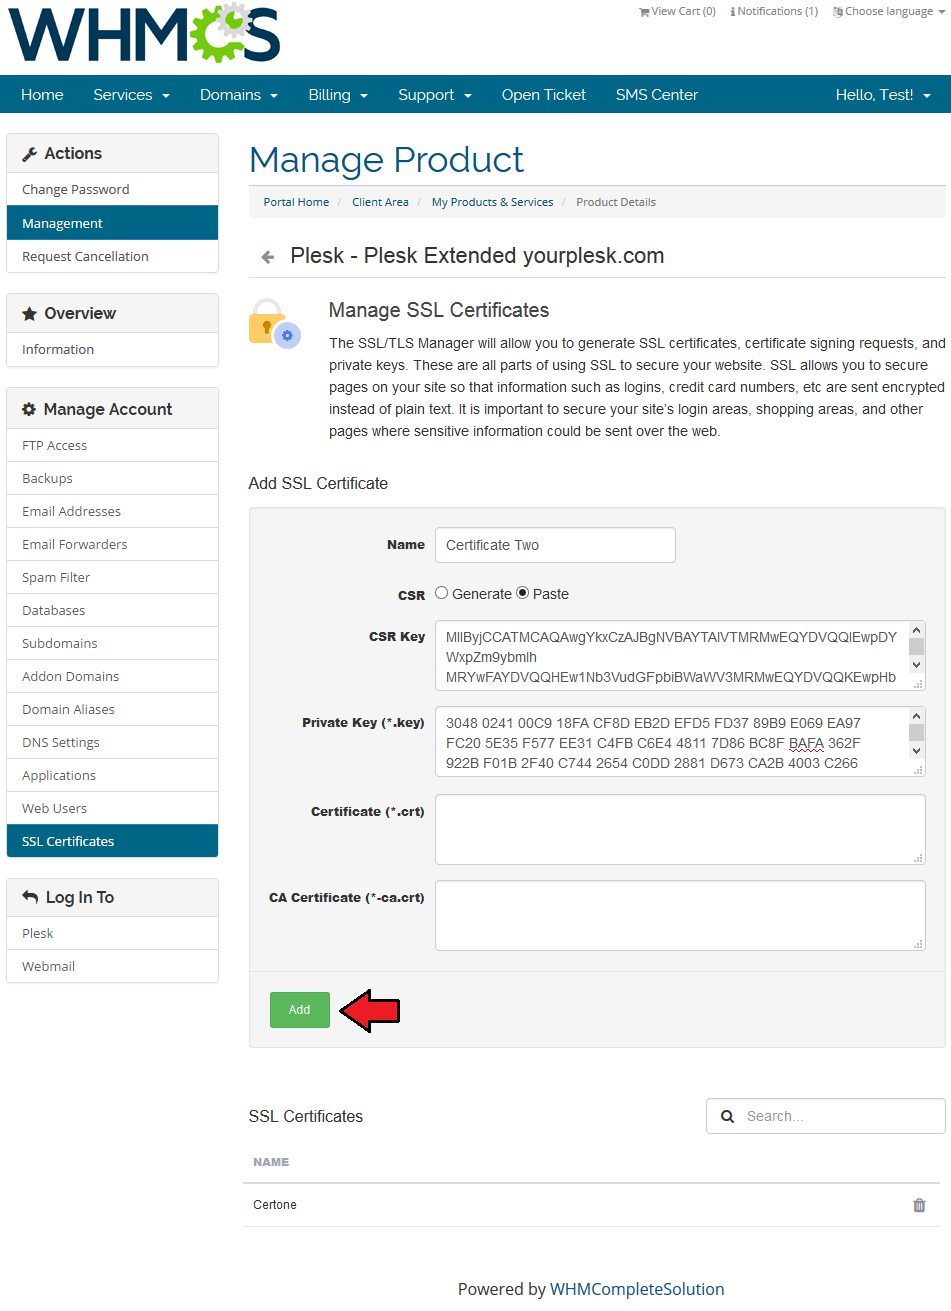
| This section will allow you to generate or paste ready SSL certificates and private keys. Simply choose 'Generate' or 'Paste' and then fill out required fields. Once ready, you will see a list of ready certificates on the list below. |
|
One Click Login
Log In To Panel
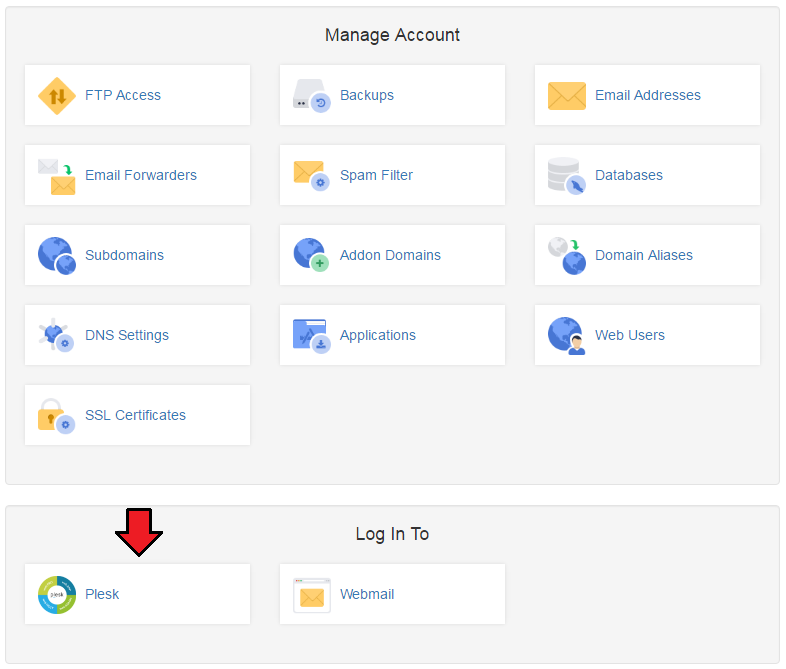
| With a single click of a button 'Log In To Panel' you can be redirected to your Plesk Panel account. Note that you must have a proper IP address or domain entered in admin area panel to use this button. |
|
Log In To Webmail
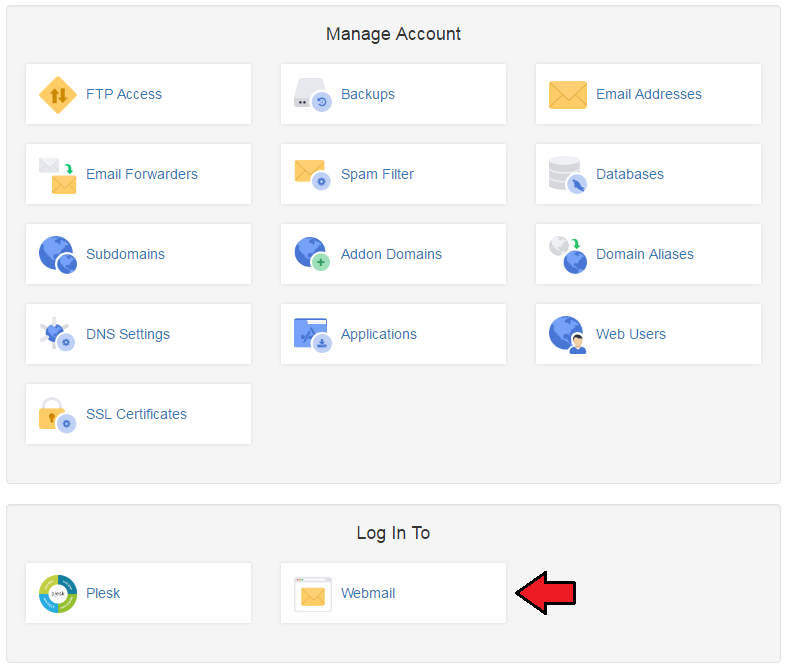
| You can quickly access your webmail through pressing 'Log In To Webmail' button. Note that you must have a proper IP address or domain entered in admin area panel to use this button. |
|
Management of Existing Products
| You can easily use Plesk Extended module with your already configured Plesk products. To do so change the type of servers and module names of products from 'Plesk' to 'PleskExtended'. |
Billing Management
| When you combine Plesk Extended For WHMCS with Advanced Billing For WHMCS, you will be able to set up additional billing options. |
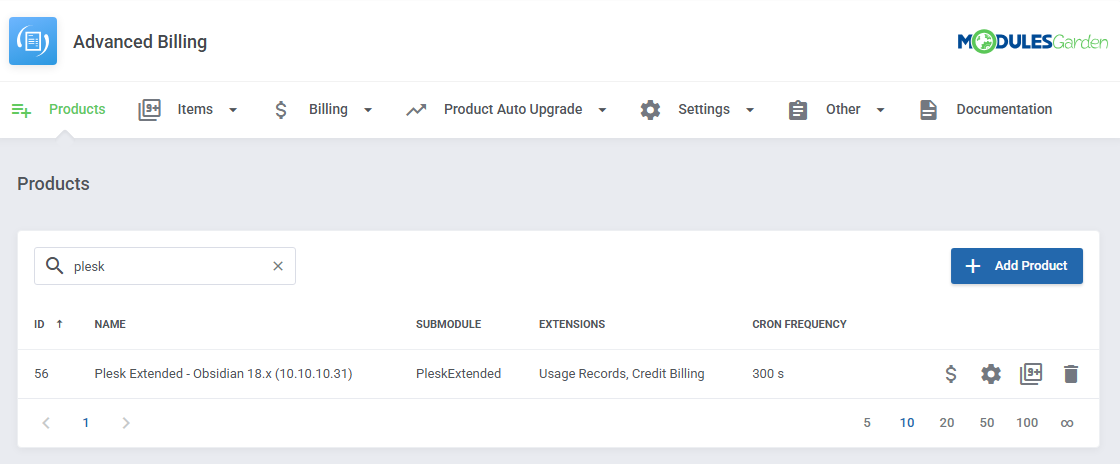
|
| The module allows you to charge your customers basing on the server resources used by them. |
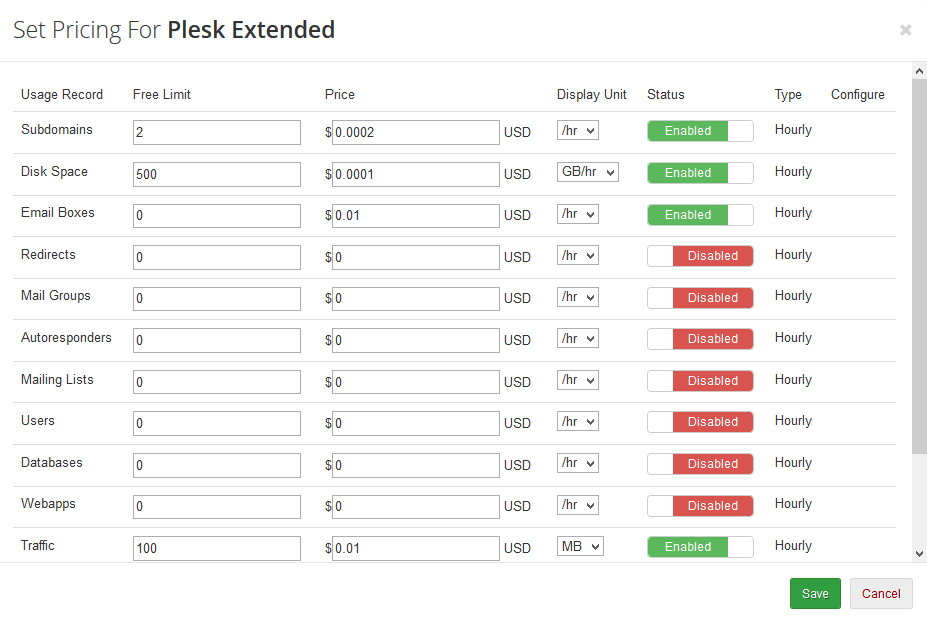
|
| With Advanced Billing module, you can also display your customers the current server resource usage and their cost. |
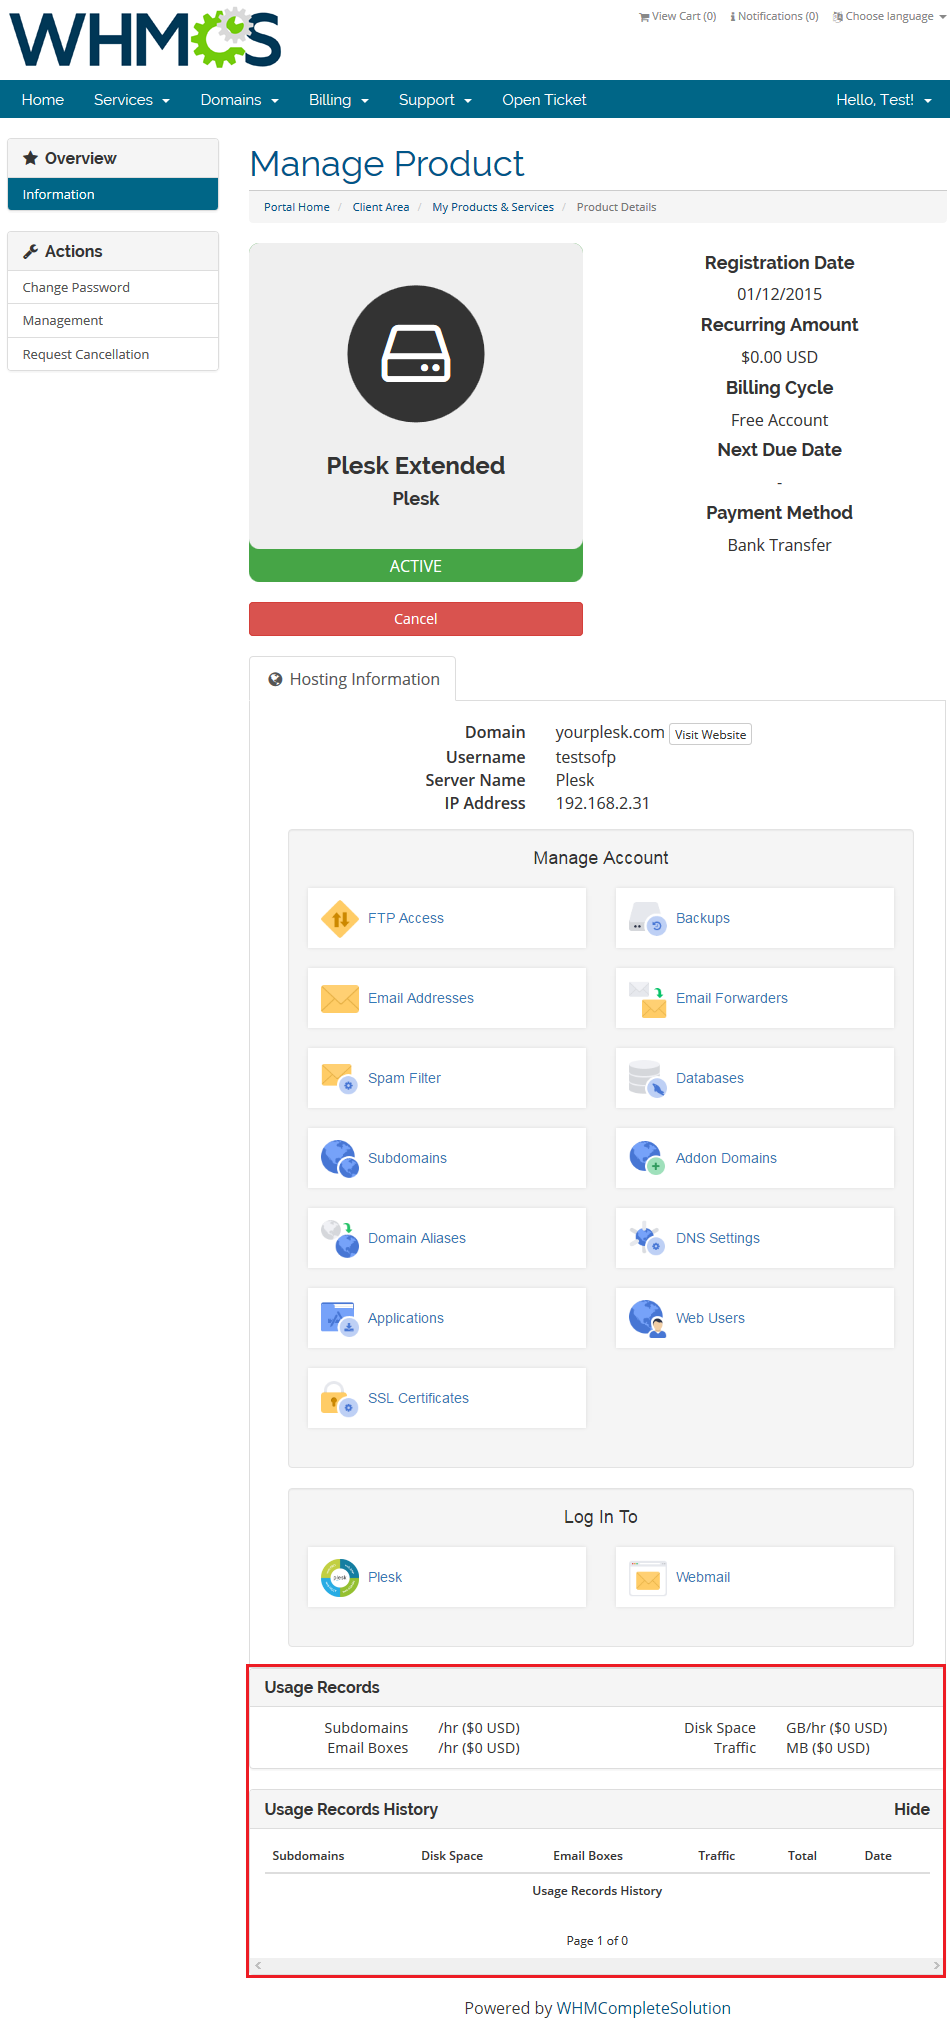
|
Tips
| 1. 'Login To Webmail' button address: 'http(s)://webmail.{domain_from_order}'. |
| 2. To set up an existing customer's account in your Plesk Extended, create a new WHMCS order with the same username, password and email address. Then set the account status to active. |
| 3. As this module supports templates system, any changes made in the module's templates files will be saved after the upgrade process. |
Common Problems
| 1. When you have problems with connection, check whether your SELinux or firewall does not block ports. |
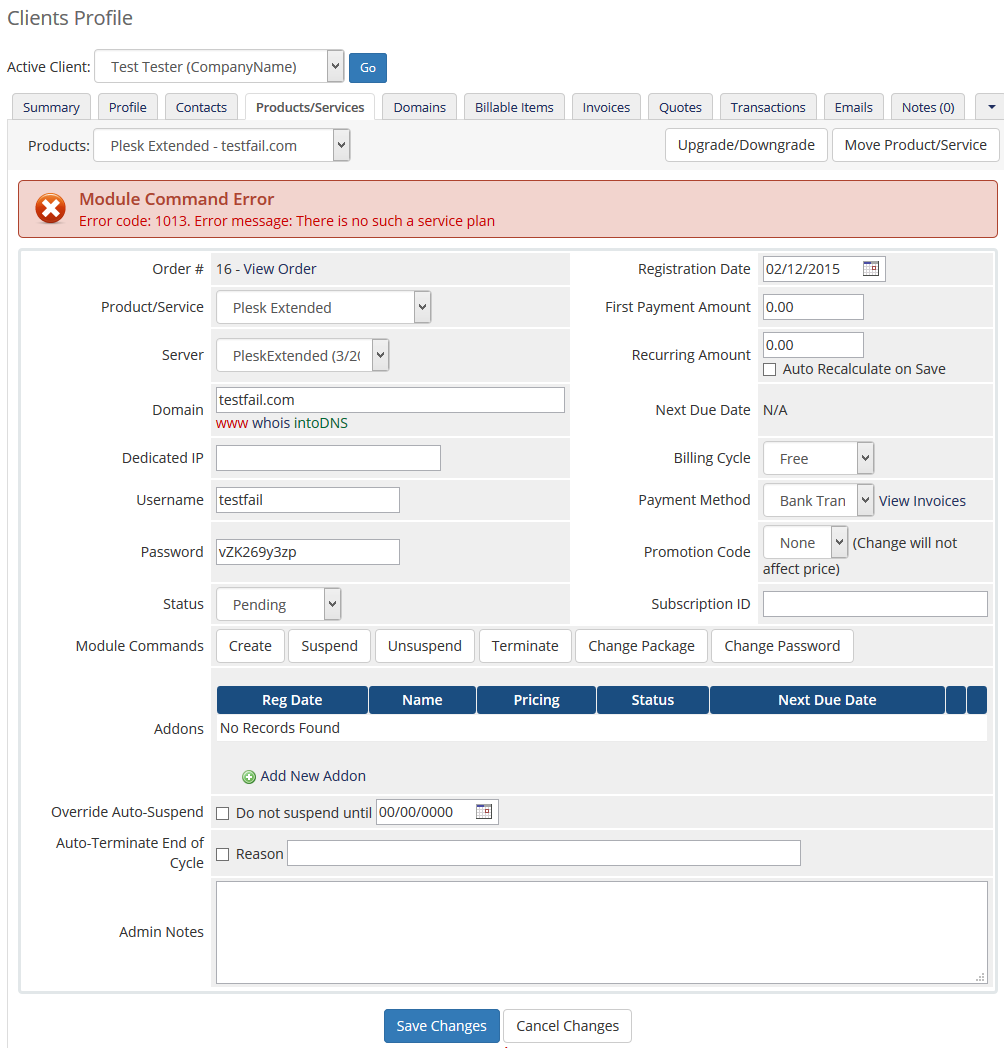
| 2. If you see an error as shown on the screen below, it means that you haven't provided your service plan name or reseller plan name in product's 'Module Settings'. Once you enter the name, the problem will disappear. |
|
| 3. If you are unable to connect with your Plesk server or client area functionalities don't work properly, then make sure that you are connecting with your server on port 8443. Here you can find more information on how to change default port in Linux and Windows |
| 4. Unable to get the version number from the server. CURL Error: 7 - couldn't connect to host. Check server connection details. Check connection details and the connection itself between WHMCS and server. |
| 5. Unable to get the version number from the server. Permission denied. You have to set admin account access details. You need admin account access to use PPPE module, reseller account API is not supported. |
| 6. Blank page at 'Applications'. Reason: Some libraries may be missing. |
| 7. If you have problems with your license, please make sure that the content of the file is correct. Please note that for Plesk Extended For WHMCS V2.0.0 and later the license key begins with: $plesk_extended_licensekey="ModulesGarden_PleskEX_LicenseKey"; Not as it was for the previous versions: $parallels_plesk_panel_extended_licensekey="ModulesGarden_PleskEX_LicenseKey"; |
| 8. In case you see an error: 'Request Is Invalid: Error In Line 5: Element 'owner-id' is not a valid value of the atomic type 'int'.' while creating the product, please verify your product type. Most probably it is set to 'Dedicated/VPS Server' or 'Other' which are not supported. See point 15 for more info. |