Password Manager For WHMCS
Contents |
About Password Manager For WHMCS
| Password Manager For WHMCS gives you the possibility to store passwords and share them safely with your staff and clients. The module offers various mechanisms allowing you to conveniently manage passwords, send email reminders, as well as integrate with your WHMCS client area. |
- Administrator Area Features:
| ✔ Create Private Access Details |
| ✔ Share Access Details With Clients & Administrators |
| ✔ Display Clients Access Details In Clients Summary And Clients Tickets |
| ✔ Define Access To Clients Access Details: |
| ✔ Full Access - Any Administrator Can View Any Password |
| ✔ Restricted Access - Allowed Administrators Can View Any Password |
| ✔ Shared Access - Allowed Administrators Can View Shared Passwords |
| ✔ Store All Access Details In Encrypted Format |
| ✔ Add Notes To Password |
| ✔ Set Direct Links To Website Or Login Page With Password Used |
| ✔ Display Password Owner |
| ✔ Toggle Availability Of Private Passwords And Product Passwords For Clients |
| ✔ Forbid Password Management For Chosen Clients/Client Groups |
| ✔ Exclude Products/Product Groups From Being Displayed |
| ✔ Allow Clients To Set Master Password For Owned Passwords |
| ✔ Define Client Passwords Limit Per User |
| ✔ Adjust Lenght And Characters For Random Password Generation |
| ✔ Notify Upon Password Change |
| ✔ Send Password Change Reminder |
| ✔ Define Email Templates For Reminder And Notification |
| ✔ Define Time Period For Password Change Reminder |
- Client Area Features:
| ✔ Display And Manage Access Details |
| ✔ Display And Add Additional Access Details Of Owned Services |
| ✔ Generate Random Passwords |
| ✔ Share Access Details With Administrators And Clients |
| ✔ Create Shared Categories |
| ✔ Assign Categories To Access Details |
| ✔ Restrict Access To Owned Passwords Using Master Password |
| ✔ Restrict Contacts Access To Passwords |
- General Info:
| ✔ High-Level Security With Advanced Two-Way Encryption |
| ✔ Multi-Language Support |
| ✔ Supports PHP 5.4 Up To PHP 7 |
| ✔ Supports WHMCS Templates Five and Six |
| ✔ Supports WHMCS V6 and V7 |
Installation
| This tutorial will show you how to successfully install Password Manager For WHMCS. We will guide you step by step through the whole installation and configuration process. |
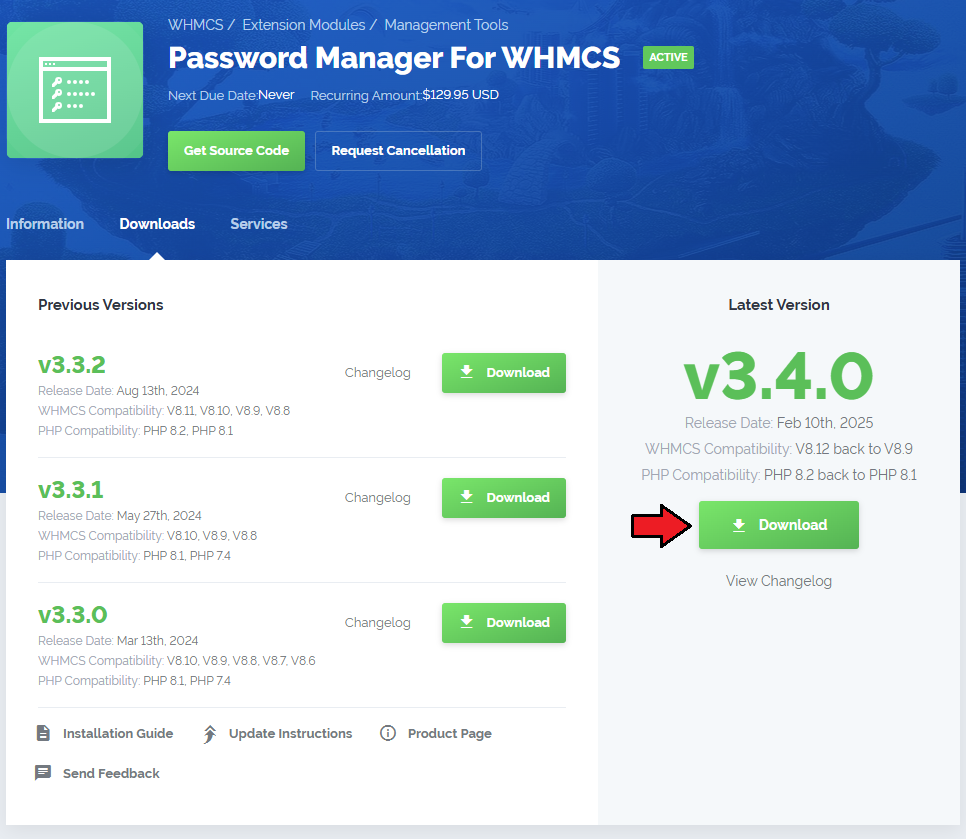
| 1. Log in to your client area and download the module. |
|
| 2. In the downloaded file you will find two packages that support different PHP versions. As presented on the screen below, the first one is dedicated to PHP 7, while the second one is aimed at PHP 5.4 up to PHP 5.6. It does not apply to open source versions. Note: You can check current PHP version in your WHMCS. To do so proceed to 'Utilities' → 'System' → 'PHP Info'. |

|
| 3. Extract the downloaded file and choose the one with the right PHP version. Upload and extract the PHP file into the main WHMCS directory. The content of PHP version files should look like this. |
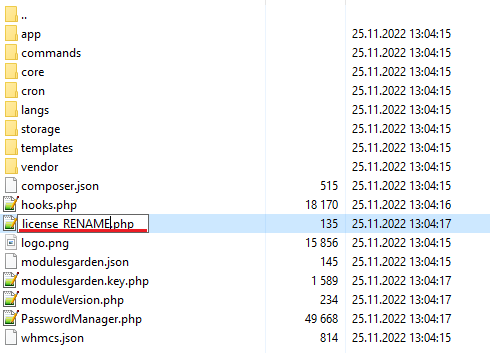
| 4. When you install Password Manager For WHMCS for the first time you have to rename 'license_RENAME.php' file. File is located in 'modules/addons/PasswordManager/license_RENAME.php'. Rename it from 'license_RENAME.php' to 'license.php'. |
|
| 5. In order to configure your license key, you have to edit a previously renamed 'license.php' file. Enter your license key between quotation marks as presented on the following screen. You can find your license key in your client area → 'My Products'. |

|
| 6. Now you have to activate the module in your WHMCS system. Log in to your WHMCS administrator area. Go to 'Setup' → 'Addon Modules'. |

|
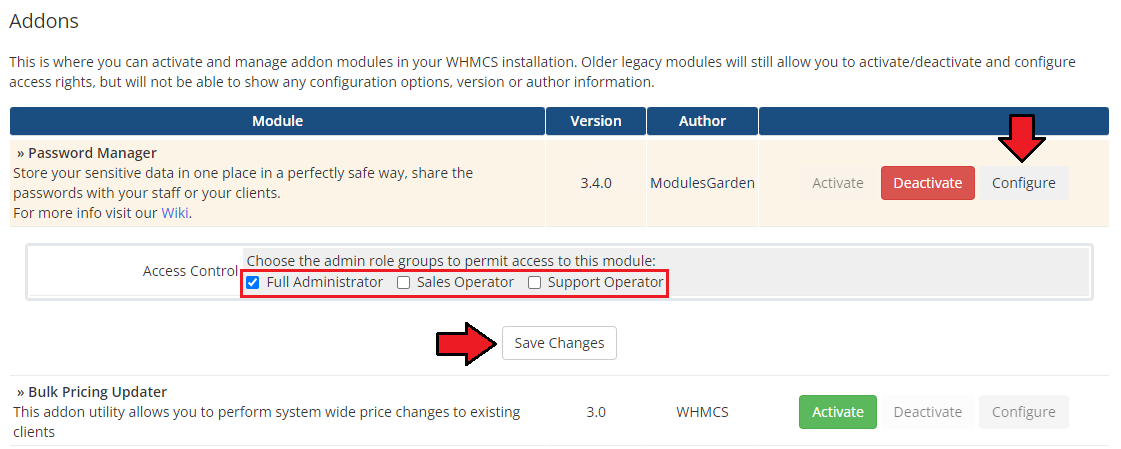
| 7. In the next step you need to permit access to the module. To do so, click on 'Configure' button, select administrator groups which should have access to this addon and press 'Save Changes'. |
|
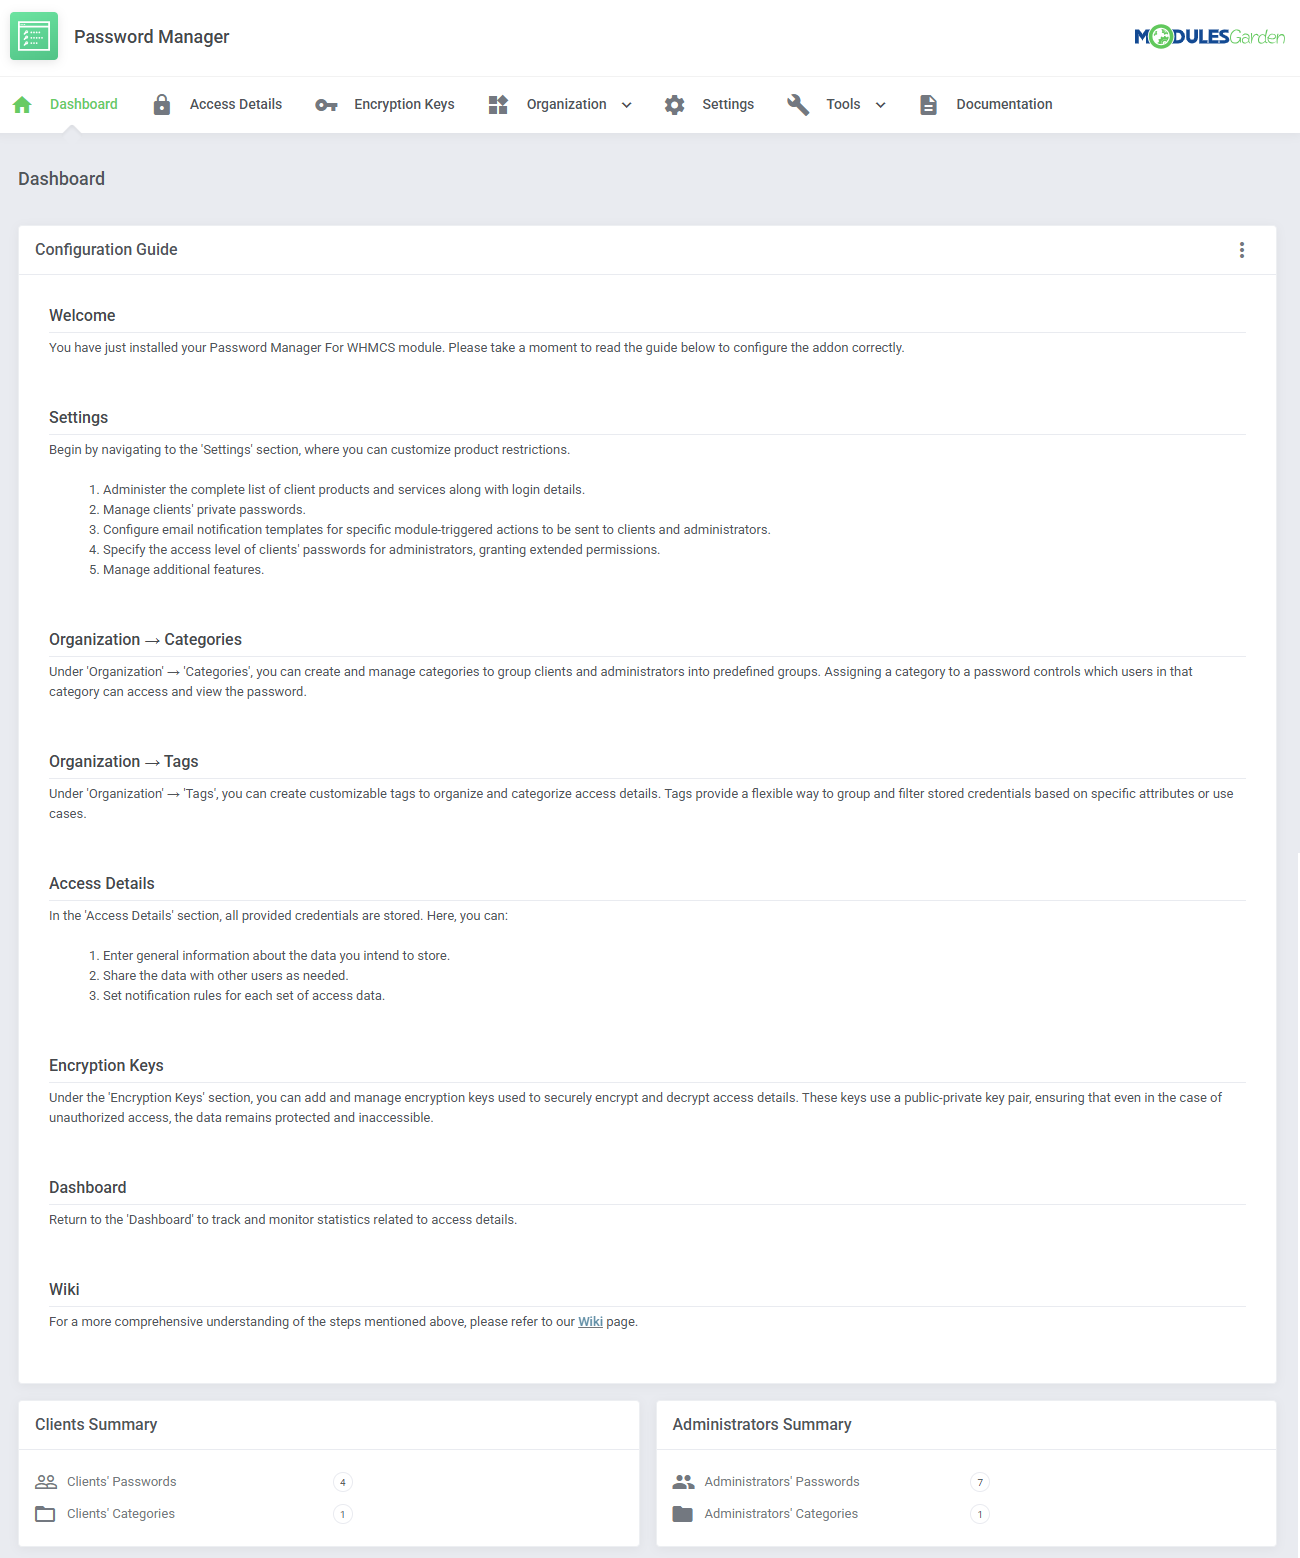
| 8. You have just successfully installed Password Manager For WHMCS! You can access your module under 'Addons' → 'Password Manager'. |
|
Configuration and Management
| Password Manager For WHMCS allows to share passwords in your WHMCS. In this short guide we will present you the possibilities of our module. |
Configuration
| Before you start your work with our Password Manager For WHCMS, please move to 'Settings' tab, where you will configure access restrictions to products passwords, define email notifications and manage security settings. |
Client Product Password
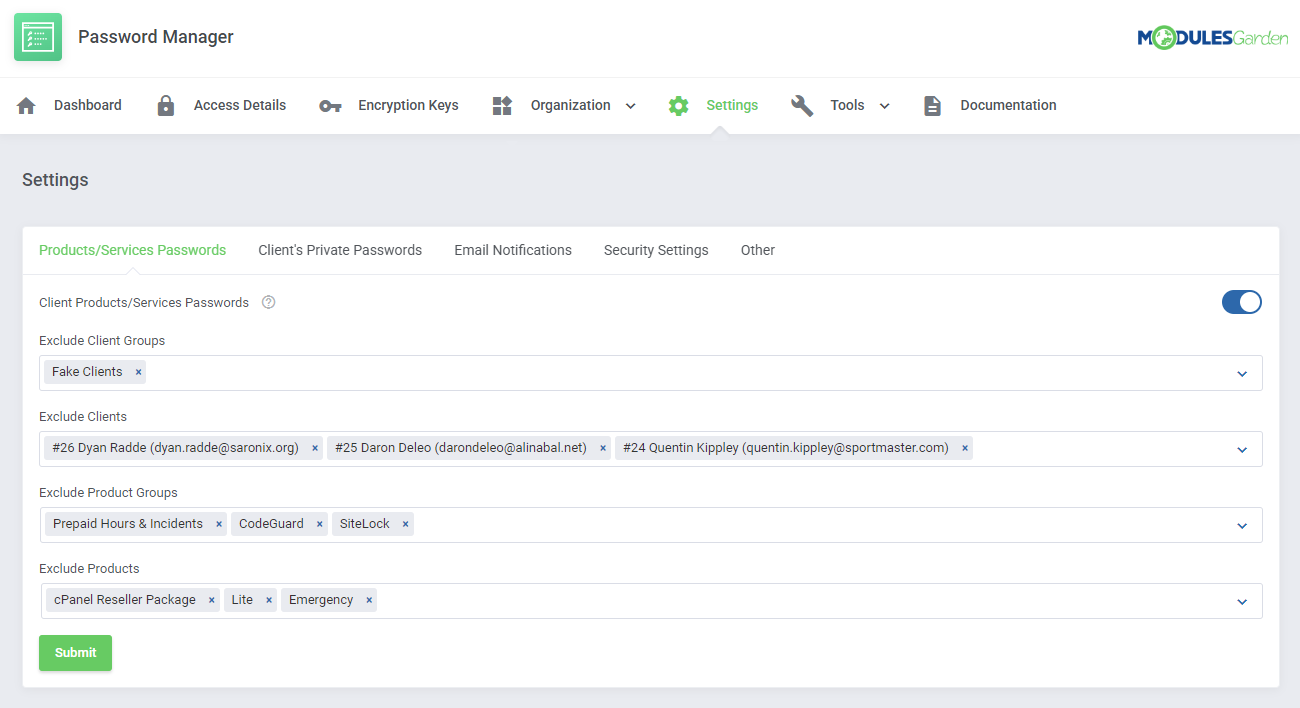
| First of all, decide whether you wish to allow to display a full list of client's products and services login details by selecting option: 'Client Product Password'. If enabled, access details to client's products and services will be displayed in the client area → 'Password Manager'. 'Exclude Client Groups' - enter any client group name to disable product's access details from being displayed for clients in these groups. |
|
Client Private Passwords
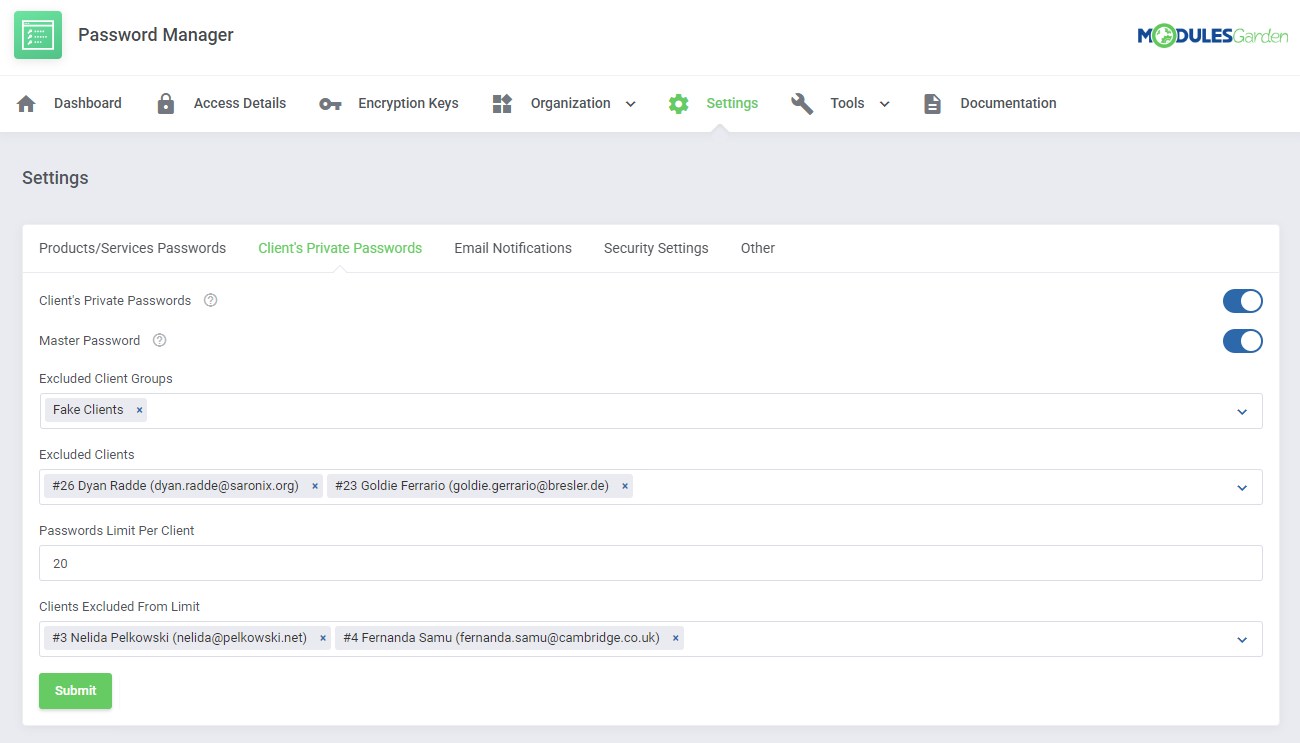
| The next section is dedicated to the management of private passwords of clients. If you wish to allow your clients to manage their personal access details, select the 'Client Private Passwords' option. Your clients can be also permitted to set their own 'Master Password' to provide additional protection for their stored passwords. Next, move to the specific configuration: 1. 'Exclude Client Groups' - disable private access details management for selected here client groups. |
|
Email Notifications
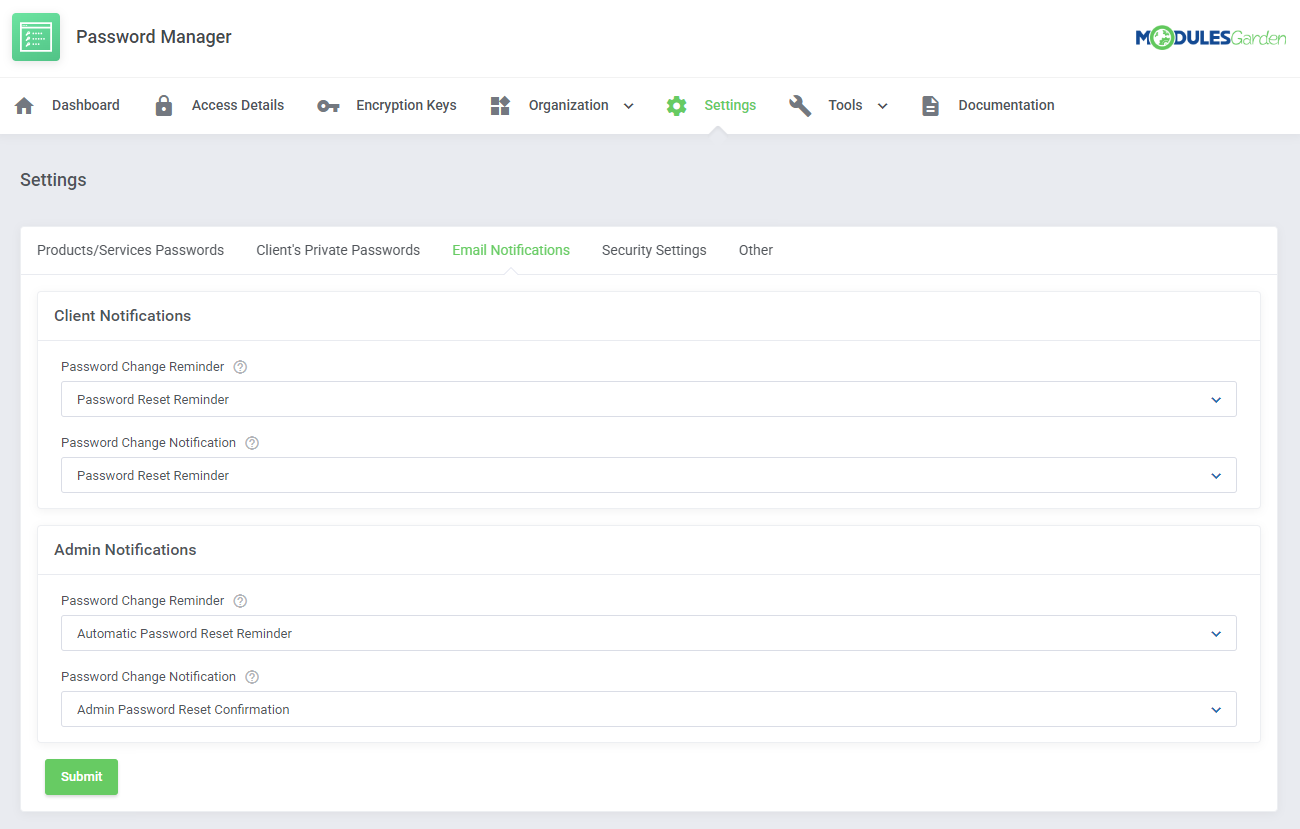
| This section allows you to define email notification templates that will be sent by the module on specific actions to clients and administrators. 1. 'Password Change Reminder' - select an email template that will be used to remind clients or administrators about the need to change the password. |
|
Security Settings
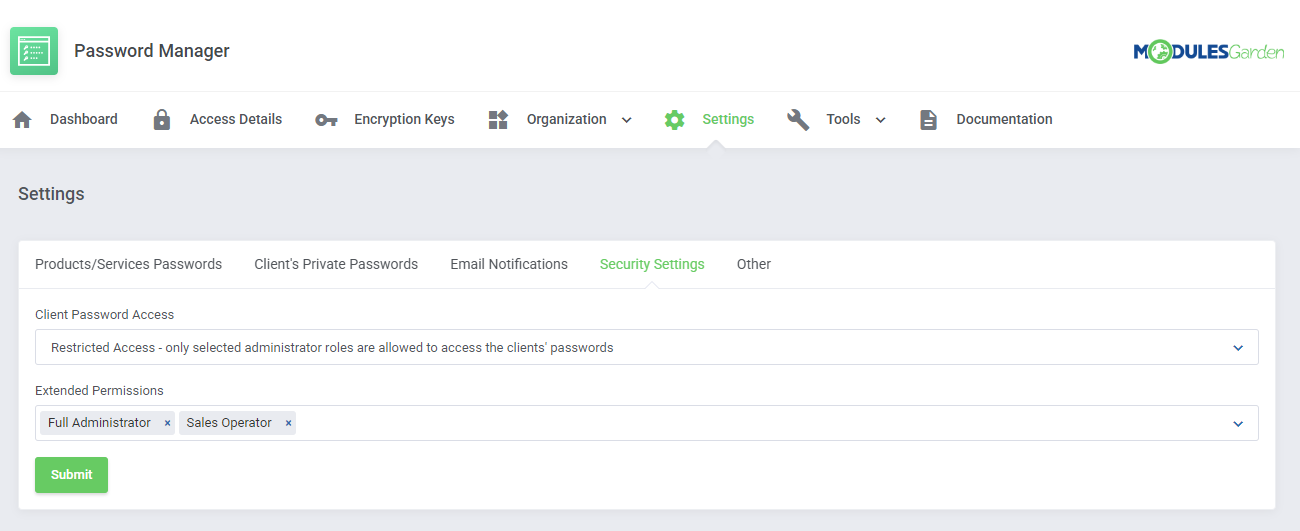
| Under 'Security Settings' tab, you have to define the level of access to clients' passwords for administrators and grant them extended permissions. You may grant your administrators:
You may also select here administrators group which will be granted 'Extended Permissions'. |
|
Other
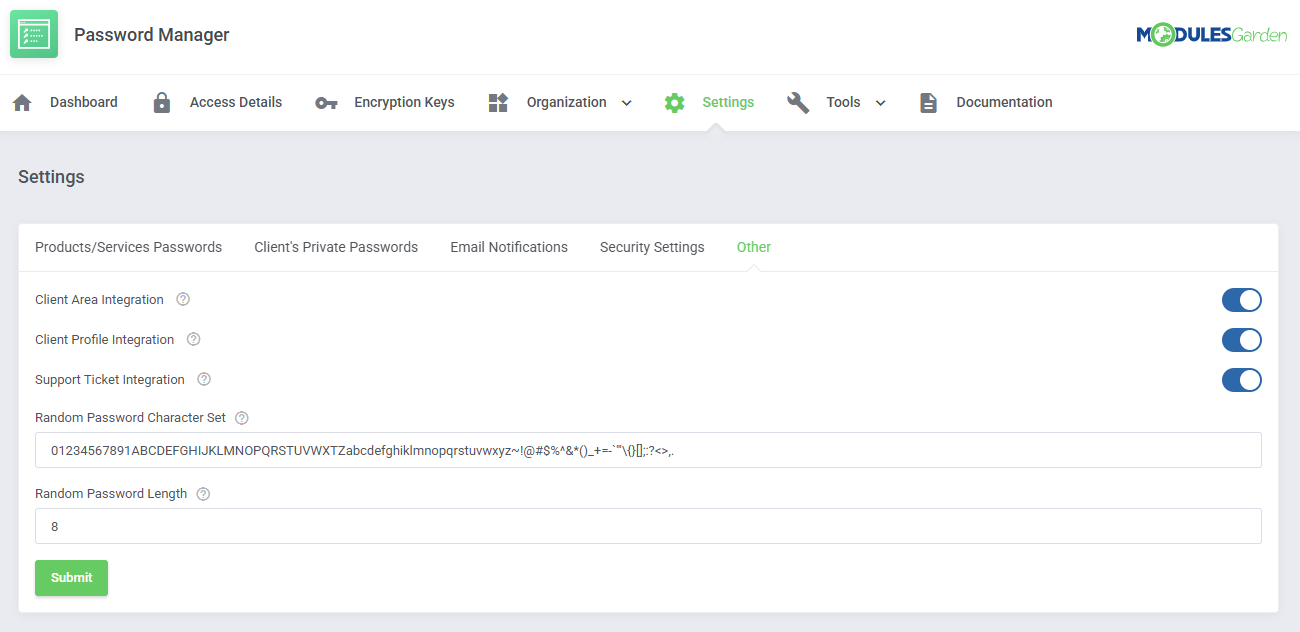
In the very last section you may manage additional options that 'Password Manager For WHMCS ' has to offer.
|
|
Categories
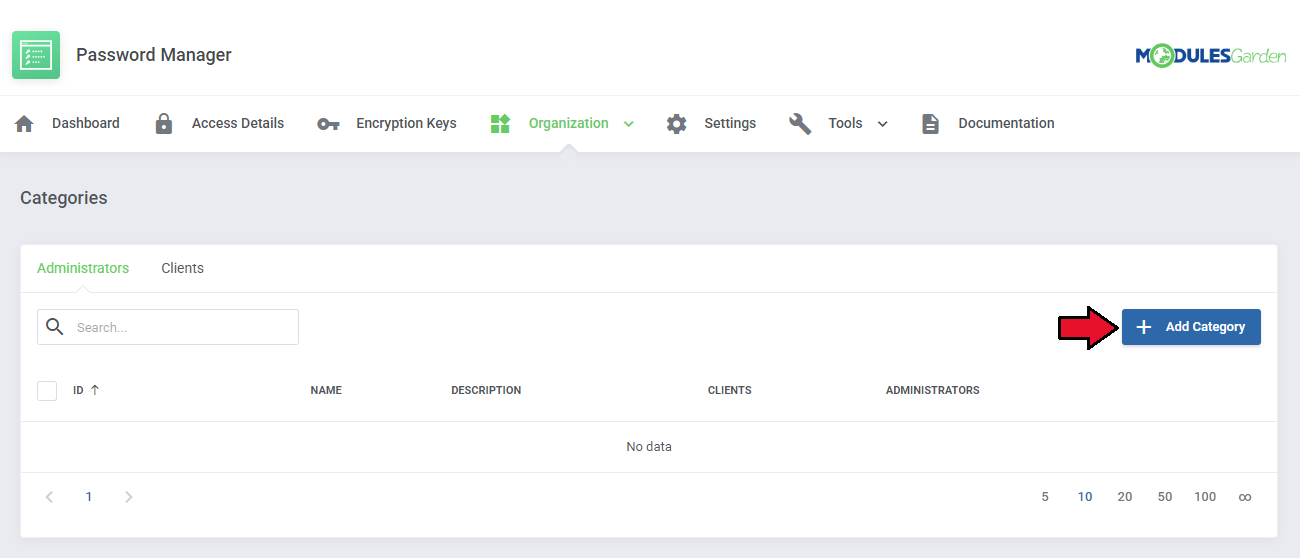
| Categories allow you to prepare predefined sets of clients and administrators. Through assigning a category to a password, clients and administrators from that category are granted the permission to view this password. |
|
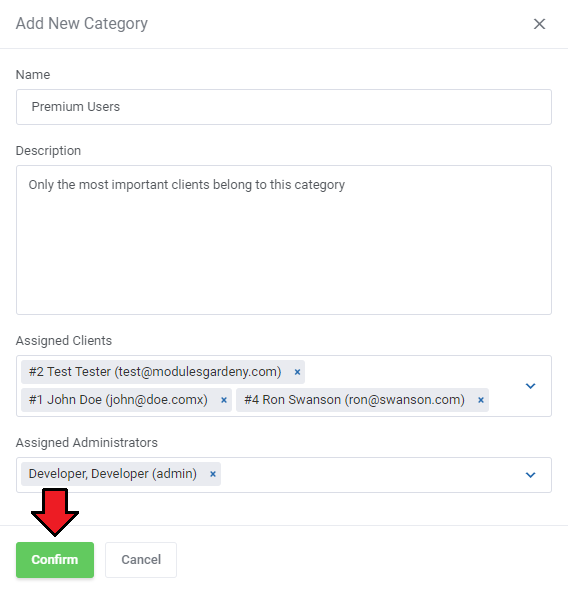
| Now, fill out the form with category name and description. Assign desired clients and administrators to the category and press 'Add'. |
|
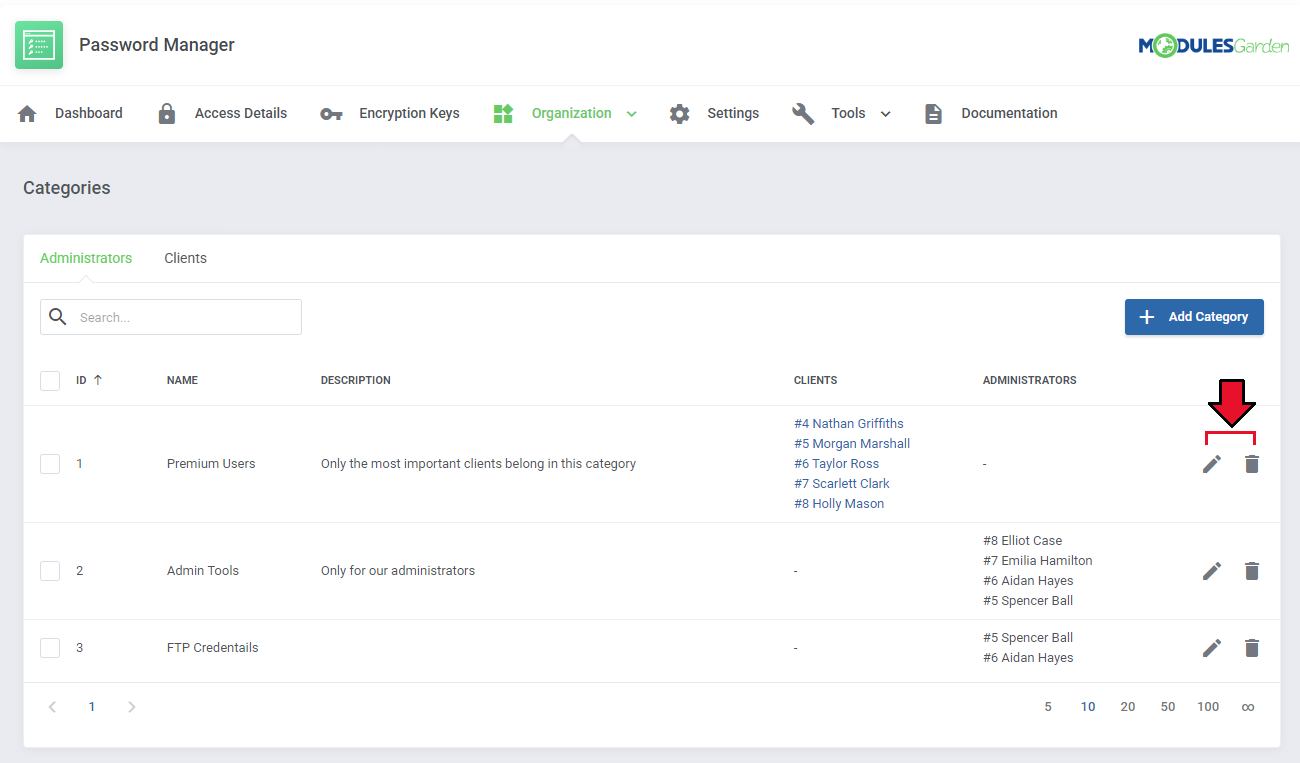
| The list of administrator categories with any details such as the number of clients in it and administrators allowed to access the details is now visible. You may always edit the category or delete if needed. Use the action buttons to do so. |
|
Access Details
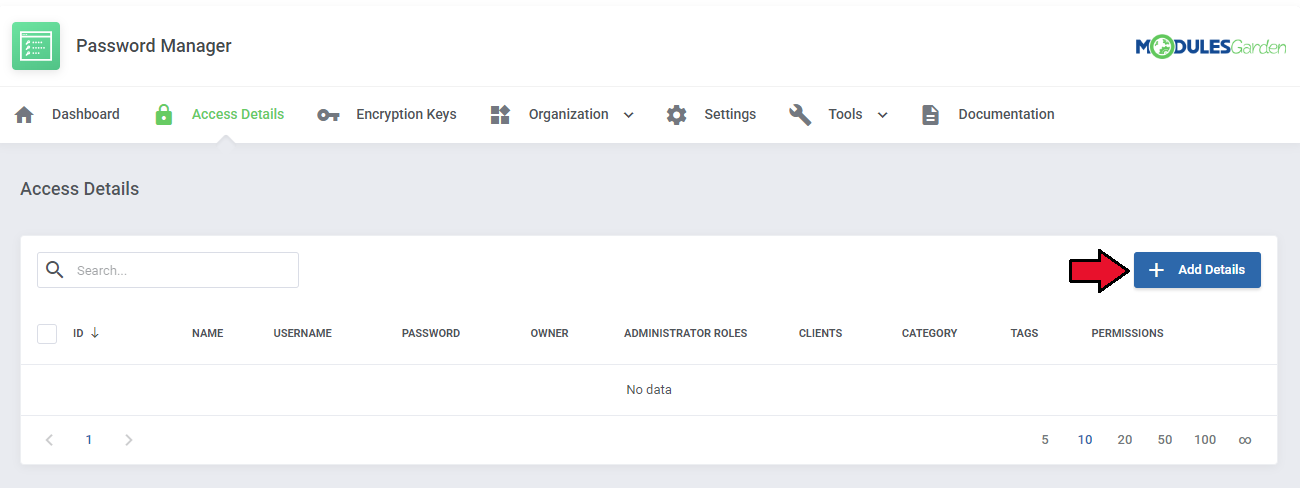
| 'Access Details' section includes a list of provided access details. Here you can create new access details and decide who can view them. Press 'Add New' to begin. |
|
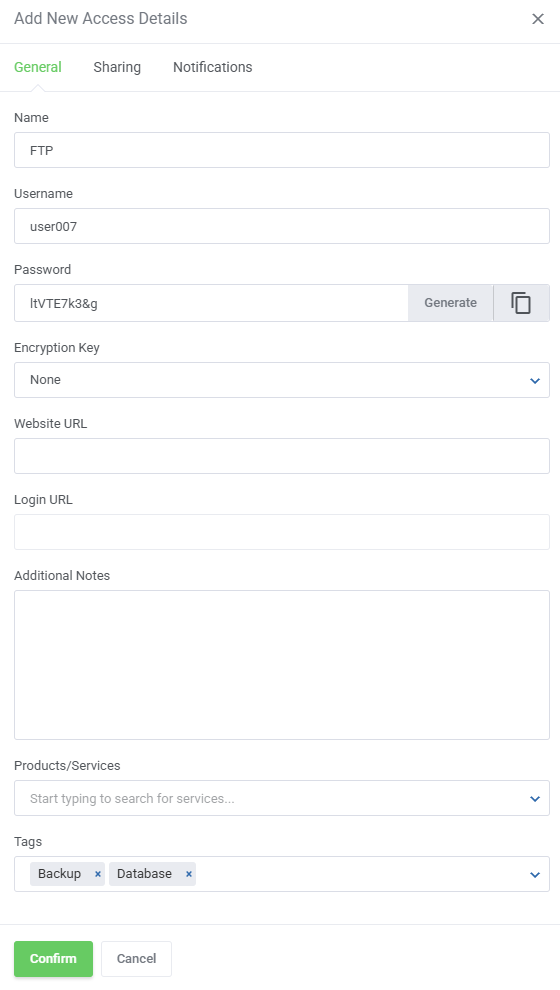
| Fill in 'Name', enter access details into 'Username' and 'Password'. You can also make your logging in easier through entering website URL and website log in URL consecutively into 'Website URL' and 'Log In URL'. |
|
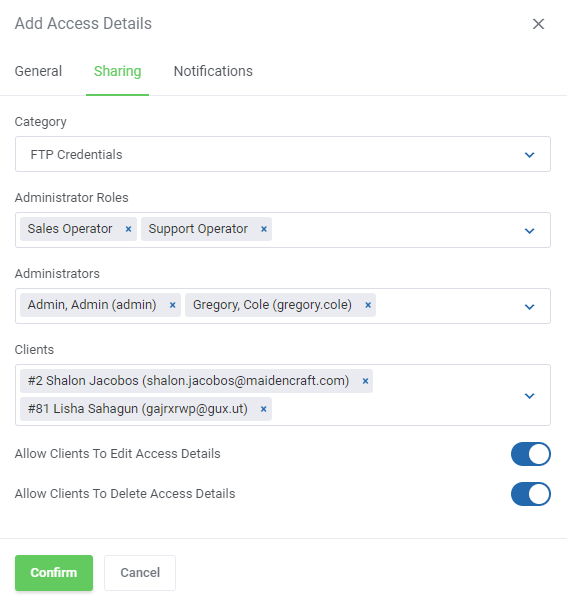
| In this section choose 'Category' and select 'Administrators', 'Administrator Groups' and 'Clients' who should have access to this details. Note: There is disjunction relation between 'Administrators' and 'Administrator Roles'. |
|
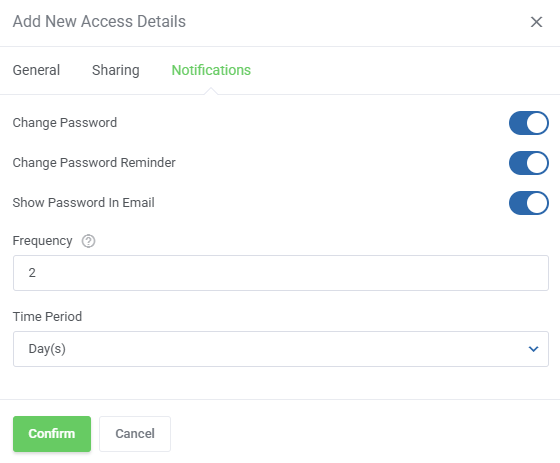
| Finally, you can set up notifications rules. 'Send Password Change Notification' - message is sent upon password being changed. |
|
Access Details List
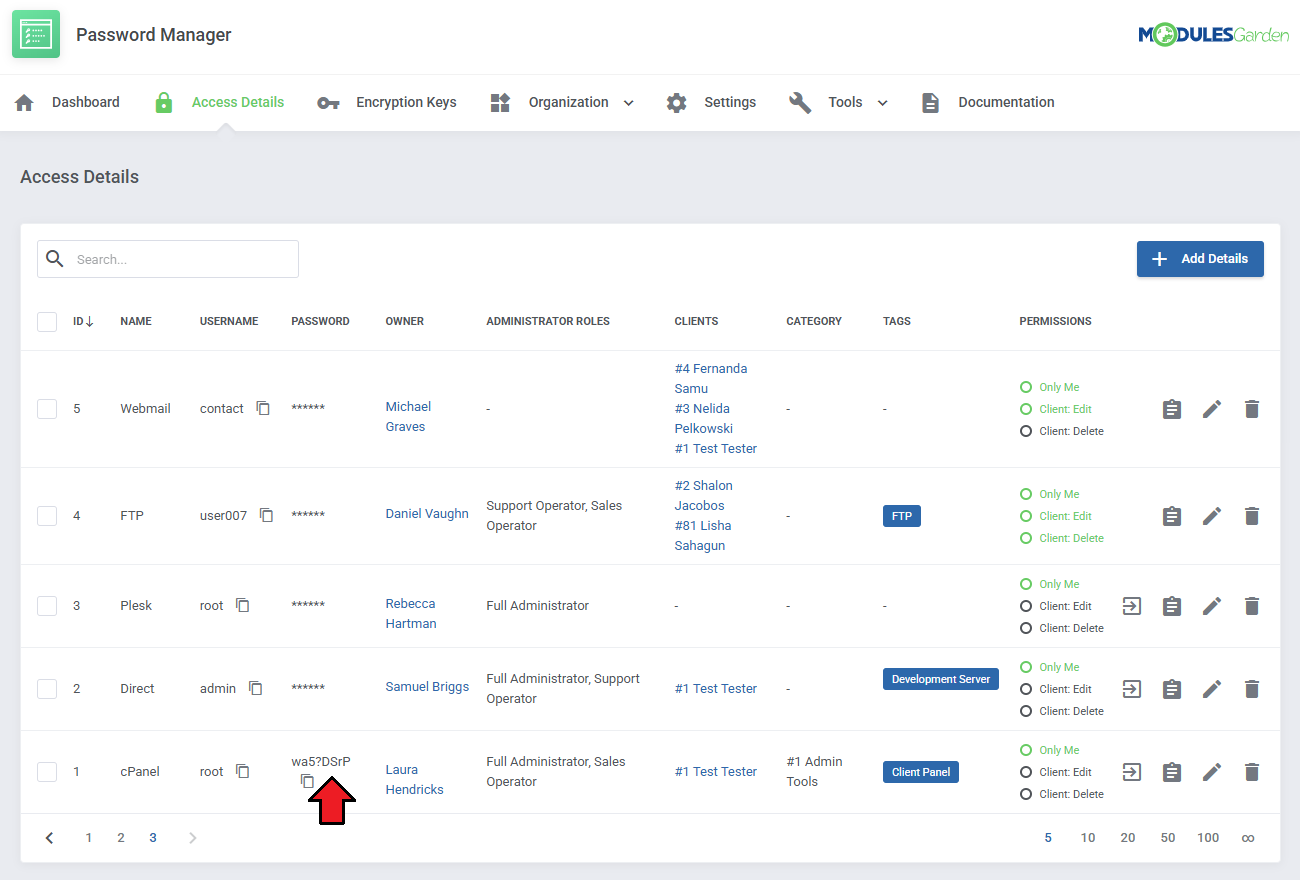
| On the list of access details you will see some basic info, such as ID and name, username and password with the possibility to view the password. |
|
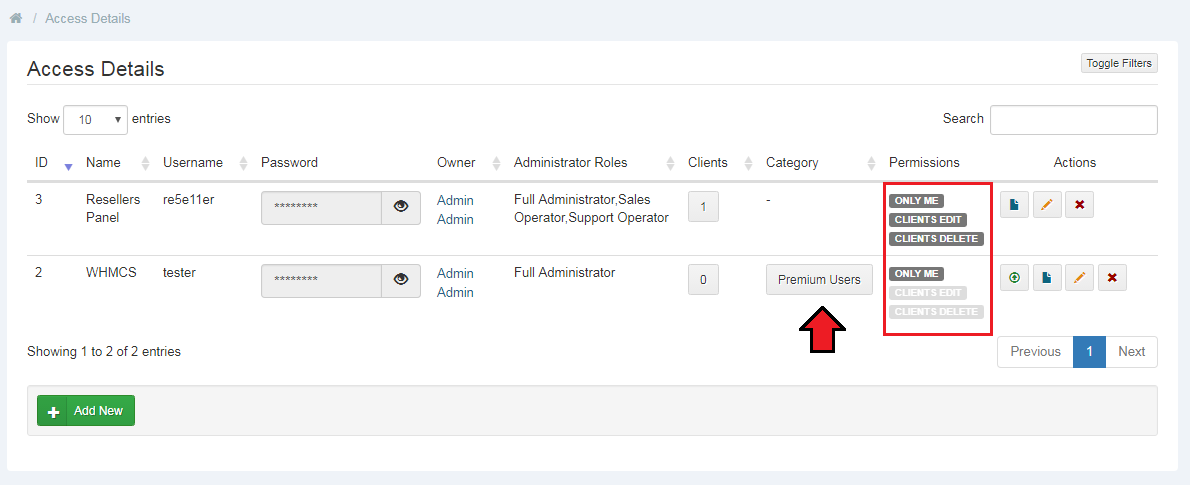
| There is also information on the access details owner and administrator groups allowed, number of clients allowed and category assigned (press the category to see who exactly is in it). Finally, you can check set up edit permissions. |
|
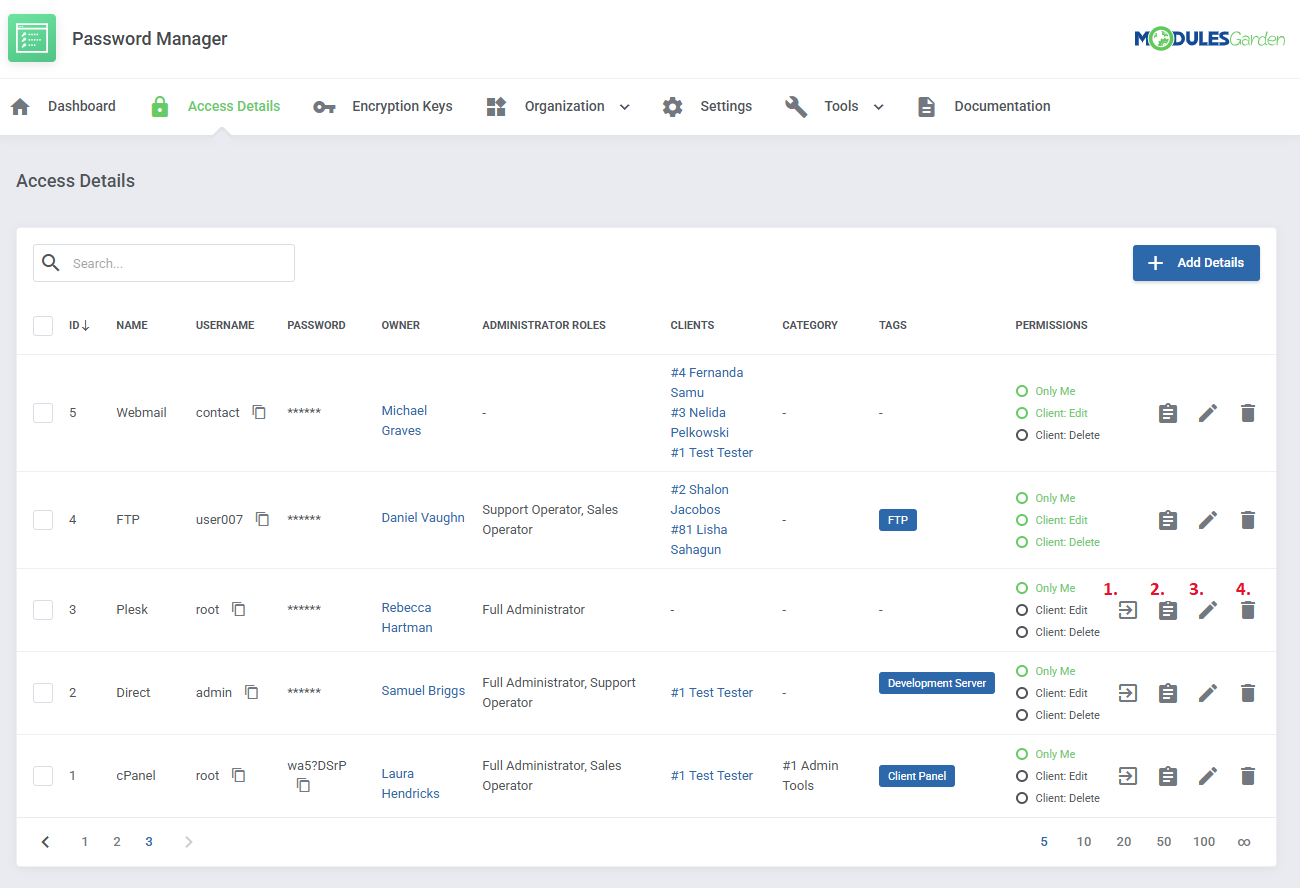
| Use action buttons to manage the entered access details.
1. Log into your website (if URL has been provided) |
|
Contacts
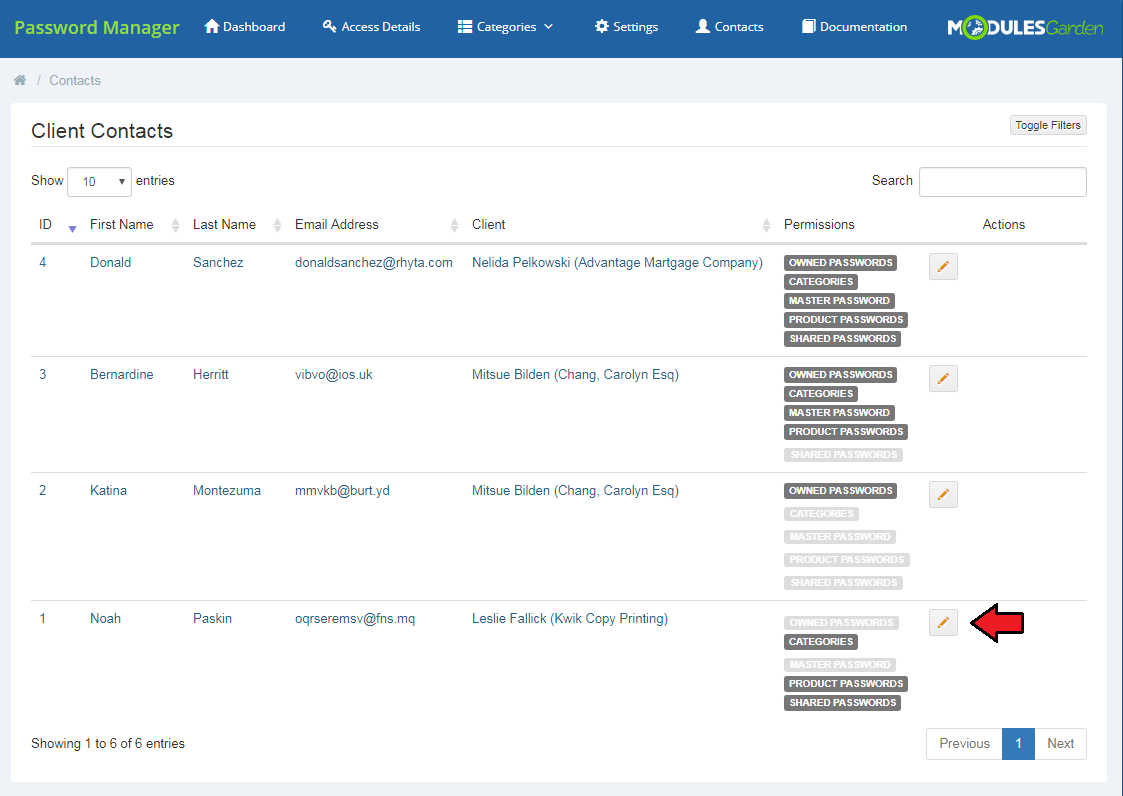
| In 'Contacts' , you can see and manage the permissions of clients' contacts/sub-accounts with regard to the access they shall have to the clients' passwords. |
|
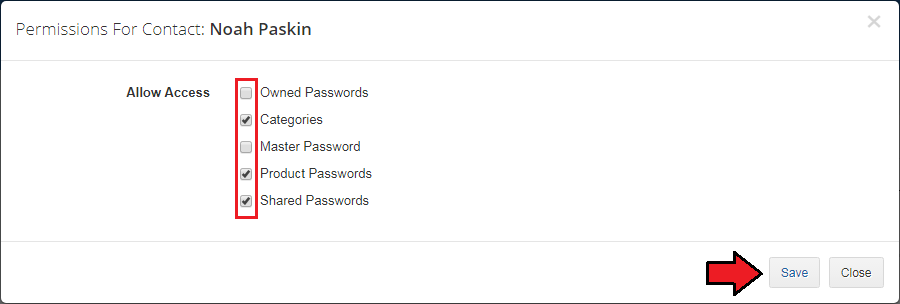
| If you want to change any permission, simply click the 'Edit' action. |
|
Dashboard
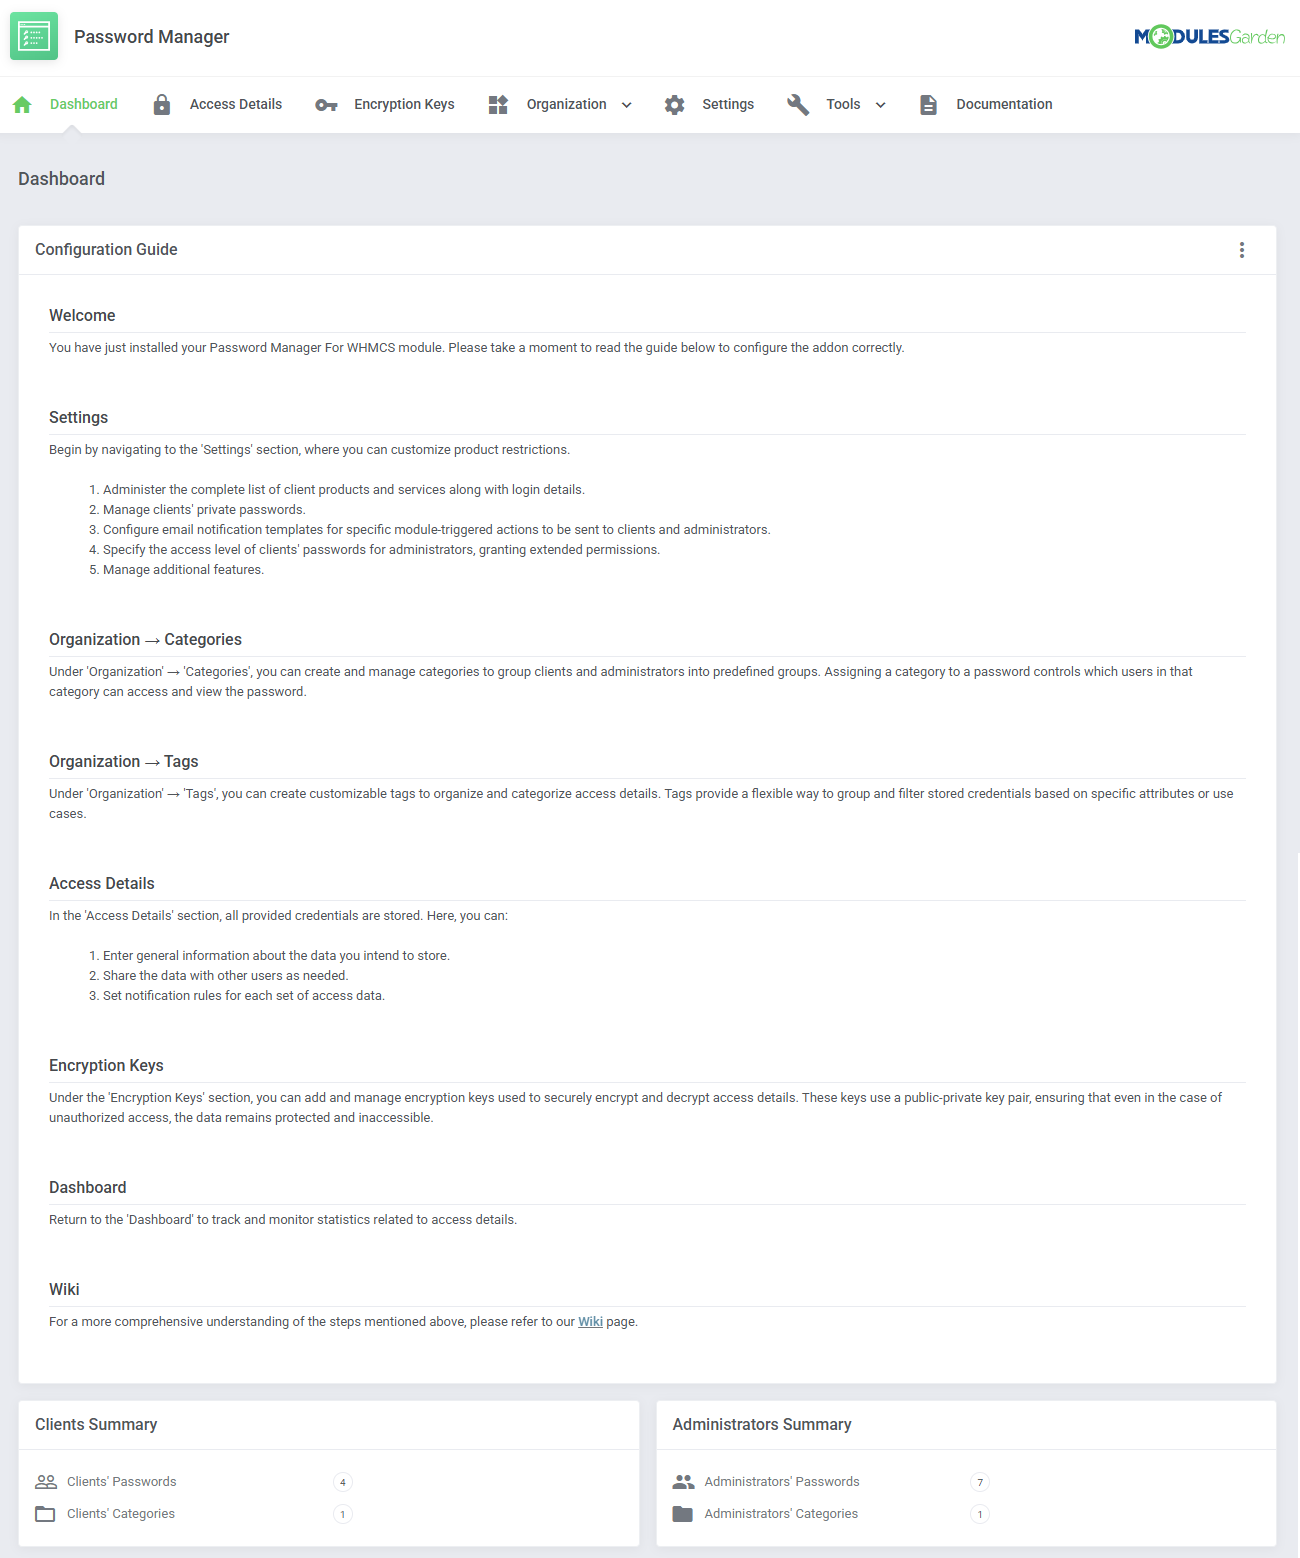
| A short summary on the clients' and administrators' access details and categories is available on the dashboard. |
|
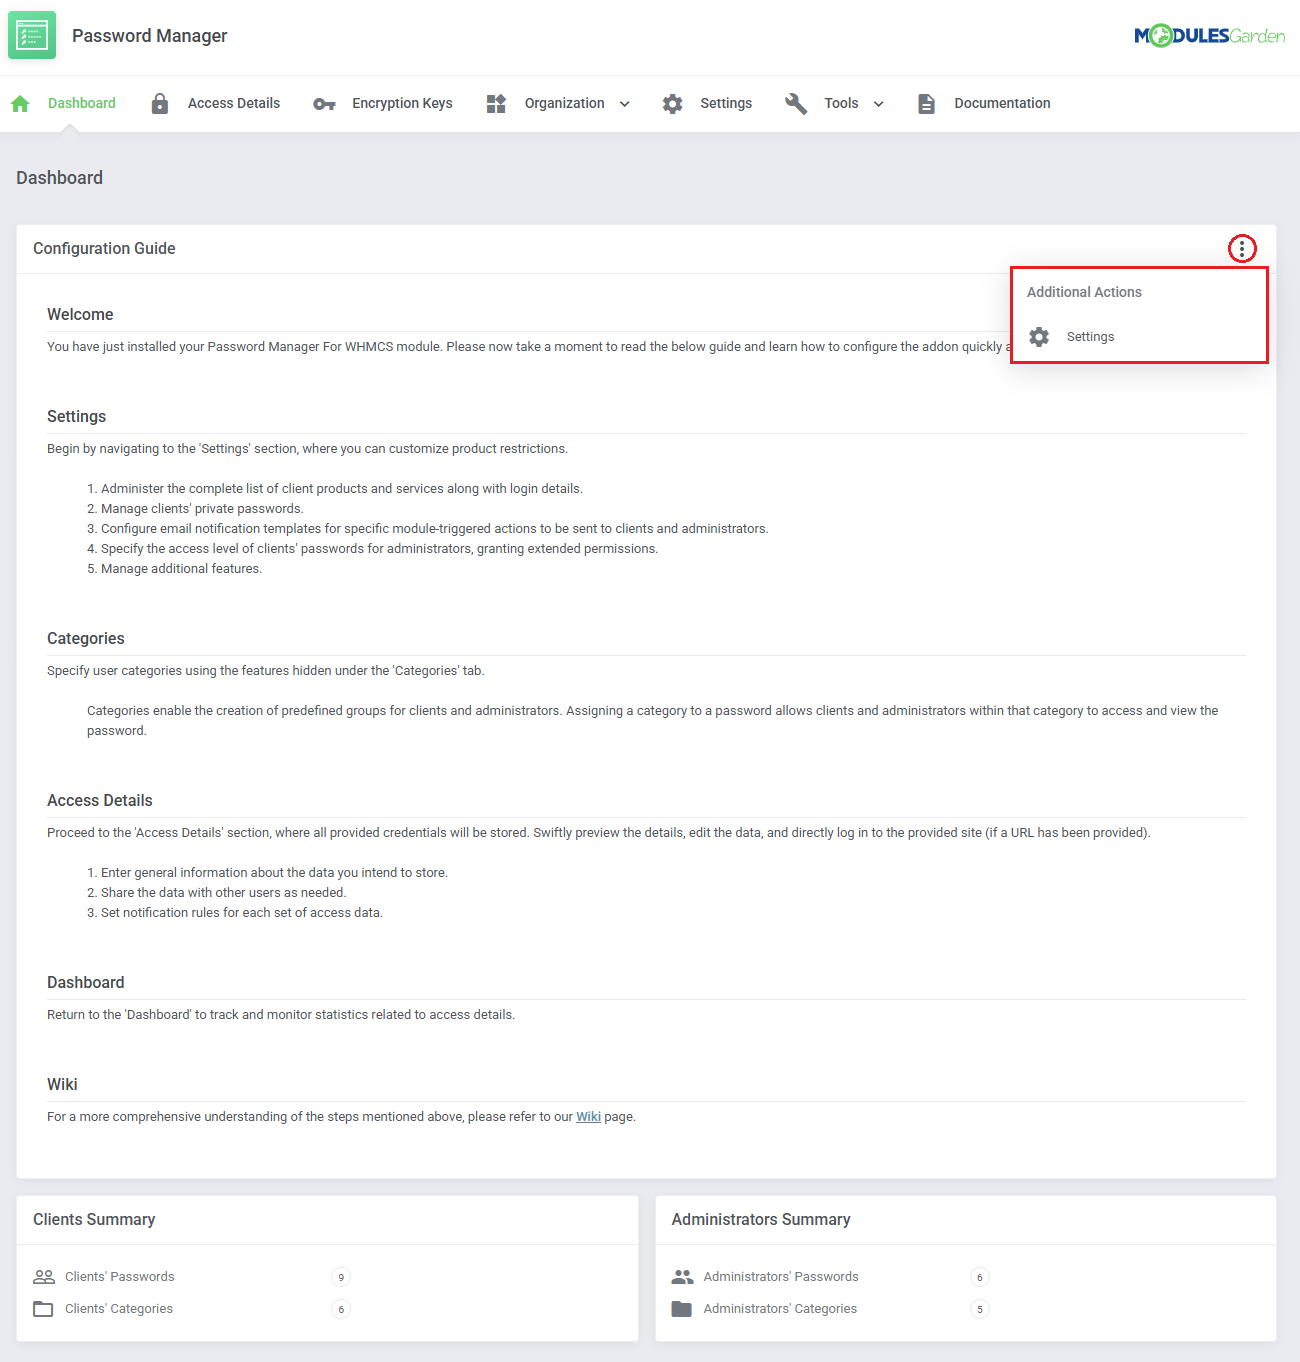
| The last tab in the addon is 'Documentation'. When pressed, it redirects you to this very site. |
|
Administrator Area Integration
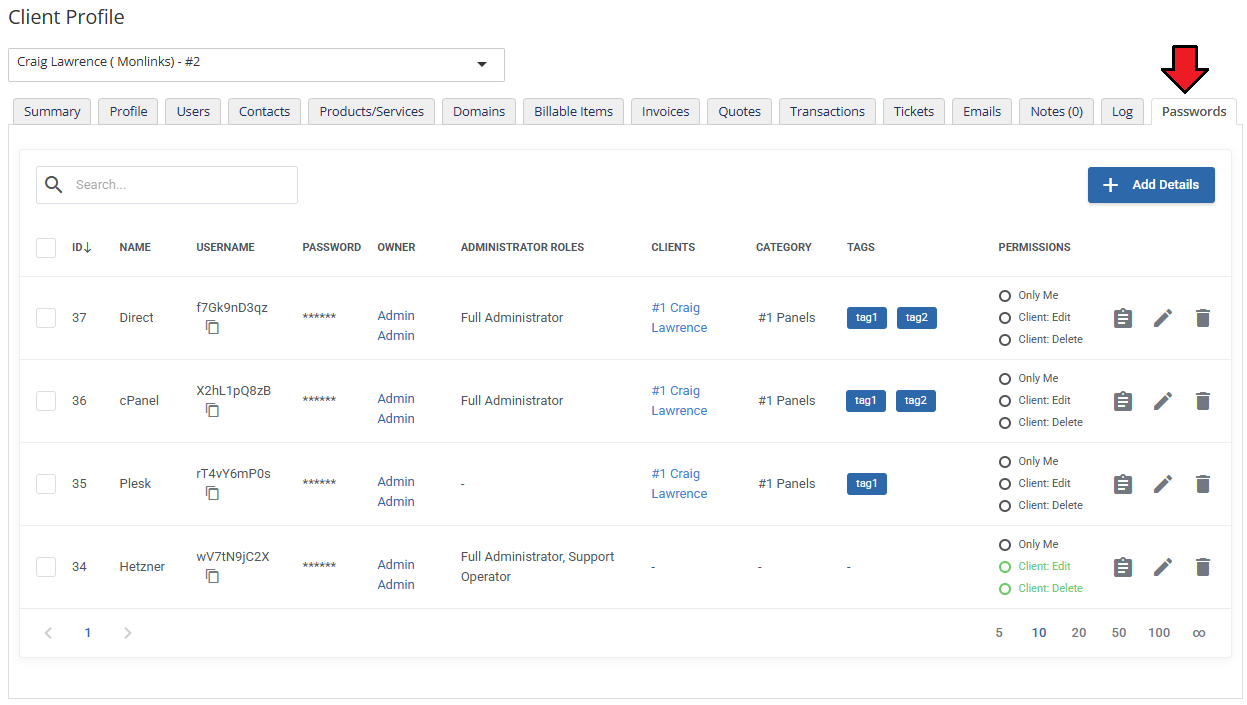
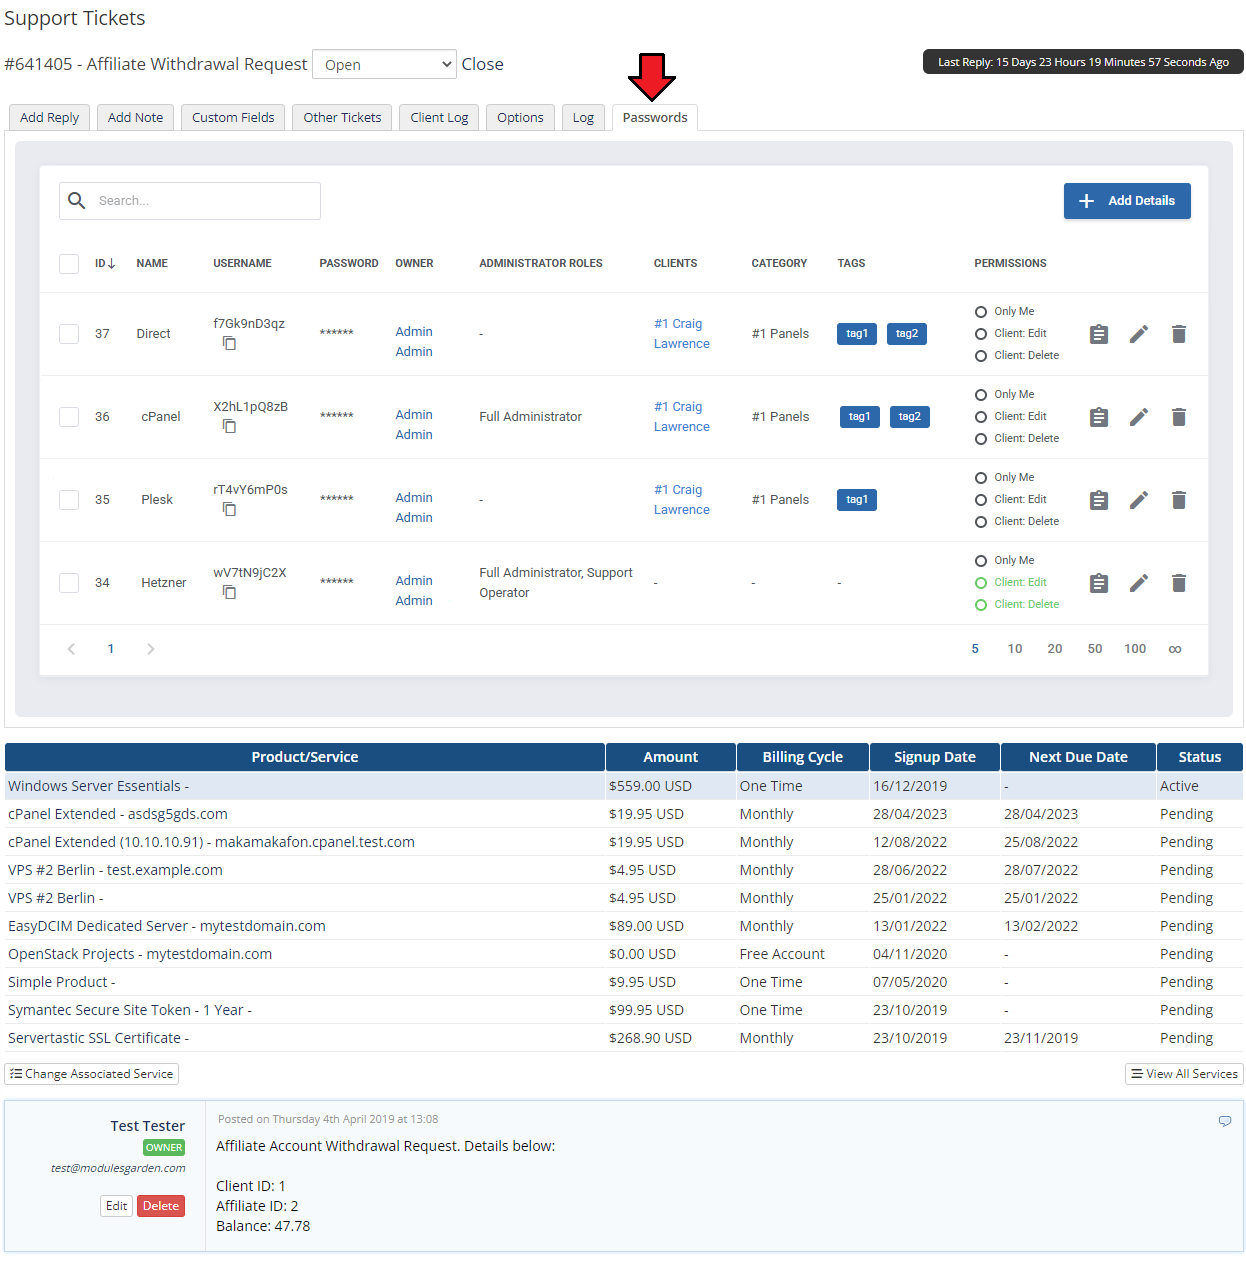
| Our module integrates with your administrator area as well as client area. Passwords of any client can be viewed in summary page as it is shown below, but only if you enable this option in 'Settings' section in the addon. |
|
| Your support operators are also able to access clients passwords from within ticket. As you may have noticed, these places allow them not only to see passwords, but also create new ones. |
|
Client Area
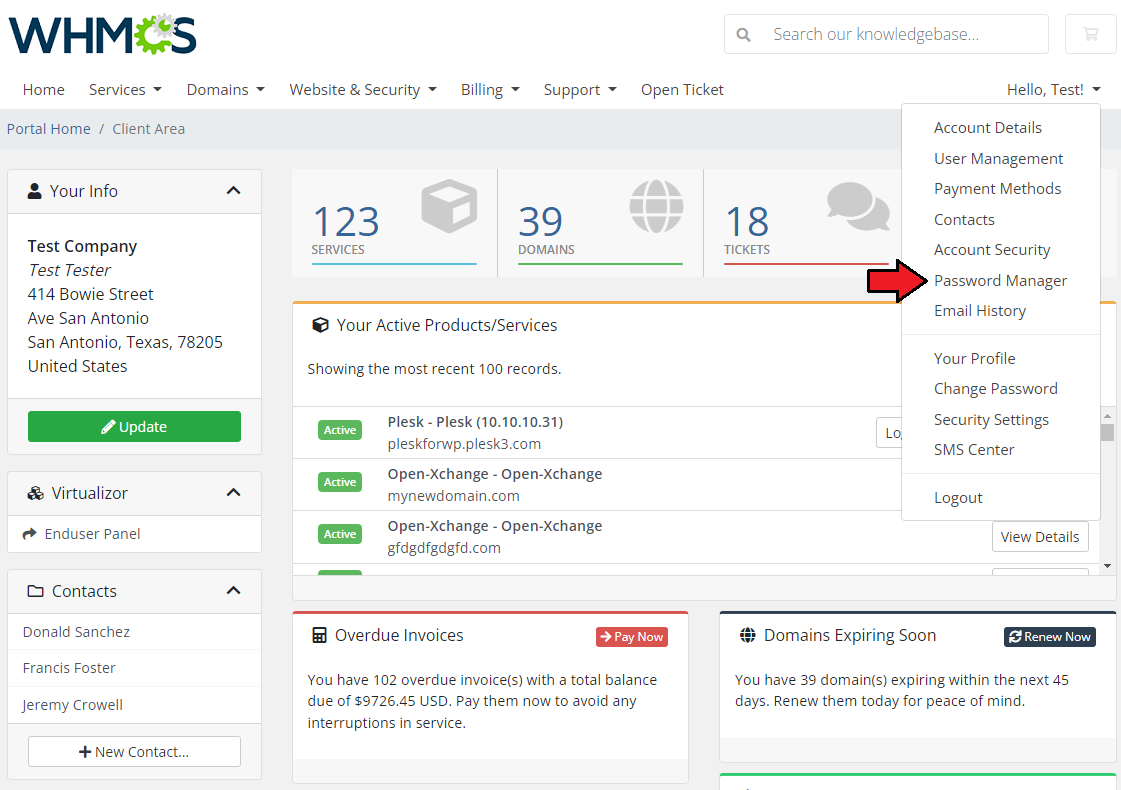
| Your clients can access client area password management page through 'Password Manager' button in navigation bar. To allow integration with client area, a proper option must be enabled in 'Addon' → 'Settings' → 'Other'. |
|
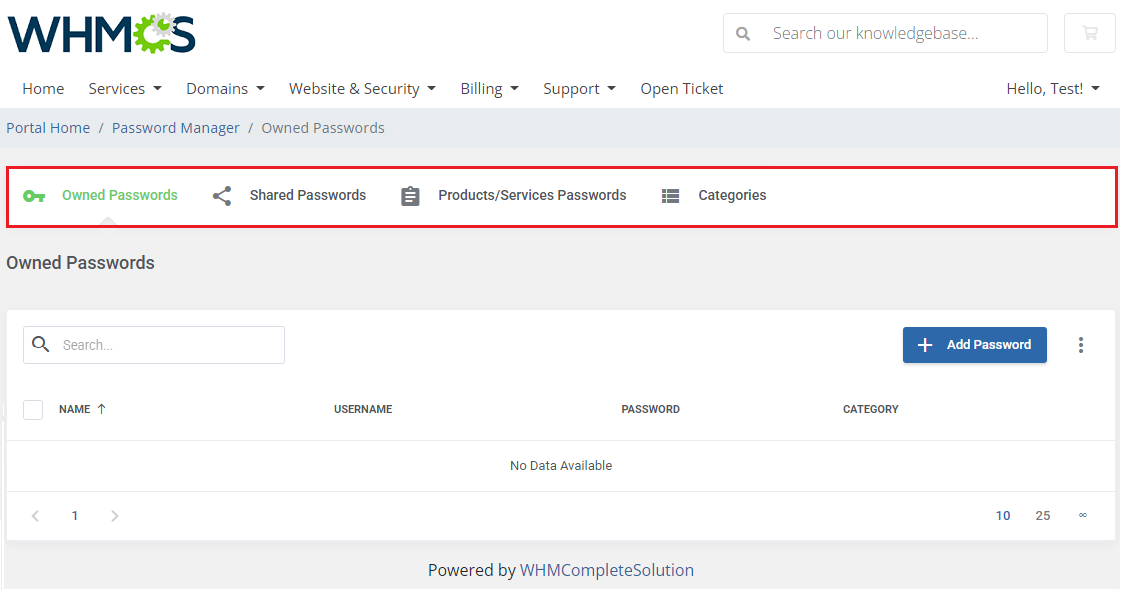
| In 'Password Manager', your clients can view access details depending on the settings configured by the administrator and level of access allowed for the client. Underneath you can see a client's area with full access to any option given. As you can see, there are five sections available: 'Owned Passwords', 'Shared Passwords', 'Product Passwords' , 'Categories' and 'Contacts'. |
|
Owned Passwords
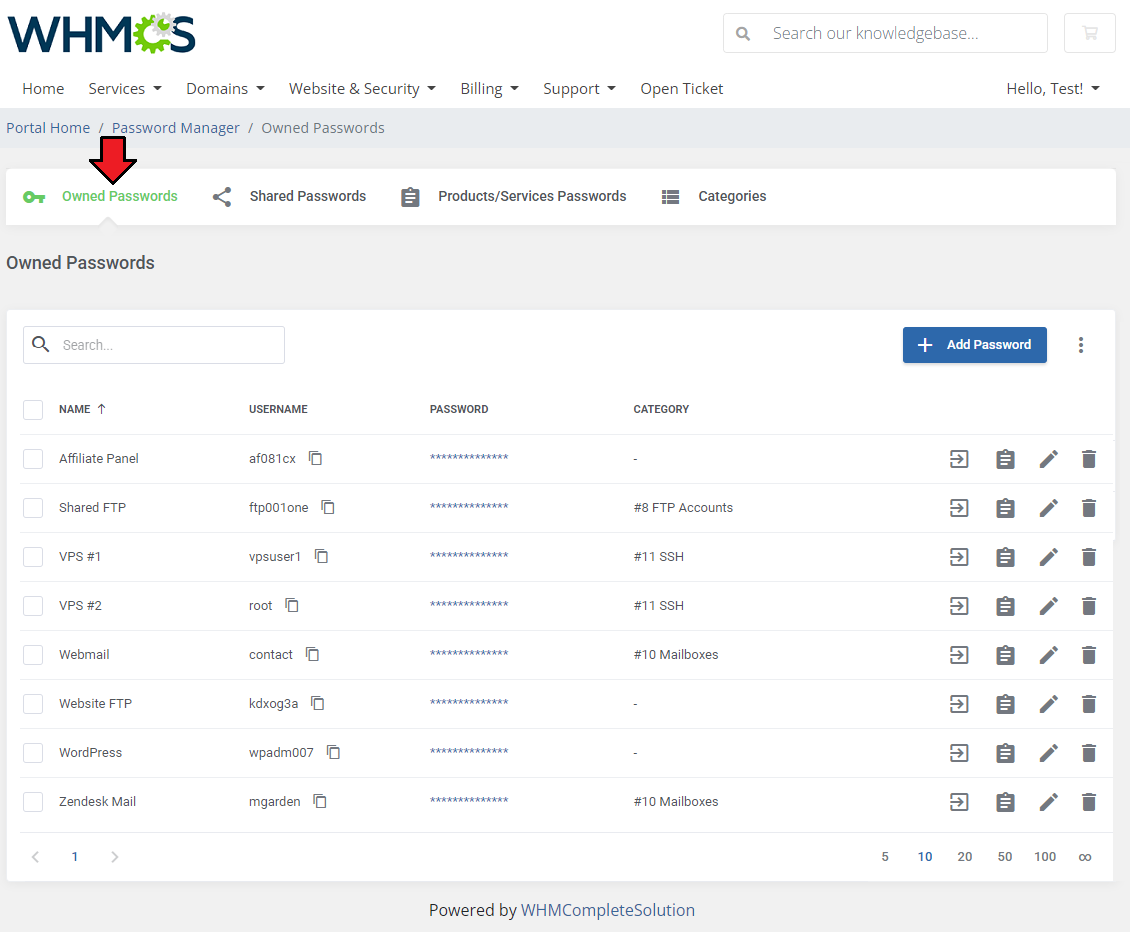
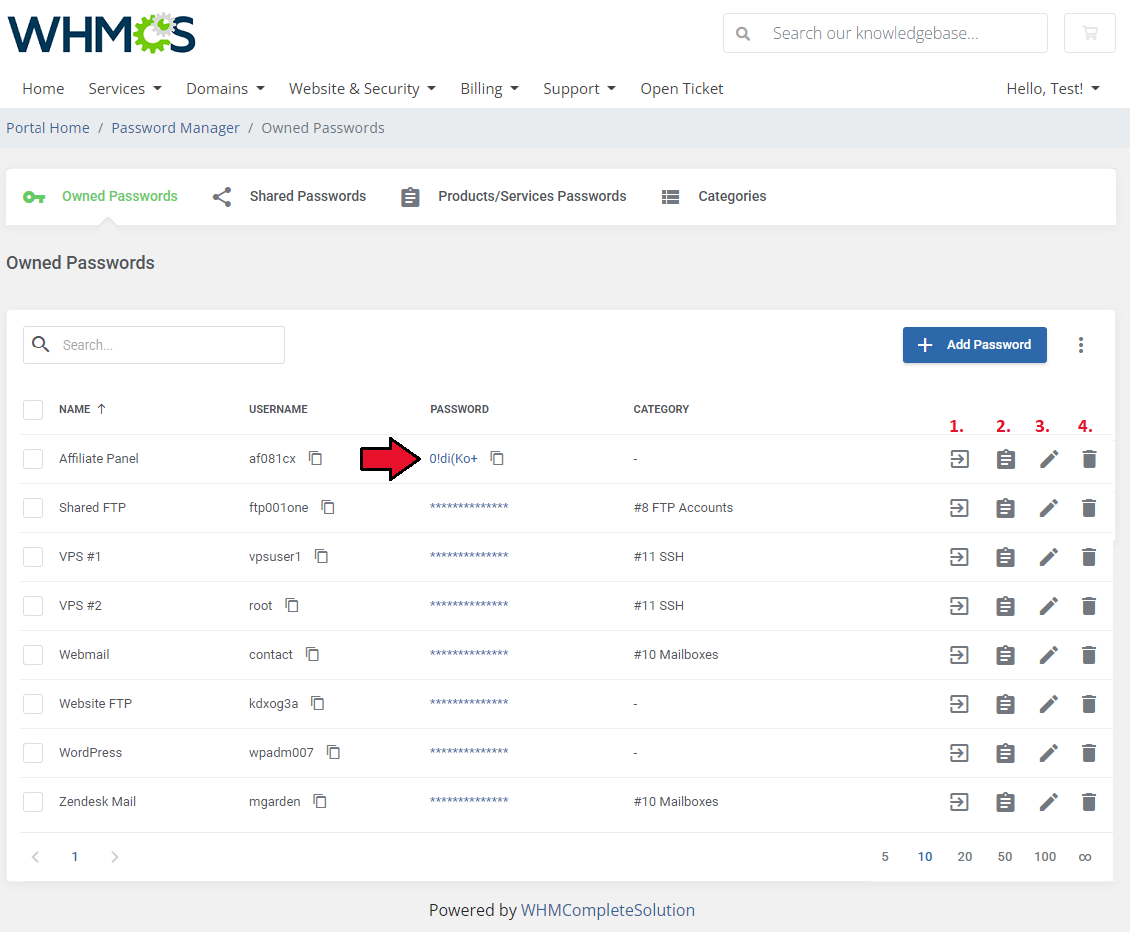
| If you enabled 'Client Private Passwords' your clients will be allowed to view, manage and create their own access details. Please note that 'Shared' column with information on whether the details are allowed for administrators or not is available only if you select 'Shared Access' in the addon's settings. |
|
| Preview the password and use action buttons to manage the access details:
1. Log into URL |
|
Add Access Details
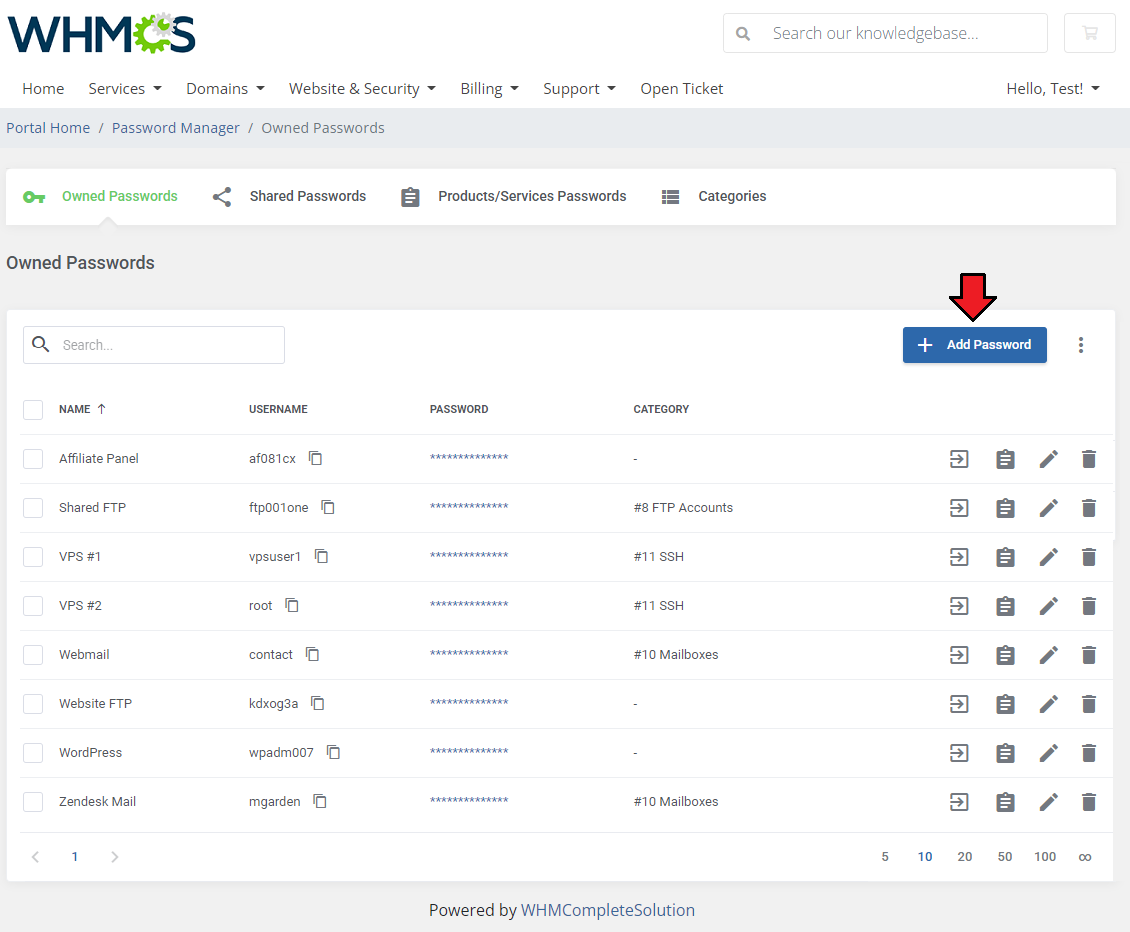
| To create access details, press 'Add New' button as shown on the following screen. |
|
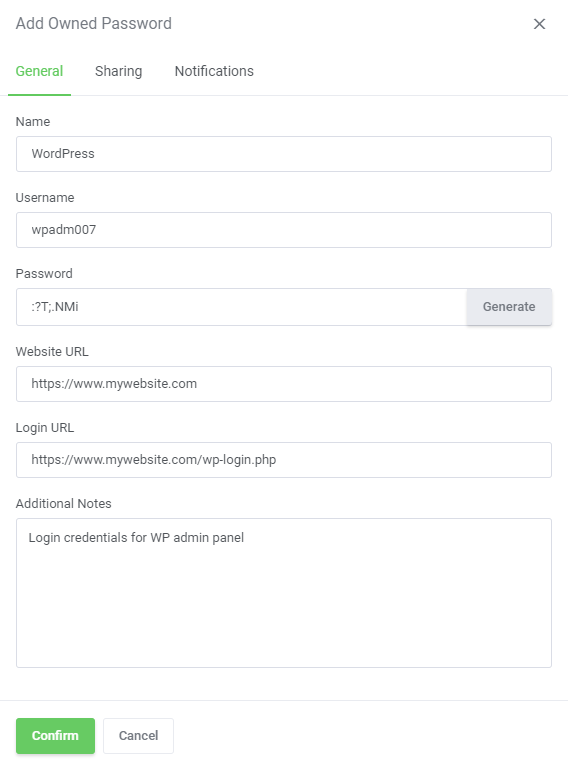
| Type the new password name and enter access details into 'Username' and 'Password'. You can also generate random password. Optionally, provide 'Website URL' and 'Log In' URL to be allowed to log into your site directly from 'Password Manager' page. |
|
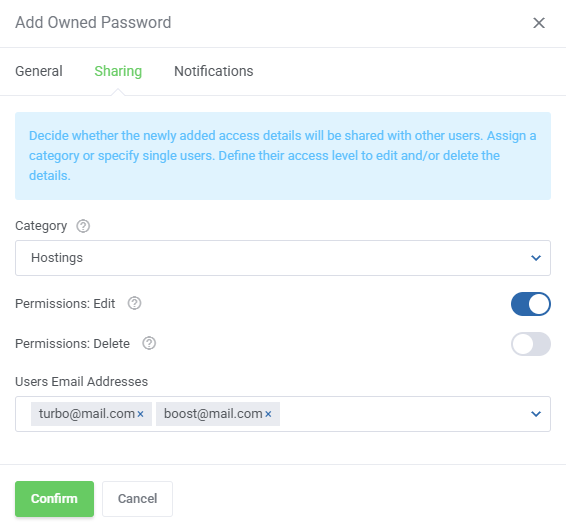
| You may now move to 'Sharing' section. There, you can decide which category the new access details will be assigned to. Choose one from the dropdown menu or select 'Unassign' to leave it without any category. Depending on the category you select, the access details will be available for those specified in its configuration. Additionally, define which actions can be made on shared passwords. |
|
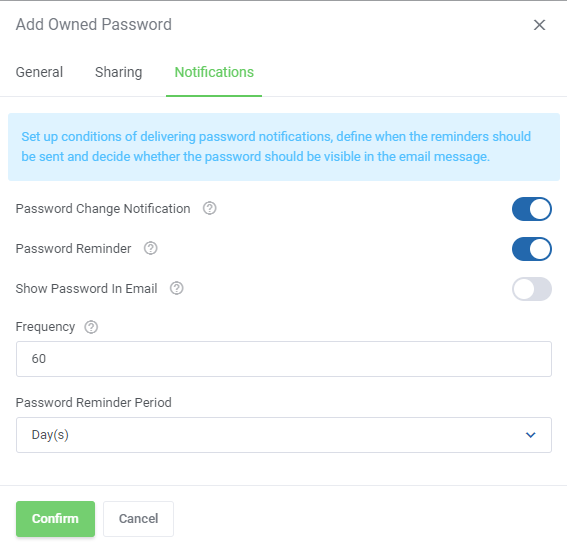
| Finally, in ' Notifications' section, set up conditions of delivering password notifications. Enable this option if needed and define when the reminders should be sent. You can also define whether you wish to receive the new password in the message. Do not forget to press 'Add' to finish. |
|
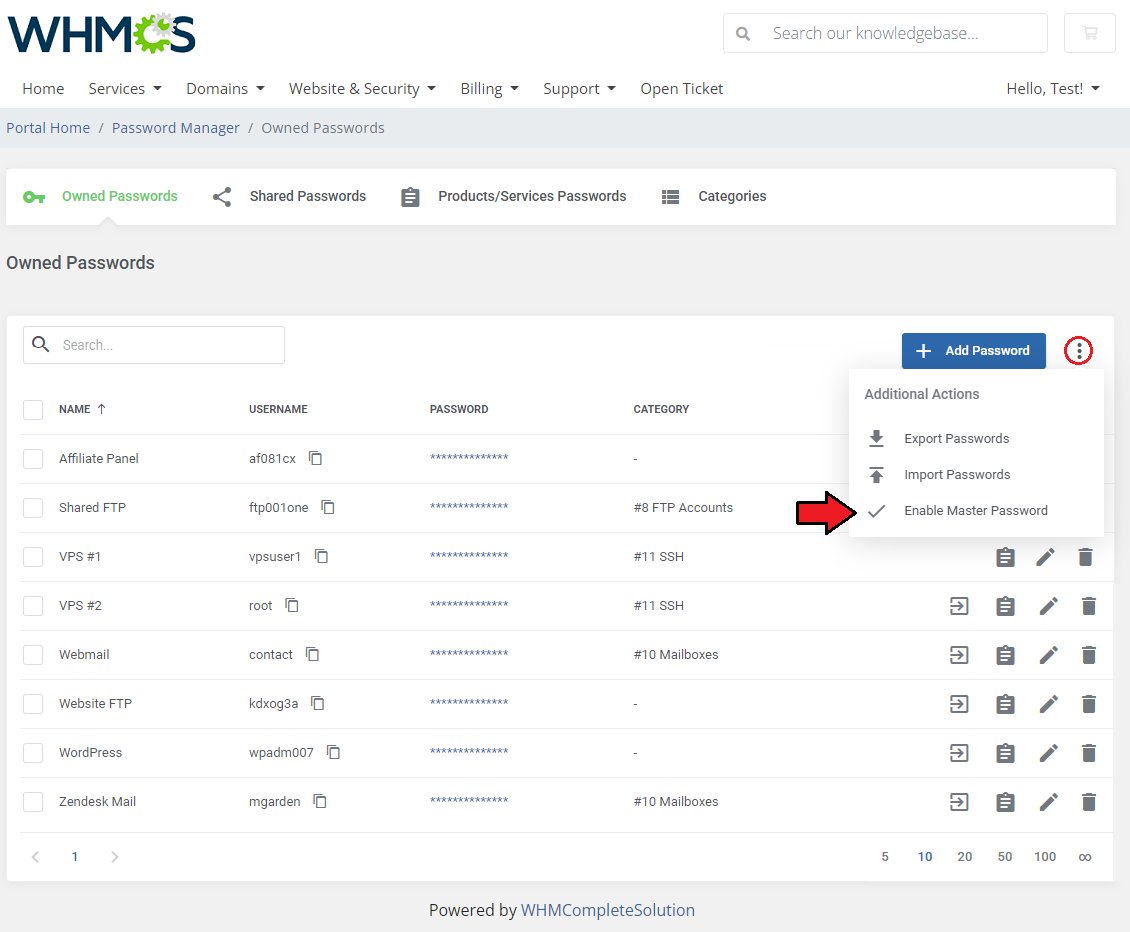
| If the administrator has enabled the 'Master Password' option in 'Client Private Passwords' , the clients will have the ability to set an additional protection for their owned passwords. |
|
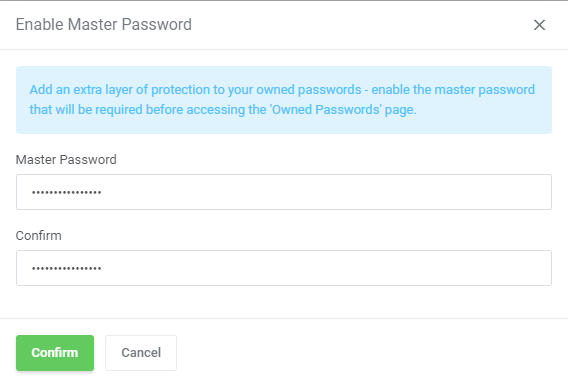
| Simply provide and confirm a new password that will protect the access to owned passwords. Note - if you lose or forget this password, you will also lose the access to your saved credentials in this section! |
|
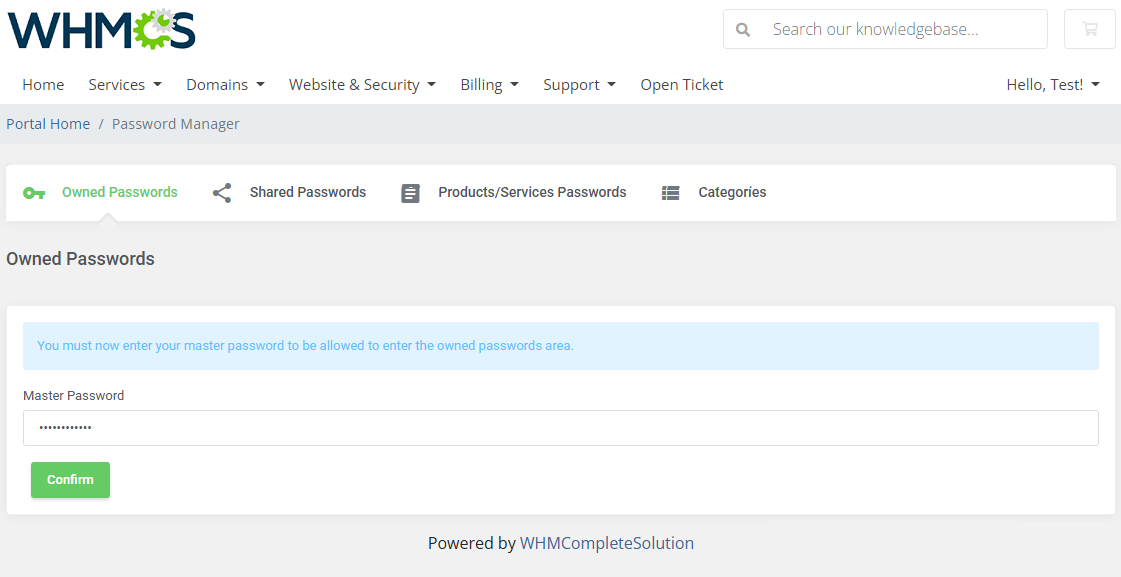
| From now on, access to the 'Owned Passwords' section will require the master password. |
|
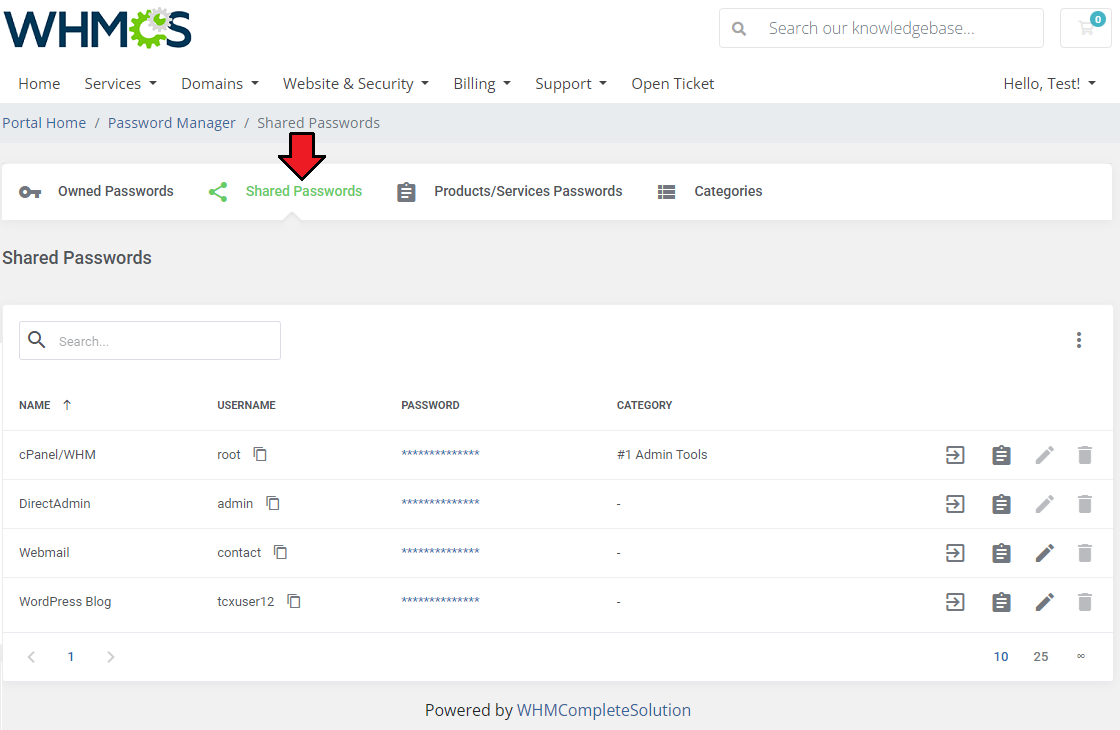
| Under 'Shared Passwords' your clients can view and manage access details that administrators shared with them, gave permission to view. |
|
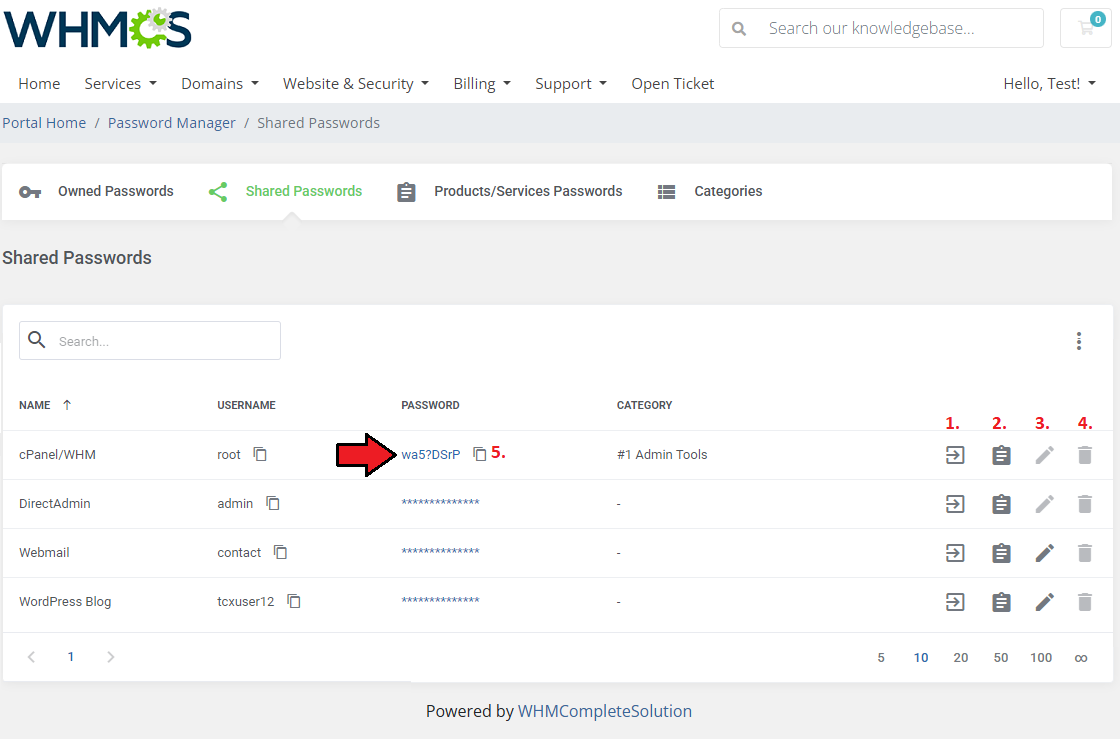
| Preview the password and use action buttons to manage the access details:
1. Log into URL if it has been provided |
|
Product Passwords
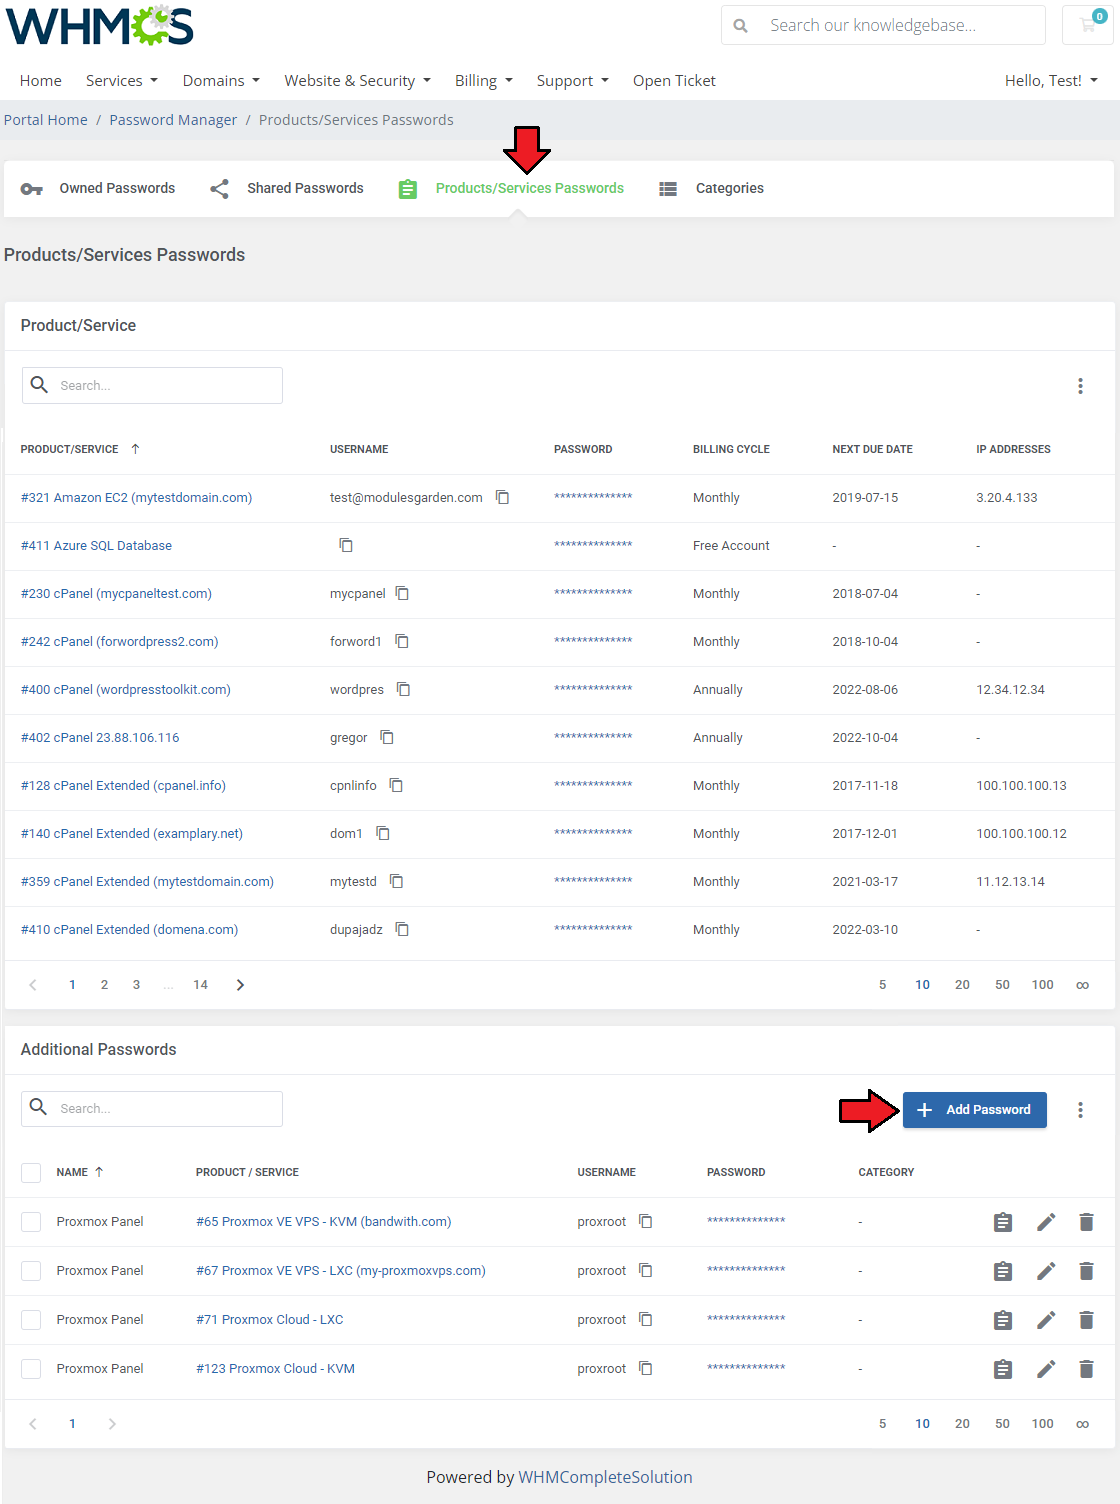
| 'Product Passwords' section includes any access details to your client's products that they own. For convenience, clients can also assign additional passwords to selected services similarly like in 'Owned Passwords' section. Remember that as an administrator, you have to enable this option in the 'Addon' → 'Settings'→ 'Client Product Password'. |
|
Categories
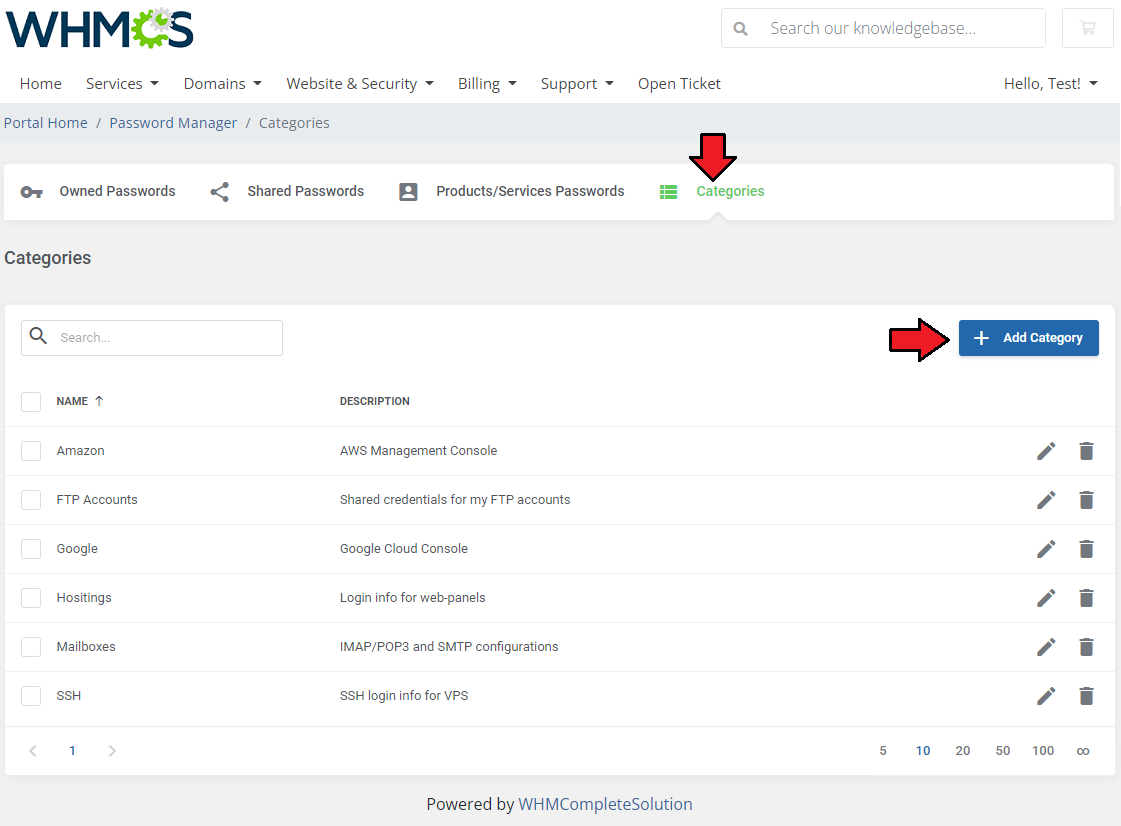
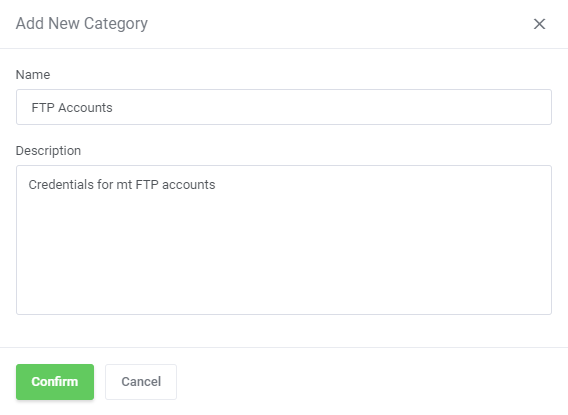
| Move to 'Categories' tab. There is a list of created by the client categories which are used to allocate passwords for sharing. To create a new one, press 'Add Category' button. |
|
| Fill in category name and description and press 'Add'. Created category can be seen by this client as well as administrators in the administrator area. |
|
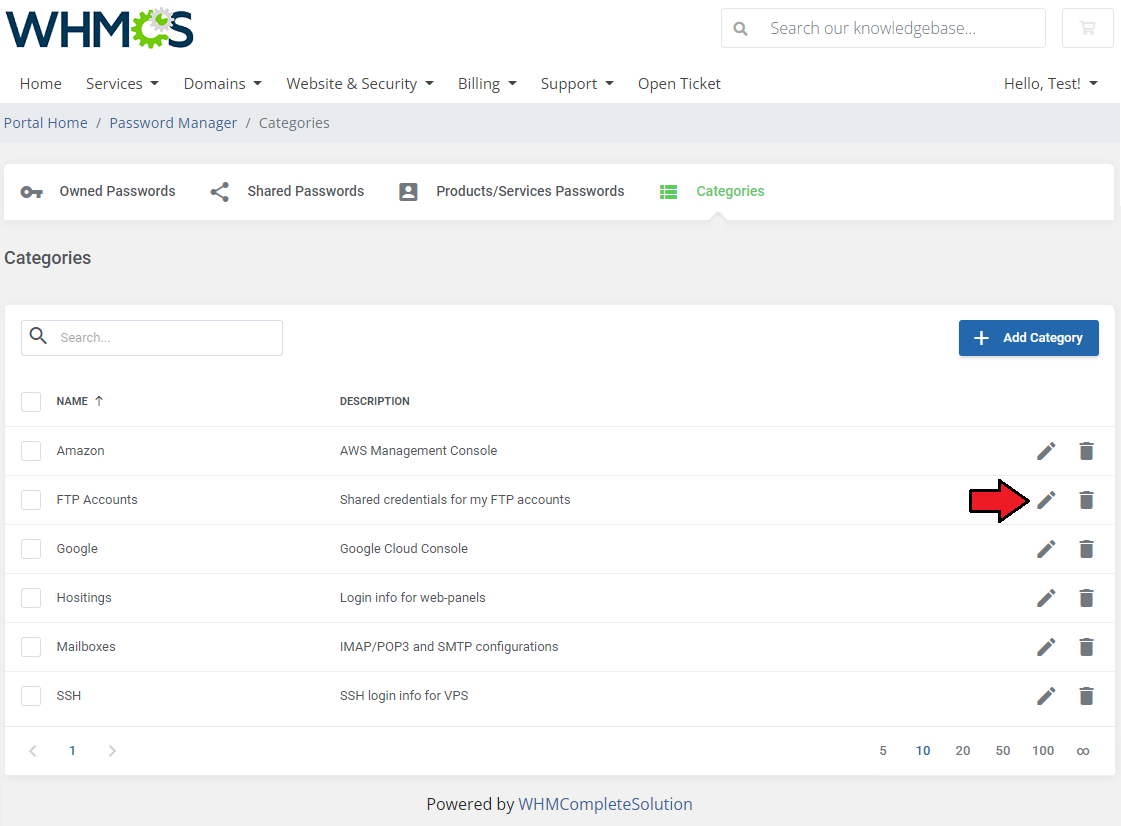
| Clients may edit their categories, delete and add new ones any time they wish. |
|
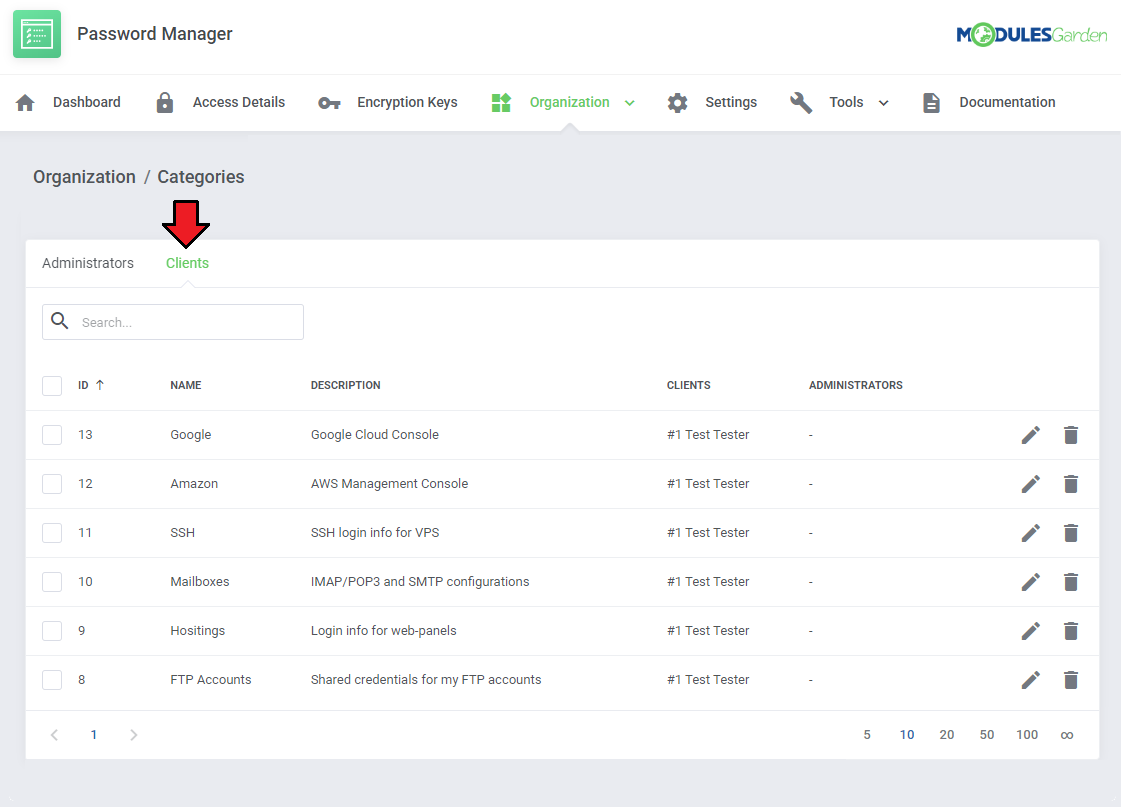
| Any categories created by clients will be automatically visible for administrators in the addon where you can manage them. |
|
Contacts
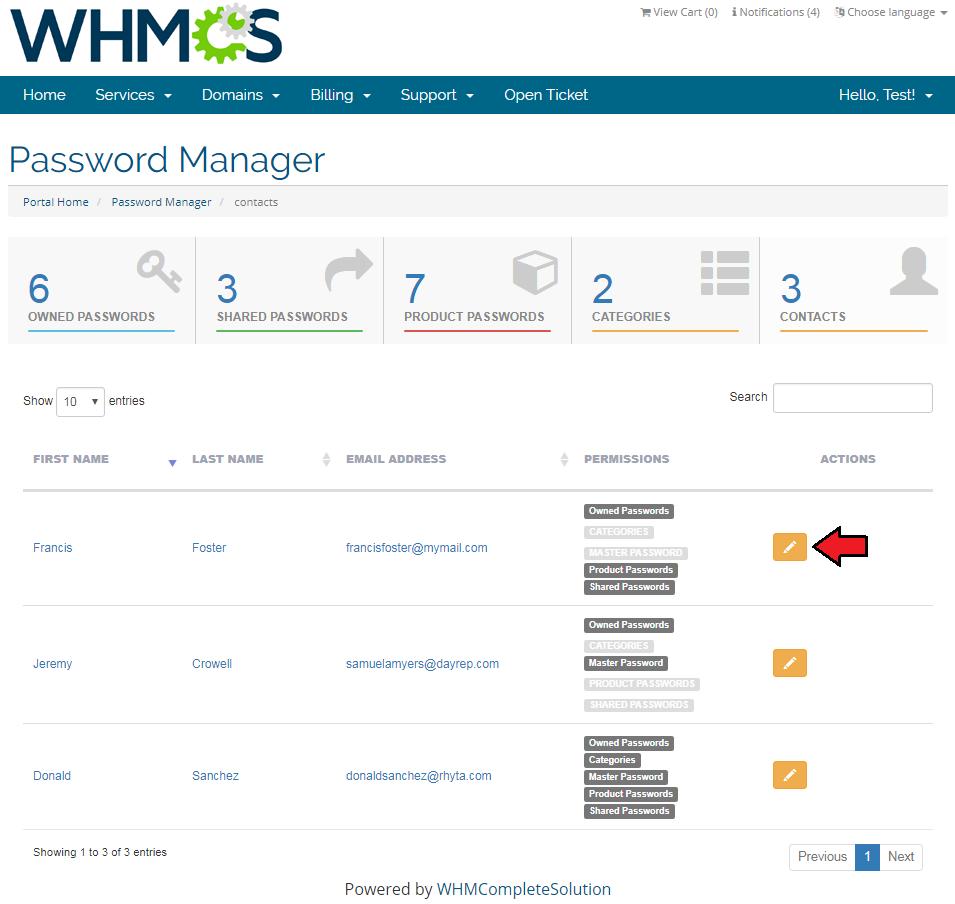
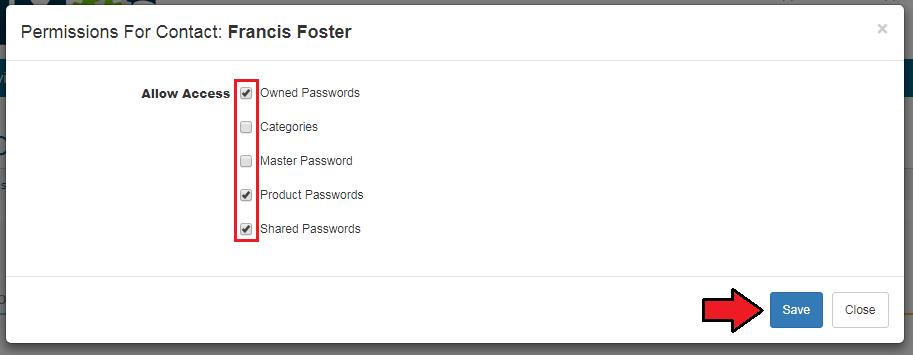
| If the clients have contacts/sub accounts, their access can be restricted to the selected sections of Password Manager. To proceed, just select the contact and press Edit. |
|
| In the opened window, select which sections chosen contacts may have access to. |
|
Tips
1. Any additional options under 'Addons' → 'Passwords Manager' → 'Settings' → 'Other' are by default enabled on the module activation.
|
2. Password Manager For WHMCS ensures full protection of your access details using its own security tools and WHMCS internal two way encryption system.
|
| 3. As this module supports templates system, any changes made in the module's templates files will be saved after the upgrade process. |
Common Problems
| 1. When you have problems with connection, check whether your SELinux or firewall does not block ports. |