OVHcloud VPS And Dedicated Servers For WHMCS
From ModulesGarden Wiki
(Difference between revisions)
|
|
| Line 151: |
Line 151: |
| | *'''General Info:''' | | *'''General Info:''' |
| | {| | | {| |
| − | |style="padding: 10px 0px 0px 30px;"|✔ Supports OVH VPS And Dedicated Servers | + | |style="padding: 10px 0px 0px 30px;"|✔ Integrated With <u>Server Allocator For WHMCS</u> - Automatic Assignment Of Most Suitable Servers To Products [https://www.modulesgarden.com/products/whmcs/server-allocator (read more)] |
| | + | |} |
| | + | {| |
| | + | |style="padding: 0px 0px 0px 30px;"|✔ Supports OVH VPS And Dedicated Servers |
| | |} | | |} |
| | {| | | {| |
Revision as of 12:23, 12 July 2019
OVH VPS & Dedicated Servers For WHMCS will let you automatically supply VPS and dedicated servers powered by OVH, as well as So you Start and Kimsufi.
The module will allow your clients not only to remotely control the status of a machine, but also access the KVM and IMPI console, and update reverse DNS paths.
In addition, you will easily decide whether an existing server can be reused by another customer, in case the previous one no longer needs it.
|
| ✔ Create/Suspend/Unsuspend/Terminate Server
|
| ✔ Resize Server By Changing Size Slug For Server Plan
|
| ✔ Create/Suspend/Unsuspend/Terminate Server
|
| ✔ Power On/Power Off/Shut Down/Reboot Server
|
| ✔ Reboot Server In Rescue Mode
|
| ✔ Access KVM/IPMI Console (OVH)
|
| ✔ View Server Status And Details
|
| ✔ Monitor Server Protocols Status (VPS)
|
| ✔ View/Create/Restore/Delete Snapshots (VPS)
|
| ✔ View Assigned IP Addresses And Update Reverse DNS Paths
|
| ✔ View Assigned Disks With Bandwidth And Space Limit
|
| ✔ View Traffic Statistics Graph (Dedicated Servers)
|
| ✔ Configure Product Details For:
|
| ✔ Choose Features Available In Client Area
|
| ✔ Generate Configurable Options
|
| ✔ Choose Welcome Email, Password Reset And Rescue Reboot Email Templates
|
| ✔ Choose Usable OVH Server Location, Country And Type
|
| ✔ Choose Existing Servers To Be Reused By Another Client
|
| ✔ Power On/Power Off/Shut Down/Reboot Server
|
| ✔ Reboot Server In Rescue Mode
|
| ✔ Access KVM/IPMI Console (OVH)
|
| ✔ View Server Status And Details
|
| ✔ View/Create/Restore/Delete Snapshots (VPS)
|
| ✔ View Assigned Disks With Bandwidth And Space Limit (VPS)
|
| ✔ View Assigned IP Addresses And Update Reverse DNS Paths
|
| ✔ View Traffic Statistics Graph (Dedicated Servers)
|
| ✔ Choose Server Parameters During Order
|
| ✔ Receive Email Notifications After Server Creation, Password Reset And Rescue Reboot
|
| ✔ Operating System Template
|
| ✔ Operating System Template
|
| ✔ Operating System Language
|
| ✔ Integrated With Server Allocator For WHMCS - Automatic Assignment Of Most Suitable Servers To Products (read more)
|
| ✔ Supports OVH VPS And Dedicated Servers
|
| ✔ Supports "So you Start" And "Kimsufi" Brands
|
| ✔ Supports Plan Upgrades (VPS)
|
| ✔ Supports PHP 7.1 Up To PHP 7.3
|
| ✔ Supports WHMCS Template Six
|
| ✔ Supports WHMCS V7.5 And Later
|
Installation and Configuration
This tutorial will show you how to successfully install and configure OVH VPS & Dedicated Servers For WHMCS.
We will guide you step by step through the whole installation and configuration process.
|
Installation
| 1. Log in to our client area and download the module.
|
2. Upload and extract the extension into the main WHMCS directory.
Extracted files in your WHMCS directory should look like this:
|
4. When you install OVH VPS & Dedicated Servers For WHMCS for the first time, you have to rename the 'license_RENAME.php' file.
The file is located in 'modules/servers/OvhVpsAndDedicated/license_RENAME.php'. Rename it from 'license_RENAME.php' to 'license.php'.
|
5. In order to configure your license key, you have to edit the previously renamed 'license.php' file.
Enter your license key between the quotation marks as presented on the following screen.
You can find your license key in our client area → 'My Products'.
|
6. Now, set up the 'storage' folders as recursively writable.
These folders are available at:
- '/your_whmcs/modules/servers/OvhVpsAndDedicated/' and
- '/your_whmcs/modules/addons/OvhVpsAndDedicated/'
|
7. The last step is setting up the cron job.
- Mail cron - will be used to send emails to clients after Server creation, reinstallation and entering the rescue mode.
You will find more information on this topic in the product configuration section. We suggest the cron to run every 5 minutes:
php -q /your_whmcs/modules/servers/OvhVpsAndDedicated/cron/cron.php mail:run
Remember to replace 'your_whmcs' with your WHMCS root path.
|
Activation of Addon
8. Now you have to activate the module in your WHMCS system.
Log in to your WHMCS admin area. Click 'Setup' and find 'Addon Modules'.
Afterwards, find 'OVH VPS And Dedicated Servers For WHMCS' and press the 'Activate' button.
|
9. In the next step you need to permit access to this module.
To do so, click on the 'Configure' button, tick the desired admin roles and press 'Save Changes'.
|
10. OVH VPS And Dedicated Servers For WHMCS has been successfully installed!
Access the addon under 'Addons' → 'OVH VPS And Dedicated'.
|
Configuration of Server
11. Now, we will show you how to configure a new product.
Go to 'Setup' → 'Products/Services' → 'Servers' and press 'Add New Server' .
|
12. Next, enter your server name and select 'OVH' from the 'Type' field.
Now, provide your:
- Application Key
- Application Secret
- Consumer Key
Then select Location and Country corresponding with the server offered by the administrator and finally, select the server type.
Note: For "So You Start" and "Kimsufi" select 'Dedicated'.
Check the connection when ready and, if it is successful, save the changes.
|
| API details are generated depending on the location where you own the OVH account. These might be:
To create an application, please move directly here and create the necessary keys.
In case you encounter any issues with generating your API details, please contact your provider. To learn more about API, please refer to the documentation.
|
|
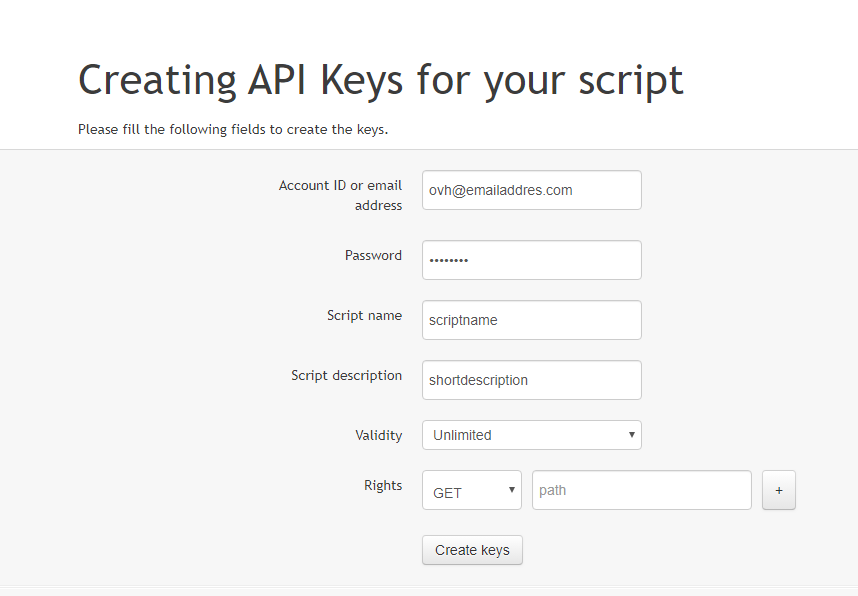
You may also skip the 'Consumer Key' field in the server configuration (Application Key and Secret must be provided).
After saving the changes, the module will redirect you, in such case, to your provider's page where the key can be generated at once. Please log in and select 'Unlimited' in the key validity field.
The 'Consumer Key ' will be automatically generated and entered in the appropriate field in the server's configuration page in the module.
|
| 13. It is time to create a server group. To do so, click on 'Create New Group'.
|
| 14. Enter a name, click on your previously created server, press 'Add' and afterward 'Save Changes'.
|
Configuration of Product
15. In order to create and configure a product, go to 'Setup' → 'Products/Services' → 'Products/Services'.
Click on 'Create a New Group'.
|
| 16. Enter your product group name and press 'Save Changes'.
|
17. Once you have a product group, you can create a new product.
To do so, first click on 'Create a New Product'.
|
18. Afterward, choose your product type, enter your product name and choose the product group from the dropdown menu. Press 'Continue'.
|
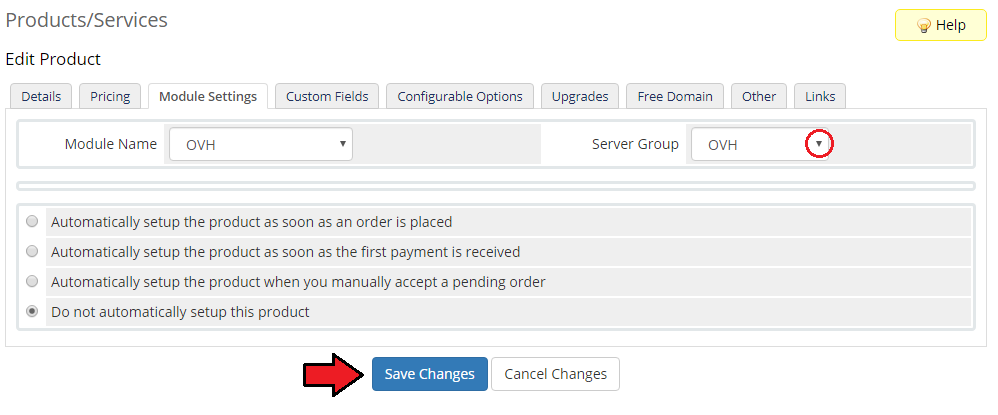
19. Now, go to the 'Module Settings' section, choose your previously created server group from the dropdown menu.
The module should automatically save and reload the settings. If not, click on the 'Save Changes' option manually.
|
|
20. Now, you can start configuring the settings of the Server you sell.
Bear in mind that the settings vary, depending on the server type selected.
Underneath we will describe the settings configuration for 'OVH VPS' and 'OVH Dedicated Servers' in details.
Note that settings for 'So You Start' and 'Kimsufi' products are very much alike the 'OVH Dedicated Servers' once, so you may surely base on them while configuring these products.
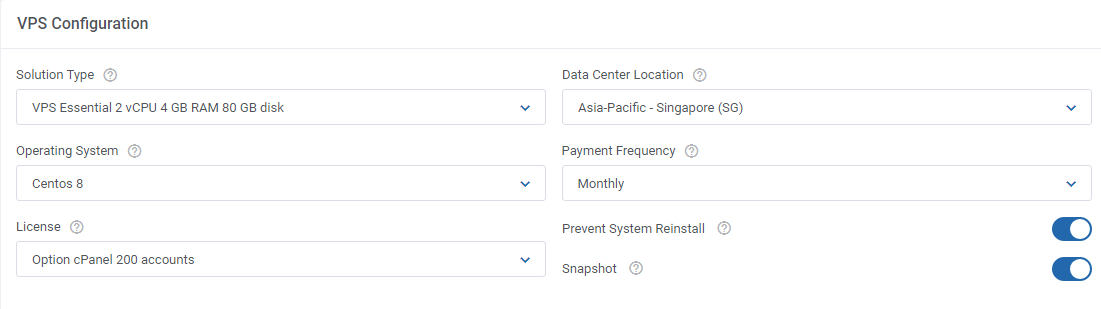
OVH VPS configuration settings:
- VPS Type - Select a VPS, each type is adapted for specific use
- VPS Cloud
- VPS Cloud RAM
- VPS SSD
- Solution Type - choose from the available the one that will suit your needs the most
- Operating System - choose the OS, it can still be reinstalled at any time if such an option is enabled for clients
- GNU/Linux
- Windows (Cloud/Cloud RAM only)
- Image - select the image of the system or system with a preinstalled application, such as cPanel or WordPress, that will be installed on the server
- Version - version of operating system or application to be installed
- Language - language of operating system or application to be installed
- Datacenter Location - choose where the server shall be located on the OVH data center
- Duration Term - choose frequency of renewals
- Snapshot - toggle to allow clients to capture an image of the server at a given time, option used to quickly restore the VPS or secure it before making changes
- License - this field appears when Windows OS or an image with Plesk or cPanel is selected, decide whether a paid license shall be also added to the order
|
|
OVH Dedicated Server configuration settings:
- Operation System Template - choose template of operation system to install
- Operating System Language - choose language of installed operation system
|

|
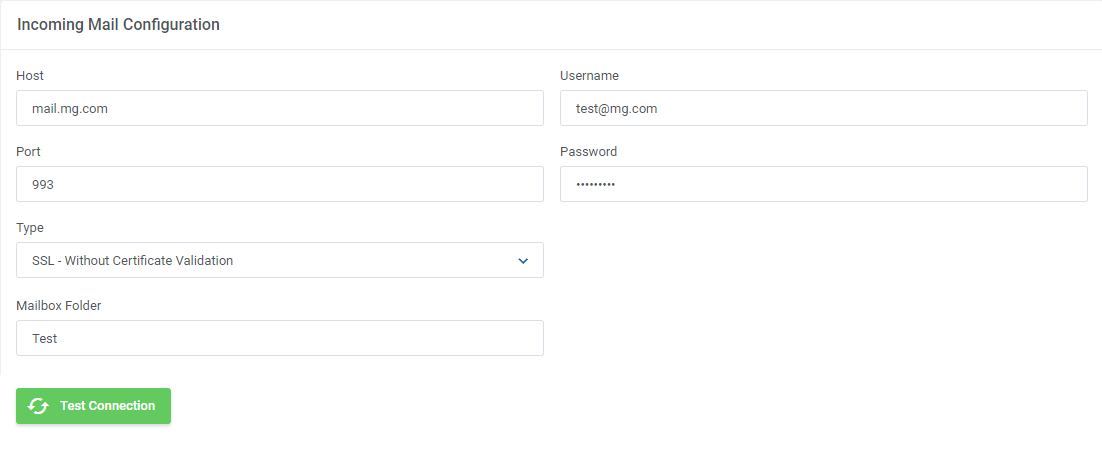
21. Afterward, set up incoming mail configuration.
Due to API limitations, all emails with server credentials can only be sent to your OVH / Kimsufi / So You Start email address set in the panel.
This applies to messages with credentials sent after creating the server as well as messages sent after reinstallation.
The solution to this problem is email piping that will be used to receive messages sent to your OVH mailbox and then forwarded through the templates further to your WHMCS clients.
Note: Even though the module filters the received messages in your mailbox, we recommend that you use a separate mailbox for your main OVH VPS and Dedicated Servers profile account to avoid any issues with non-OVH content.
After setting up the dedicated mailbox, provide its valid credentials below and test whether the connection has been established correctly.
Note: There is available an option to 'Disable Certificate Validation'. Please toggle this option ONLY if you are having troubles with the connection. The certificate validation will be omitted when connecting to an email box.
|
|
The cron set during the last stage of the module's installation should periodically check that mailbox for OVH messages.
If any new emails are received, they will be then converted to your email template and sent to the corresponding client.
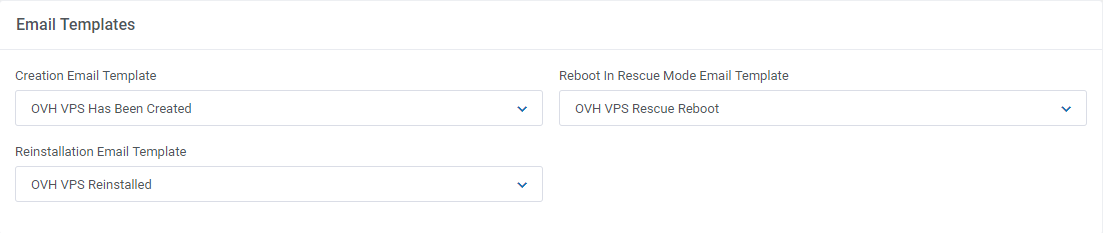
The default email templates for product creation, reinstallation and reboot in rescue mode can be specified below. Take a look at the Tips section - tip no 1, and check the templates' types.
|
|
22. Automation Settings section includes detailed actions that will be automatically performed by the module in several situations:
- Action On Service Suspension - decide what to do with the server in situation when the module command: Suspend has been triggered
- Stop (VPS)
- Do Nothing (VPS)
- Do Nothing (Dedicated Server)
- Reboot To Rescue (Dedicated Server)
- Terminate (Dedicated Server)
- Reinstall (Dedicated Server)
- Auto Pay With Preferred Method - toggle to make payments for orders automatically with a preferred payment method in OVH Panel
- Auto Assign VPS/Dedicated Server To Reusable On Termination - when terminated, the server will be in fact cleared and added to the queue to be selected as a reusable by other clients
- Waive Retractation Period - toggle to waive retractation period on OVH orders
|

|
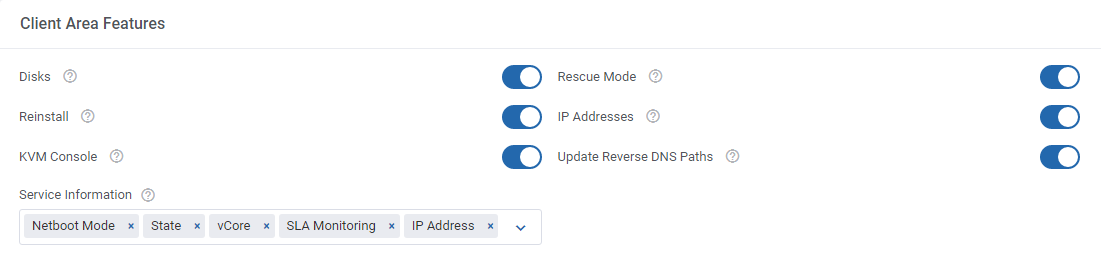
23. The following section is dedicated to the Client Area Features.
You will find here numerous options that can be enabled and then will be available to your clients in their client area. Please note that some options are available for VPS only, Dedicated Server only and some for both of them:
- Snapshot (VPS only) - if enabled, clients are granted access to snapshot section
- Disks (VPS only) - if enabled, clients are allowed to view disks attached to their servers with specified limits
- Reinstall - if enabled, clients are allowed to reinstall the server in the client area
- KVM/IPMI Console - if enabled, clients are allowed to manage their server using KVM console
- Rescue Mode - if enabled, clients are allowed to reboot the server in rescue mode
- IP Addresses - if enabled, clients are allowed to view IP addresses assigned to the server
- Update Reverse DNS Paths - if enabled, reverse DNS can be updated in the client area, 'IP Addresses' must be previously enabled to use his option
- Traffic Statistics Graph (Dedicated Server only) - if enabled, clients are allowed to view traffic graph
Important: Access to KVM/IPMI Console and Traffic Statistics Graph is available for OVH only. "Kimsufi" and "So You Start" brands do not support them.
|
|
24. At the end of the configuration process, you can decide whether you want to generate configurable options for the product.
Configurable options can be used by your clients to select each Server parameters individually during order placement.
Otherwise, if configurable options are not defined, then the fixed parameters specified in the earlier configuration will be used instead.
|
If you decide to use configurable options, press on the 'Create' button and select which options you want to generate.
Note that the configuration for disabled options will still be taken from the configuration of the main product.
More information about how to use configurable options can be found here or in the official WHMCS documentation.
|
Configuration of Addon
You have just correctly created and customized a new product.
Go to 'Addons' → 'OVH VPS And Dedicated' in your WHMCS.
|
Servers
| 'Servers' section contains a list of your configured servers, you may quickly edit them directly from this site, simply press the edit icon.
|
| In the next step, press the marked icon to see a list of deployed machines.
|
There you will see all existing machines on this very server. Whether they are used by any client already or not.
Next to the machine name, there are details such as:
- its state
- displayed name
- assigned client (if there is any already)
- service assigned
- reusable toggle - for machines that can be used again by other clients without the necessity to terminate it first. If disabled, the machine can be simply terminated when not used.
If enabled, when the product is created for the next time by the client, this machine will be automatically reinstalled and assigned to this client.
In order to manually assign the machine to a client, simply press the marked on the screen button.
|
| Start typing to see a list of clients, then select existing service to assign.
|
| There is also a possibility to assign reusable products to the machine. These products will be permitted to use this machine.
|
Logs
| Go back to 'Logs' section, there you will see a list of all module actions, including errors, notifications etc.
|
Management
Admin Area
OVH VPS & Dedicated Servers For WHMCS allows you to monitor and manage your customer servers from the admin area of your WHMCS system.
This includes supervision of such features like:
- Module commands and service actions that enable you to manage server status and features
- Service information which provides you with the current status, resources and options set for the server
|
OVH VPS type
- Service Monitoring section with current statuses
- Created snapshot with a direct option to edit, restore and delete it
- List of IP addresses with option to update the reverse DNS path
- List of disks with any important details
|
OVH Dedicated Servers type:
- List of IP Addresses with option to update the reverse DNS path
- Traffic statistics graph
|
Ordering
Owing to configurable options, you are able to offer a product which your clients can tailor according to their needs.
Additionally, you are able to set up pricing for each configurable option, which makes your offer even more competitive.
After the order placement and successful VM creation, the server credentials will be sent to the client's email address according to the set cron execution intervals.
|
Client Area
Client area interface of 'OVH VPS & Dedicated Servers' should look like the one on the screen below.
As you can see, the control panel contains useful options required for managing a server.
The module allows your customers to easily power on/off, shutdown, reboot and reboot in rescue mode, reinstall and access console through pressing the corresponding buttons.
Clients can also view disks, create and restore snapshots, see IP addresses and view current traffic graphs.
Additionally, clients may view the current server parameters, resources as well as the assigned IP addresses.
OVH VPS client area view:
|
| OVH Dedicated Server client area view:
|
Service Actions
Access Console
In case of OVH VPS, clients might be granted access to KVM console.
Simply press its icon to open the console window.
|
For OVH Dedicate Servers, there is supported IPMI console.
Press the IPMI Access icon and then select type and TTL of the IPMI access to continue to the console.
|
Rescue Reboot
This action reboots the server in the rescue mode.
The moment you press the confirm button, new login details are sent in an email template selected in the product configuration (see point 21), with accordance to the cron settings.
Note: The action might last up to a few minutes, please be patient.
|
Reinstall
The action when triggered, causes the new login details to be sent in an email template selected in the product configuration (see point 21) and with accordance to the cron settings.
Note: Please be patient as reinstallation process is quite time consuming.
|
Service Management
Snapshot (VPS)
Use snapshots to save the current contents of the virtual machine memory.
You may use them later to restore the VM's settings.
Note: Creating a snapshot may take a while, so it will not appear on the list right away.
|
Allowed actions on the created snapshot:
- Edit the snapshot (description)
- Restore the snapshot to reverse the saved contents of the VM settings
- Delete the snapshot
- Create another snapshot.
Note: Keep in mind that you must have previously deleted the existing snapshot, as only one snapshot may exist at the time.
|
Disks (VPS)
When you enter this section, you will see a list of assigned disks with any details on them, such as:
- Type
- Size
- Bandwidth limit
- Free space threshold
- Status
|
IP Addresses
Under 'IP Addresses' you may see any assigned IP addresses, their version, type, location, MAC address and reverse DNS if specified.
Update the reverse DNS path of an IP address by pressing the marked button.
|
| Provide a new reverse DNS for the selected IP address. Press 'Confirm' when ready.
|
Traffic Statistics Graph (Dedicated Servers)
Open this section to see the graph with traffic statistics. You will find there outlined data on errors, packets and traffic downloads as well as uploads.
You may easily adjust the graph's view by changing the time scope of the displayed stats.
Note 1: Some of the mentioned option may not be visible on the graph until soma data are generated. This is applicable to the graph itself as well.
Note 2: "So You Start" and "Kimsufi" brands may not support graphs.
|
Tips
1. List of 'OVH VPs & Dedicated Servers' email templates included in the module:
- OVH VPS Has Been Created
- OVH VPS Rescue Reboot
- OVH VPS Reinstalled
- OVH Dedicated Reinstalled
- OVH Dedicated Server Rescue Reboot
In order to view the templates' content and edit it, please move to WHMCS → Setup → Email Templates.
More detailed information on templates can be found in the official documentation.
|
Update Instructions
Essential guidance through the process of updating the module is offered here.
Keep in mind there is a quick and easy option in our client area that will let you upgrade the license of your module to an open source version at any time - and at a lower price!
To take advantage of it, simply use the License Upgrade button located on the product's page and a discounted invoice will be generated automatically.
|
Common Problems
| 1. When you have problems with connection, check whether your SELinux or firewall does not block ports.
|


