Google Cloud Virtual Machines For WHMCS
From ModulesGarden Wiki
(Difference between revisions)
|
|
| Line 1: |
Line 1: |
| | + | <meta name="keywords" content="google cloud virtual machines for whmcs, google cloud virtual machines configuration, whmcs google cloud virtual machines management, whmcs google cloud virtual machines installation, whmcs google cloud virtual machines common problems, about whmcs google cloud virtual machines, whmcs google cloud virtual machines documentation, whmcs google cloud virtual machines faq, whmcs google cloud virtual machines help, whmcs google cloud virtual machines guide, whmcs google cloud virtual machines wiki, whmcs google cloud virtual machines tutorial, whmcs google cloud virtual machines tips, whmcs google cloud virtual machines wiki, google vps, google instance, google instances, google vm, google virtual private servers"></meta> |
| | + | <meta name="description" content="ModulesGarden Wiki Contains All The Information You Need About The Google Cloud Virtual Machines For WHMCS For WHMCS Module."></meta> |
| | | | |
| | =About [https://www.modulesgarden.com/products/whmcs/google-cloud-virtual-machines Google Cloud Virtual Machines For WHMCS]= | | =About [https://www.modulesgarden.com/products/whmcs/google-cloud-virtual-machines Google Cloud Virtual Machines For WHMCS]= |
Revision as of 12:49, 3 June 2020
Google Cloud Virtual Machines For WHMCS is a carefully and thoroughly planned module that allows you to provision and have charge of Google Cloud instances directly from your WHMCS system.
Your customers will be entitled to carry out all key actions such as start, stop, and reboot the server remotely.
What is more, you may easily oversee product features and monitor the status of each sold machine.
|
| ✔ Create/Suspend/Unsuspend/Terminate Server
|
| ✔ Start/Stop/Reboot Server
|
| ✔ View Server Status And Details
|
| ✔ View Assigned Private And Public IP Addresses
|
| ✔ Configure Product Details:
|
| ✔ Provide Hostname Prefix
|
| ✔ Choose Network And Network Tier
|
| ✔ Generate Configurable Options
|
| ✔ Run API Connection Test
|
| ✔ Start/Stop/Reboot Server
|
| ✔ View Server Status And Details
|
| ✔ View Assigned Private And Public IP Addresses
|
| ✔ Provide SSH Key During Order
|
| ✔ Red Hat Enterprise Linux
|
| ✔ Red Hat Enterprise Linux for SAP
|
| ✔ SQL Server on Windows Server
|
| ✔ SUSE Linux Enterprise Server
|
| ✔ SUSE Linux Enterprise Server for SAP
|
| ✔ Any Other OS Platforms When Made Available By Google Cloud
|
| ✔ Supports PHP 7.1 Up To PHP 7.3
|
| ✔ Supports WHMCS Template Six
|
| ✔ Supports WHMCS V7.8 And Later
|
Installation and Configuration
This tutorial will show you how to successfully install and configure Google Cloud Virtual Machines For WHMCS smoothly.
We will guide you step by step through the whole installation and configuration process.
|
Installation
| 1. Log in to our client area and download the module.
|
2. Upload and extract the extension into the main WHMCS directory.
Extracted files in your WHMCS directory should look like this:
|
3. When you install Google Cloud Virtual Machines For WHMCS for the first time, you have to rename the 'license_RENAME.php' file.
The file is located in '/yourWHMCS/modules/servers/GoogleCloudVirtualMachines/license_RENAME.php'. Rename it from 'license_RENAME.php' to 'license.php'.
|
4. In order to configure your license key, you have to edit the previously renamed 'license.php' file.
Enter your license key between the quotation marks as presented on the following screen.
You can find your license key in our client area → 'My Products'.
|
5. Now, set up the 'storage' folder as recursively writable.
This folder is available at '/yourWHMCS/modules/servers/GoogleCloudVirtualMachines/'.
|
Configuration of Server
Before you can go on, you must generate your access details. You will need them to connect with the server successfully.
Underneath, you will find instructions where to find them.
|
| 7. Now, go to the 'Credentials' section.
|
| 8. Click 'Create Credentials' .
|
| 9. Here, choose the 'Service account' type.
|
| 10. In this part, you need to complete your service account name. Once ready, press 'Create' .
|
| 11. It is time to specify service account permissions. So, select the 'Compute Admin' role from the dropdown menu and click 'Continue' .
|
| 12. In this step, you have to create your key. Click the appropriate button as shown below.
|
| 13. Select the key type. It is recommended to use the 'JSON' type. Finally, click 'Create' .
Important! Once you proceed, the file with your private key will be downloaded to your computer.
Remember to store this file in a secure place because it is not possible to regain the key when the file is lost.
|
| 14. Now, log in to your WHMCS and proceed to 'Setup' → 'Products/Services' → 'Servers' and press 'Add New Server'.
|
15. Next, enter your server 'Name' , 'Hostname' , 'IP Address' and select 'Google Cloud Virtual Machines' from the 'Module' field.
Now, provide your Google Cloud username and paste the content of the previously downloaded file with your key details in the 'Access Hash' field.
Finally, check the 'Test Connection' and save the changes.
|
| 16. It is time to create a server group. To do so, click on 'Create New Group' .
|
| 17. Enter a name, click on your previously created server, press 'Add' and afterward 'Save Changes' .
|
Configuration of Product
18. In order to create and configure a product, go to 'Setup' → 'Products/Services' → 'Products/Services'.
Click on 'Create a New Group'.
|
| 19. Enter your product group name and press 'Save Changes'.
|
20. Once you have a product group, you can create a new product.
To do so, first click on 'Create a New Product'.
|
21. Afterward, choose your product type, enter your product name, choose module and the product group from the dropdown menus. Press 'Continue'.
|
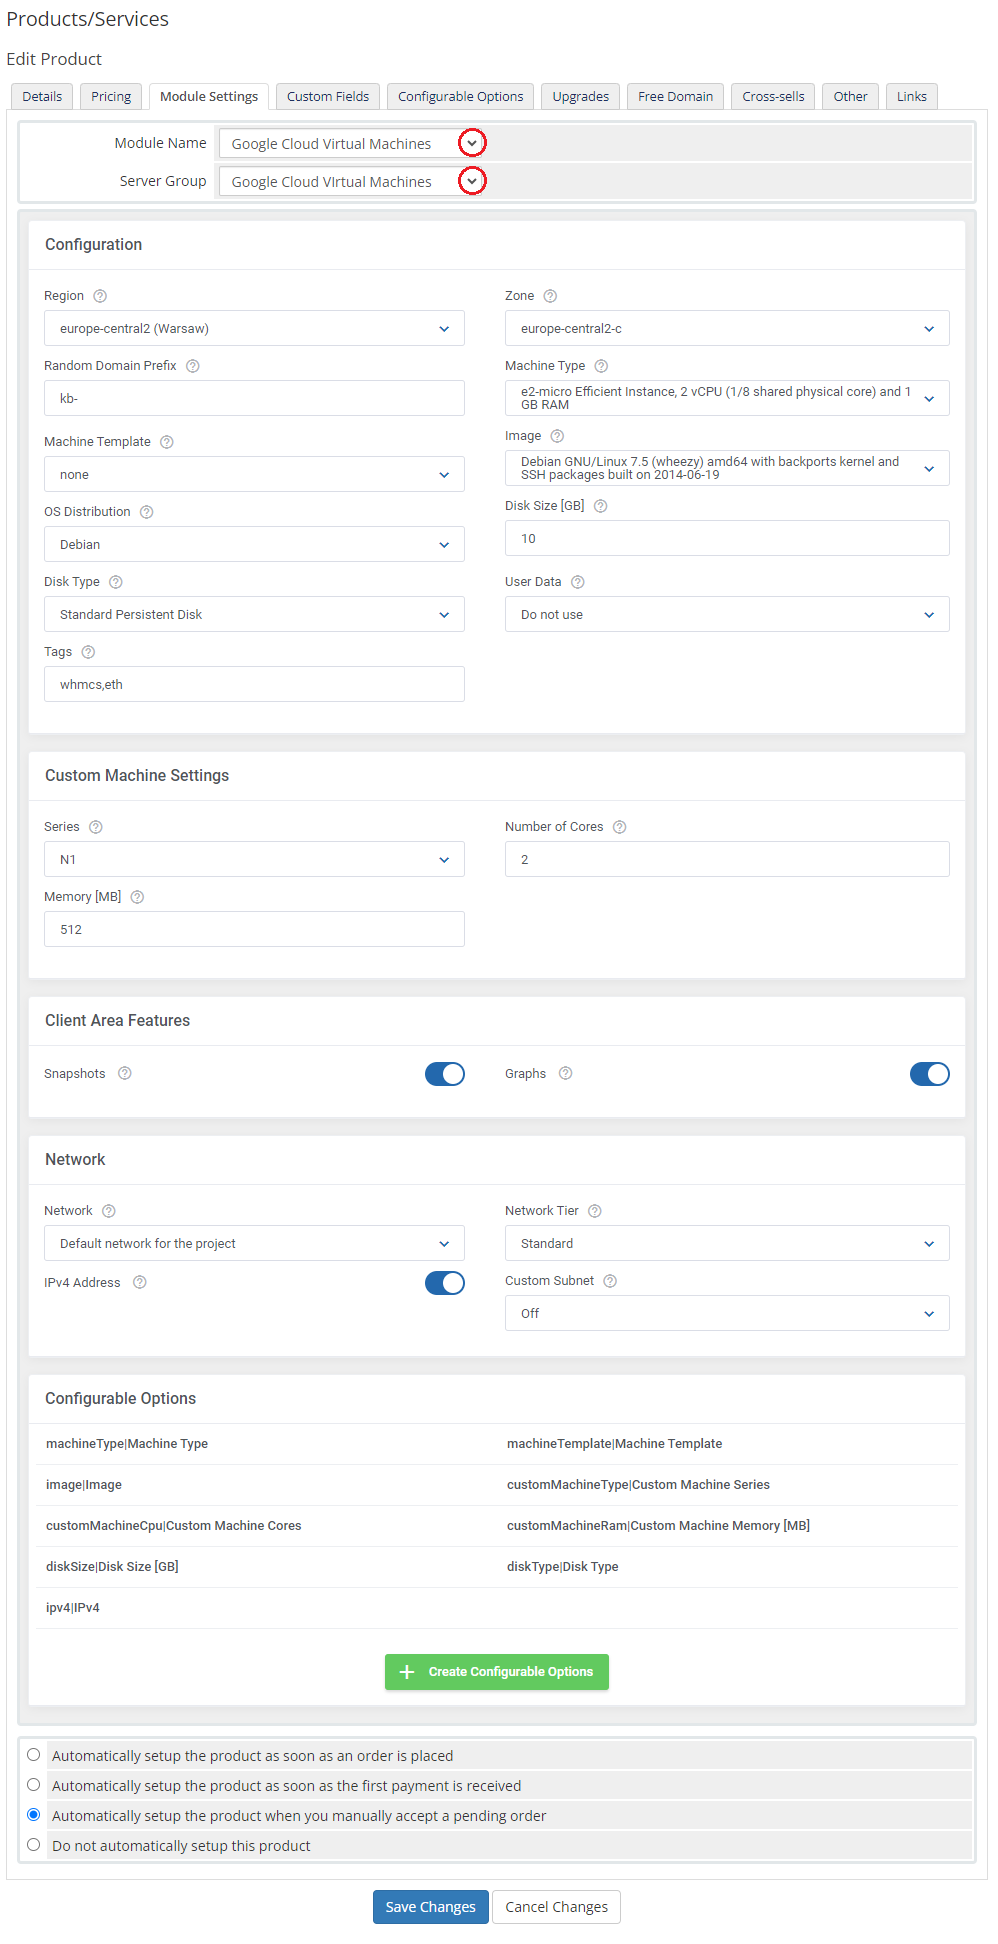
22. Now, go to the 'Module Settings' section, choose your previously created server group from the dropdown menu.
The module should automatically save and reload the settings. If not, click on the 'Save Changes' option manually.
|
|
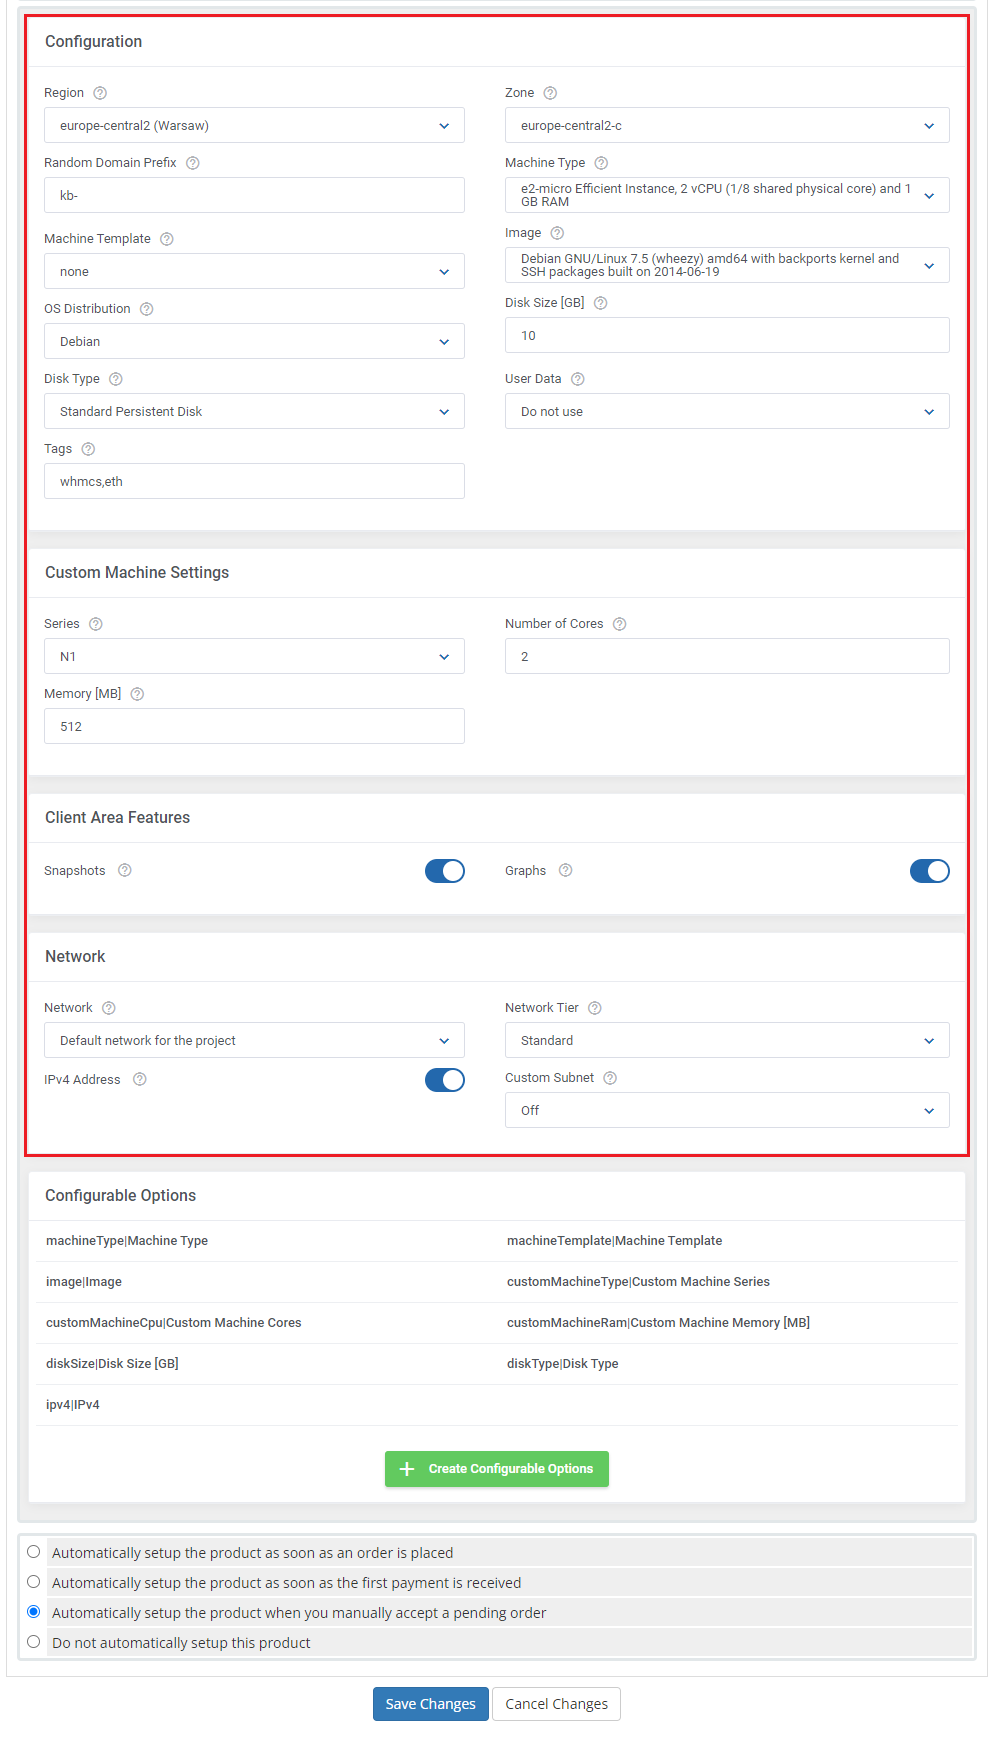
23. Now, let's start configuring the settings of the server that you sell.
- Region - is a particular geographical location where you can host your resources. Each region consists of one or more zones.
- Hostname Prefix - you can provide a hostname prefix.
- OS Distribution - choose a preferred OS distribution from the dropdown menu.
- Disk Type - Standard persistent disks are efficient and practical for handling sequential read/write operations while SSD persistent disks are dedicated to enterprise applications
and high-performance database needs that demand lower latency and more IOPS.
- Zone - is a location within a region. Once the 'Region' is selected, then you can define a zone.
- Machine Type - you can choose from many predefined machine types in each machine type family.
- Image - select a preferred OS image.
- Disk Size - provide the disk size in GB.
- Network - choose a network.
- Network Tier - there are two tiers available, 'Standard' and the ' Premium' one. More about differences between them can be found here
- IPv4 Address - you can enable the IPv4 Address.
|
|
24. At the end of the configuration process, you can decide whether you want to generate configurable options for the product.
Configurable options can be used by your clients to select each virtual machine parameters individually during order placement.
Otherwise, if configurable options are not defined, then the fixed parameters specified in the earlier configuration will be used instead.
If you decide to use configurable options, press on the 'Create Configurable Options' button.
|
Now, select which options you want to generate and confirm by clicking 'Create' .
Note that the configuration for disabled options will still be taken from the configuration of the main product.
More information about how to use configurable options can be found here or in the official WHMCS documentation.
|
SSH Keys
In the 'Custom Fields' tab you will find the 'SSH Public Key' field which is displayed to clients on the order form by default.
Your SSH key must be an RSA key with a key size of either 2048 bits or 4096 bits.
If you would like to limit the possibility of entering the key e.g. only to the 'ssh-rsa' format, you can use the regular expression in the validation field, such as:
#ssh-rsa AAAA[0-9A-Za-z+/]+[=]{0,3}( [^@]+@[^@]+)?#
Remember that API allows such action only once, during the initial VM creation.
Note: If you disable the 'Show on Order Form' option, a client will not be able to provide SSH Key while placing an order.
|
Management
Admin Area
Google Cloud Virtual Machines For WHMCS allows you to supervise and manage your customer server instance from the admin area of your WHMCS system.
This includes supervision of such features as:
- Configurable options which enable you to view the chosen server details
- Module commands to allow easy and quick management of the server
- Service actions, including: Start, Stop and Reboot the server
- Instance details that provide the current status, resources and options set.
- Network Interface section that informs about the chosen network, private and public IPs.
- Disk section that gathers all the information about the disk.
|
Ordering
Thanks to configurable options, you are able to offer a product which your clients can match to their needs.
Additionally, you are able to set up pricing for each configurable option, which makes your offer even more competitive.
At this moment you also have to provide the SSH key. Note that this key should be in one of the OpenSSH standard formats which are supported by API, e.g. ssh-rsa.
|
Client Area
The client area interface of Google Cloud Virtual Machines For WHMCS looks like below.
As you can see, the control panel contains useful details of the managed server.
The module allows your customers to easily start, stop and reboot their server instance through pressing the appropriate buttons.
|
Update Instructions
An essential guidance through the process of updating the module is offered here.
Keep in mind there is a quick and easy option in our client area that will let you upgrade the license of your module to an open source version at any time - and at a lower price!
To take advantage of it, simply use the License Upgrade button located on the product's page and a discounted invoice will be generated automatically.
|
Common Problems
| 1. When you have problems with connection, check whether your SELinux or firewall does not block ports.
|


