GoDaddy Domain Registrar For WHMCS
(→Configuration) |
(→About Godaddy Domain Registrar For WHMCS) |
||
| (37 intermediate revisions by 4 users not shown) | |||
| Line 1: | Line 1: | ||
<meta name="keywords" content="godaddy domain registrar for whmcs, godaddy domain registrar configuration, godaddy domain registrar management, godaddy domain registrar installation, godaddy domain registrar guide, modulesgarden godaddy domain registrar, godaddy domain registrar wiki,godaddy domain registrar tutorial, godaddy domain registrar tips, godaddy module wiki, godaddy domain registrar common problems, about godaddy domain registrar, godaddy domain registrar documentation, godaddy domain registrars faq, godaddy domain registrar help"></meta> | <meta name="keywords" content="godaddy domain registrar for whmcs, godaddy domain registrar configuration, godaddy domain registrar management, godaddy domain registrar installation, godaddy domain registrar guide, modulesgarden godaddy domain registrar, godaddy domain registrar wiki,godaddy domain registrar tutorial, godaddy domain registrar tips, godaddy module wiki, godaddy domain registrar common problems, about godaddy domain registrar, godaddy domain registrar documentation, godaddy domain registrars faq, godaddy domain registrar help"></meta> | ||
<meta name="description" content="ModulesGarden Wiki Contains All The Information You Need About The GoDaddy Domain Registrar For WHMCS Module."></meta> | <meta name="description" content="ModulesGarden Wiki Contains All The Information You Need About The GoDaddy Domain Registrar For WHMCS Module."></meta> | ||
| − | |||
| − | |||
| − | |||
=About [https://www.modulesgarden.com/products/whmcs/godaddy-domain-registrar Godaddy Domain Registrar For WHMCS]= | =About [https://www.modulesgarden.com/products/whmcs/godaddy-domain-registrar Godaddy Domain Registrar For WHMCS]= | ||
| Line 12: | Line 9: | ||
Additionally, you will be enabled to mass check/enable/disable auto-renewals through SSH console. This is an excellent tool for every GoDaddy API Reseller. | Additionally, you will be enabled to mass check/enable/disable auto-renewals through SSH console. This is an excellent tool for every GoDaddy API Reseller. | ||
|} | |} | ||
| − | |||
| − | |||
| − | |||
| − | |||
| − | |||
<!--fix dla features--> | <!--fix dla features--> | ||
*'''Module Features:''' | *'''Module Features:''' | ||
| Line 36: | Line 28: | ||
|} | |} | ||
{| | {| | ||
| − | |style="padding: 0px 0px | + | |style="padding: 0px 0px 0px 30px;"|✔ Enable GoDaddy Domain Lookup Provider |
| + | |} | ||
| + | {| | ||
| + | |style="padding: 0px 0px 0px 30px;"|✔ Choose GoDaddy Account Mode: | ||
| + | |} | ||
| + | {| | ||
| + | |style="padding: 0px 0px 0px 45px;"|✔ User Account | ||
| + | |} | ||
| + | {| | ||
| + | |style="padding: 0px 0px 10px 45px;"|✔ API Reseller Plan | ||
|} | |} | ||
| Line 57: | Line 58: | ||
{| | {| | ||
|style="padding: 0px 0px 0px 30px;"|✔ Toggle GoDaddy Auto Renewal | |style="padding: 0px 0px 0px 30px;"|✔ Toggle GoDaddy Auto Renewal | ||
| + | |} | ||
| + | {| | ||
| + | |style="padding: 0px 0px 0px 30px;"|✔ Reset Shopper Password | ||
|} | |} | ||
{| | {| | ||
| Line 97: | Line 101: | ||
*'''General Info:''' | *'''General Info:''' | ||
{| | {| | ||
| − | |style="padding: 10px 0px 0px 30px;"|✔ | + | |style="padding: 10px 0px 0px 30px;"|✔ Supports GoDaddy "User Account" And "API Reseller Plan" |
|} | |} | ||
{| | {| | ||
| Line 103: | Line 107: | ||
|} | |} | ||
{| | {| | ||
| − | |style="padding: 0px 0px 0px 30px;"|✔ Integrated With <u>Domains Reseller For WHMCS</u> - Efficient Domains Reselling With Your Own API [ | + | |style="padding: 0px 0px 0px 30px;"|✔ Integrated With <u>Domains Reseller For WHMCS</u> - Efficient Domains Reselling With Your Own API [https://www.modulesgarden.com/products/whmcs/domains-reseller (read more)] |
|} | |} | ||
{| | {| | ||
| − | |style="padding: 0px 0px 0px 30px;"|✔ Supports PHP | + | |style="padding: 0px 0px 0px 30px;"|✔ Supports PHP 7.1 Up To PHP 7.4 |
|} | |} | ||
{| | {| | ||
| − | |style="padding: 0px 0px 0px 30px;"|✔ Supports WHMCS | + | |style="padding: 0px 0px 0px 30px;"|✔ Supports WHMCS Themes "Six" And "Twenty-One" |
|} | |} | ||
{| | {| | ||
| − | |style="padding: 0px 0px | + | |style="padding: 0px 0px 0px 30px;"|✔ Supports WHMCS V7.10 And Later |
| + | |} | ||
| + | {| | ||
| + | |style="padding: 0px 0px 30px 30px;"|✔ Easy Module Upgrade To [https://www.modulesgarden.com/products/whmcs/godaddy-domain-registrar#open-source-version Open Source Version] | ||
|} | |} | ||
| Line 118: | Line 125: | ||
==Installation== | ==Installation== | ||
{| | {| | ||
| − | |style="padding: 10px 0px 0px 0px;"|'''In this brief tutorial we will show you how to successfully install and set up GoDaddy Domain Registrar For WHMCS.'''<br /> | + | |style="padding: 10px 0px 0px 0px;"|'''In this brief tutorial we will show you how to successfully install and set up [https://www.modulesgarden.com/products/whmcs/godaddy-domain-registrar GoDaddy Domain Registrar For WHMCS.]'''<br /> |
We will guide you step by step through the whole installation process. | We will guide you step by step through the whole installation process. | ||
|} | |} | ||
| Line 132: | Line 139: | ||
|} | |} | ||
{| | {| | ||
| − | |style="padding: 0px 0px | + | |style="padding: 0px 0px 15px 15px;"|'''2. In the downloaded file you might find one or two packages that support different PHP versions.'''<br/> |
| − | '' '''Note''' | + | In the most recent versions of the module, you will find only one package that supports PHP 7.1 and later.<br/> <!-- If you need a package for the previous versions of PHP, please [https://www.modulesgarden.com/support/ticket/general-support contact our support]. --> |
| + | |} | ||
| + | {| | ||
| + | |style="padding: 0px 0px 20px 25px;"|[[File:PHP71_74.png]] | ||
| + | |} | ||
| + | {| | ||
| + | |style="padding: 0px 0px 15px 15px;"|'''Previous updates of the module may contain two packages dedicated to various PHP versions.'''<br/> | ||
| + | The first one that supports PHP 5.6 up to PHP 7.0, and the second one addressed to PHP 7.1 up to PHP 7.3.<br/> | ||
| + | '''''Note:''' Keep in mind that PHP versions 5.6 up to 7.0 are no longer officially supported and their security issues are not fixed or released any more. Find more info [http://php.net/supported-versions.php here].'' | ||
| + | |} | ||
| + | {| | ||
| + | |style="padding: 0px 0px 20px 25px;"|[[File:PHP56_73.png]] | ||
|} | |} | ||
{| | {| | ||
| − | |style="padding: 0px 0px | + | |style="padding: 0px 0px 10px 15px;"| <!-- '' '''Important''': This situation does not affect [https://www.modulesgarden.com/products/whmcs/godaddy-domain-registrar#open-source-version '''the open source version'''] of this module which can be applied to any PHP from version 5.6 and later.''<br/>'' --> '''Note''': You can check the current PHP version in your WHMCS. To do so, proceed to ''' 'Utilities' → 'System' → 'PHP Info'.''' |
|} | |} | ||
{| | {| | ||
| − | |style="padding: 0px 0px 15px 15px;"|'''3. Extract the | + | |style="padding: 0px 0px 15px 15px;"|'''3. Extract the package and upload its content into the main WHMCS directory. <br/> |
| − | The content of | + | The content of the package to upload should look like this. |
|} | |} | ||
{| | {| | ||
| Line 177: | Line 195: | ||
|} | |} | ||
{| | {| | ||
| − | |style="padding: 0px 0px 20px 15px;"|'''9. Firstly, log | + | |style="padding: 0px 0px 20px 15px;"|'''9. Firstly, log in to your GoDaddy account. If you have a standard account, proceed here https://developer.godaddy.com/'''<br/> If you have a reseller account then enter this website https://reseller.godaddy.com/settings/keys <br/> '''Note:''' ''The following instruction will be presented basing on a standard account. The whole process looks similarly when you own a reseller account.'' <br/> |
Find '' 'API Keys' '' section. | Find '' 'API Keys' '' section. | ||
|} | |} | ||
| Line 184: | Line 202: | ||
|} | |} | ||
{| | {| | ||
| − | |style="padding: 0px 0px | + | |style="padding: 0px 0px 20px 15px;"|'''10. You will be moved to a section where keys can be generated and then managed. '''<br/>Press '' 'Create New API Key', '' select '''Production''' environment and press '' 'Next' '' to complete the process. |
|} | |} | ||
{| | {| | ||
| Line 190: | Line 208: | ||
|} | |} | ||
{| | {| | ||
| − | |style="padding: 0px 0px 15px 15px;"|'''11. Keep your API Key and Secret in a safe place, you will need them in a moment. Note that it is not possible to | + | |style="padding: 0px 0px 15px 15px;"|'''11. Keep your API Key and Secret in a safe place, you will need them in a moment. Note that it is not possible to view the '' 'API Secret' '' again!<br/> |
| − | Press '' ' | + | Press '' 'Got it' '' to finish. |
|} | |} | ||
{| | {| | ||
| Line 199: | Line 217: | ||
|style="padding: 0px 0px 15px 15px;"|'''12. Now, log in to your WHMCS and proceed to '' 'Setup' '' → '' 'Products/Services' '' → '' 'Domain Registrars'. '' '''<br /> | |style="padding: 0px 0px 15px 15px;"|'''12. Now, log in to your WHMCS and proceed to '' 'Setup' '' → '' 'Products/Services' '' → '' 'Domain Registrars'. '' '''<br /> | ||
Find '' 'GoDaddy Domains 3' '' and press '' 'Activate' '' next to it.<br/> | Find '' 'GoDaddy Domains 3' '' and press '' 'Activate' '' next to it.<br/> | ||
| − | |||
|} | |} | ||
{| | {| | ||
|style="padding: 0px 0px 20px 25px;"|[[File:WWD2_8.png]] | |style="padding: 0px 0px 20px 25px;"|[[File:WWD2_8.png]] | ||
|} | |} | ||
| + | <span id="AccountMode"></span> | ||
{| | {| | ||
| − | |style="padding: 0px 0px 15px 15px;"|'''13. Afterwards, press '' 'Configure' '' and enter your live API '' 'API Key', 'API Secret' '' and a URL to domain management site. <br/> | + | |style="padding: 0px 0px 15px 15px;"|'''13. Afterwards, press '' 'Configure' '' and enter your live API '' 'API Key', 'API Secret' '' and a URL to domain management site. '''<br/> '''''Note:''' API credentials are different depending on the selected below user mode.''<br/> |
| + | |||
| + | Now, you need to decide which '''GoDaddy Account Mode''' you will use for reselling domains: <br/> | ||
| + | * By default, the registrar module supports the reseller account type, which requires you to have access to GoDaddy's '' ''' 'API Reseller Plan'. ''' ''<br/> Thanks to that plan, all registered domains will have separate accounts created for your clients.<br/> | ||
| + | * Otherwise, if you do not have access to the reseller account plan, you can select a normal ''' '' 'User Account Mode'. '' '''<br/>Keep in mind that this setting will make all the domains to be registered on a single GoDaddy account that you provided in this configuration.<br/> | ||
| + | |||
| + | Next, select '''Send Email''' if you want your clients to receive an email message including the Shopper ID and Password after the domain registration or transfer.<br/> | ||
Press '' 'Save Changes' '' when ready. | Press '' 'Save Changes' '' when ready. | ||
|} | |} | ||
| Line 359: | Line 383: | ||
*request EPP code | *request EPP code | ||
*disable auto-renew feature | *disable auto-renew feature | ||
| + | *reset shopper password (may require a reseller type account) | ||
<!--'''Important:''' Remember, before transferring client's domain, its your responsibility to acknowledge your client with GoDaddy TOS.--> | <!--'''Important:''' Remember, before transferring client's domain, its your responsibility to acknowledge your client with GoDaddy TOS.--> | ||
|} | |} | ||
| Line 515: | Line 540: | ||
|} | |} | ||
--> | --> | ||
| + | |||
| + | =Domains Migration= | ||
| + | {| | ||
| + | |style="padding: 10px 0px 15px 15px;"|In case you already have some domains existing in GoDaddy Reseller account, you will need to import them into your WHMCS manually.<br/> | ||
| + | Take a look at the below instruction to learn how to do that step by step. | ||
| + | |} | ||
| + | {| | ||
| + | |style="padding: 0px 0px 15px 15px;"|1. Before you start, please turn off domains Auto Registration. This way you will avoid the new domains being registered instead of migrated.<br/> | ||
| + | Move to ''WHMCS → Setup → Products/Services → Domain Pricing'' and select '' 'None' '' next to your TLD. | ||
| + | |} | ||
| + | {| | ||
| + | |style="padding: 0px 0px 20px 25px;"|[[File:GDD10.png]] | ||
| + | |} | ||
| + | {| | ||
| + | |style="padding: 0px 0px 15px 15px;"|2. In your Admin Area you will need to place an order for your client and select '' 'Registration' '' as a domain '' 'Registration Type'. '' Then, type in the domain you are currently migrating.<br/> Override prices for registration and renewal of the domain not to generate invoices for the client and submit the order. | ||
| + | |} | ||
| + | {| | ||
| + | |style="padding: 0px 0px 20px 25px;"|[[File:GDD11.png]] | ||
| + | |} | ||
| + | {| | ||
| + | |style="padding: 0px 0px 20px 15px;"|3. Accept the just placed order for your client. | ||
| + | |} | ||
| + | {| | ||
| + | |style="padding: 0px 0px 20px 25px;"|[[File:GDD12.png]] | ||
| + | |} | ||
| + | {| | ||
| + | |style="padding: 0px 0px 20px 15px;"|4. Move to the domain’s details, and select '' 'GoDaddyDoaminsRegistrar' '' as the domain registrar. Save the changes. | ||
| + | |} | ||
| + | {| | ||
| + | |style="padding: 0px 0px 20px 25px;"|[[File:GDD13.png]] | ||
| + | |} | ||
| + | {| | ||
| + | |style="padding: 0px 0px 20px 15px;"|5. A new field '' 'Shopper ID' '' will appear. Fill in the domain Shopper ID and save the changes. | ||
| + | |} | ||
| + | {| | ||
| + | |style="padding: 0px 0px 20px 25px;"|[[File:GDD14.png]] | ||
| + | |} | ||
| + | {| | ||
| + | |style="padding: 0px 0px 20px 15px;"|6. The migration process is over. The migrated domain details will appear underneath. | ||
| + | |} | ||
| + | {| | ||
| + | |style="padding: 0px 0px 20px 25px;"|[[File:GDD15.png]] | ||
| + | |} | ||
| + | {| | ||
| + | |style="padding: 0px 0px 30px 15px;"|7. In the end you may turn on the Auto Registration if you have turned it off previously (step 1). | ||
| + | |} | ||
=Tips= | =Tips= | ||
| Line 526: | Line 597: | ||
|} | |} | ||
{| | {| | ||
| − | |style="padding: 5px 0px | + | |style="padding: 5px 0px 0px 15px;"|3. Module feature 'Enable GoDaddy Domain Suggestions' available for admins and client area feature 'Browse GoDaddy Domain Suggestions' are available in WHMCS V7 and later. |
| + | |} | ||
| + | {| | ||
| + | |style="padding: 5px 0px 30px 15px;"|4. Due to registry limitation, it is not possible to choose the '' 'ID Protection' '' for the '.ca' tld. We recommend disabling the '' 'ID Protection' '' for the '.ca' tlds. | ||
|} | |} | ||
| Line 583: | Line 657: | ||
|} | |} | ||
{| | {| | ||
| − | |style="padding: 0px 0px | + | |style="padding: 0px 0px 20px 25px;"|[[File:WWD30.png]] |
| + | |} | ||
| + | {| | ||
| + | |style="padding: 0px 0px 30px 15px;"|7. If you perform the '' 'Reset Shopper Password' '' action and you encounter the '' 'Cannot reset Shopper password - Unauthorized - Missing jwt.' '' error, <br/>then you need to make sure that API Keys were generated here https://reseller.godaddy.com/settings/keys as the ' ''Reset Shopper Password' '' action may be available only for reseller accounts. | ||
|} | |} | ||
Revision as of 14:36, 14 April 2021
Contents |
About Godaddy Domain Registrar For WHMCS
| Godaddy Domain Registrar For WHMCS is a domain registrar module that enables automation of domains provisioning in your WHMCS system with GoDaddy Domains. Your customers will be able to manage their domains and DNS records directly in your WHMCS client area. |
- Module Features:
| ✔ Register Domain With The Cheapest TLD Type Automatically |
| ✔ Send Email Details With Shopper ID And Password After Domain Registration Or Transfer |
| ✔ Auto Renew Script - Enable/Disable Auto Renewal For All Domains |
| ✔ Synchronize Domain Expiration Date And Status |
| ✔ Synchronize Domain Transfer Status |
| ✔ Enable GoDaddy Domain Lookup Provider |
| ✔ Choose GoDaddy Account Mode: |
| ✔ User Account |
| ✔ API Reseller Plan |
- Admin Area Features:
| ✔ Register/Transfer/Renew/Cancel Domain |
| ✔ Update Nameservers |
| ✔ Update Contact Details |
| ✔ Get EPP Code |
| ✔ Toggle ID Protection |
| ✔ Toggle GoDaddy Auto Renewal |
| ✔ Reset Shopper Password |
| ✔ Access Shopper ID and Password |
| ✔ Define TLD Type For Each Domain |
| ✔ View Domain Logs |
- Client Area Features:
| ✔ Browse GoDaddy Domain Suggestions |
| ✔ Log In To Control Panel |
| ✔ Access Shopper ID and Password |
| ✔ Enable/Disable Domain Auto Renewal |
| ✔ Manage Nameservers |
| ✔ Lock/Unlock Registrar |
| ✔ Update Contact Details |
| ✔ Manage DNS Records |
| ✔ Reset Shopper Password |
- General Info:
| ✔ Supports GoDaddy "User Account" And "API Reseller Plan" |
| ✔ Supports All TLDs & gTLDs Available In GoDaddy API |
| ✔ Integrated With Domains Reseller For WHMCS - Efficient Domains Reselling With Your Own API (read more) |
| ✔ Supports PHP 7.1 Up To PHP 7.4 |
| ✔ Supports WHMCS Themes "Six" And "Twenty-One" |
| ✔ Supports WHMCS V7.10 And Later |
| ✔ Easy Module Upgrade To Open Source Version |
Installation and Configuration
Installation
| In this brief tutorial we will show you how to successfully install and set up GoDaddy Domain Registrar For WHMCS. We will guide you step by step through the whole installation process. |
| 1. In the beginning make sure that you are the GoDaddy API Reseller and your API User account is active. Info: Please note that GoDaddy API Reseller and GoDaddy Reseller are not the same! Our module can be successfully used only with the former account. |
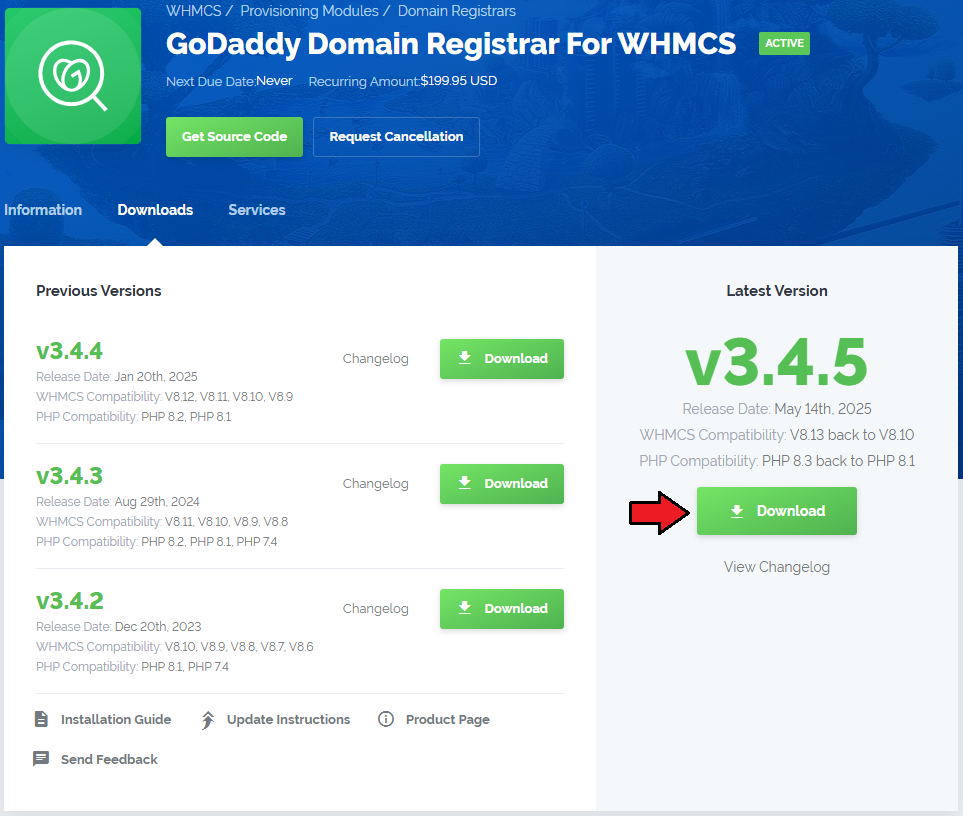
| 2. Log in to our client area and download the module. |
|
| 2. In the downloaded file you might find one or two packages that support different PHP versions. In the most recent versions of the module, you will find only one package that supports PHP 7.1 and later. |
| Previous updates of the module may contain two packages dedicated to various PHP versions. The first one that supports PHP 5.6 up to PHP 7.0, and the second one addressed to PHP 7.1 up to PHP 7.3. |

|
| Note: You can check the current PHP version in your WHMCS. To do so, proceed to 'Utilities' → 'System' → 'PHP Info'. |
| 3. Extract the package and upload its content into the main WHMCS directory. The content of the package to upload should look like this. |

|
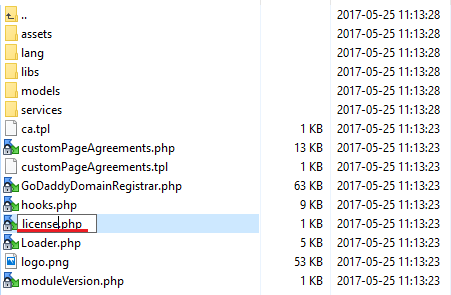
| 5. When you install GoDaddy Domain Registrar For WHMCS for the first time you have to rename 'license_RENAME.php' file. File is located in 'modules/registrars/GoDaddyDomainRegistrar/license_RENAME.php' . Rename it from 'license_RENAME.php' to 'license.php'. |
|
| 6. In order to configure your license key you have to edit a previously renamed 'license.php' file. Enter your license key between quotation marks as presented on the following screen. You can find your license key in our client area → 'My Products'. |

|
| 7. Next, please move to yourWHMCS/resources/domains directory and find 'dist.additionalfields.php' and 'dist.additionalfields_example.php' files. These files should not be edited. If you do not have 'additionalfields.php' file yet, create it manually and paste the content related to the preferred TLDs from the example file into it. |
8. Finally, set up the cron command line provided below and define its frequency (5 minutes interval is suggested).
php -q /your_whmcs/modules/registrars/GoDaddyDomainRegistrar/cron/cron.php It is responsible for sending an email message with notification after domain transfer or registration. |
Configuration
| Before you can go on, you must generate your GoDaddy API Key and API Secret. You will need them to activate your registrar module. Underneath you will find instructions where to find your API details. |
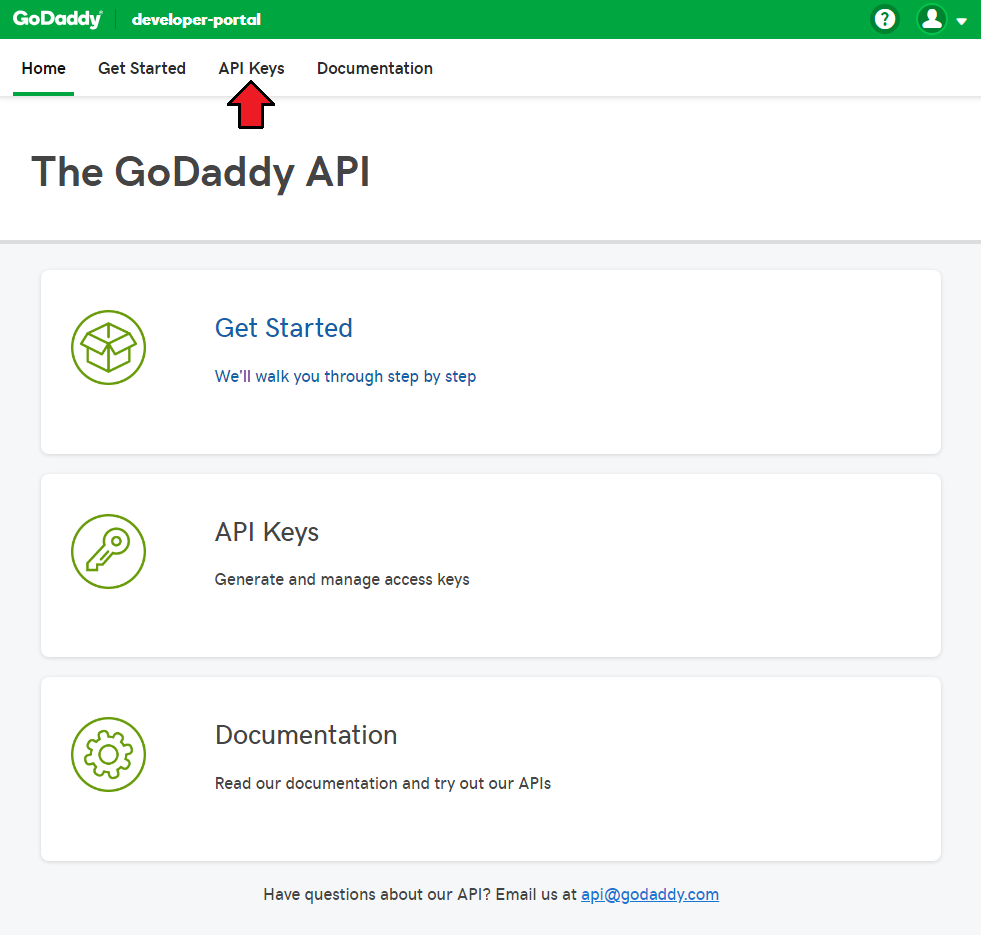
| 9. Firstly, log in to your GoDaddy account. If you have a standard account, proceed here https://developer.godaddy.com/ If you have a reseller account then enter this website https://reseller.godaddy.com/settings/keys Note: The following instruction will be presented basing on a standard account. The whole process looks similarly when you own a reseller account. Find 'API Keys' section. |
|
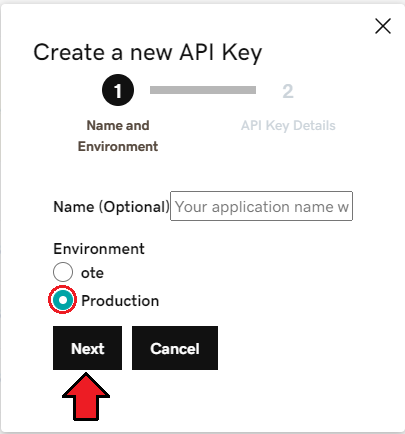
| 10. You will be moved to a section where keys can be generated and then managed. Press 'Create New API Key', select Production environment and press 'Next' to complete the process. |
|
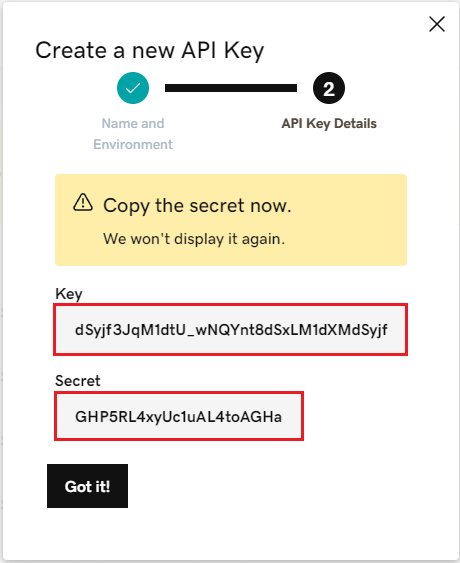
| 11. Keep your API Key and Secret in a safe place, you will need them in a moment. Note that it is not possible to view the 'API Secret' again! Press 'Got it' to finish. |
|
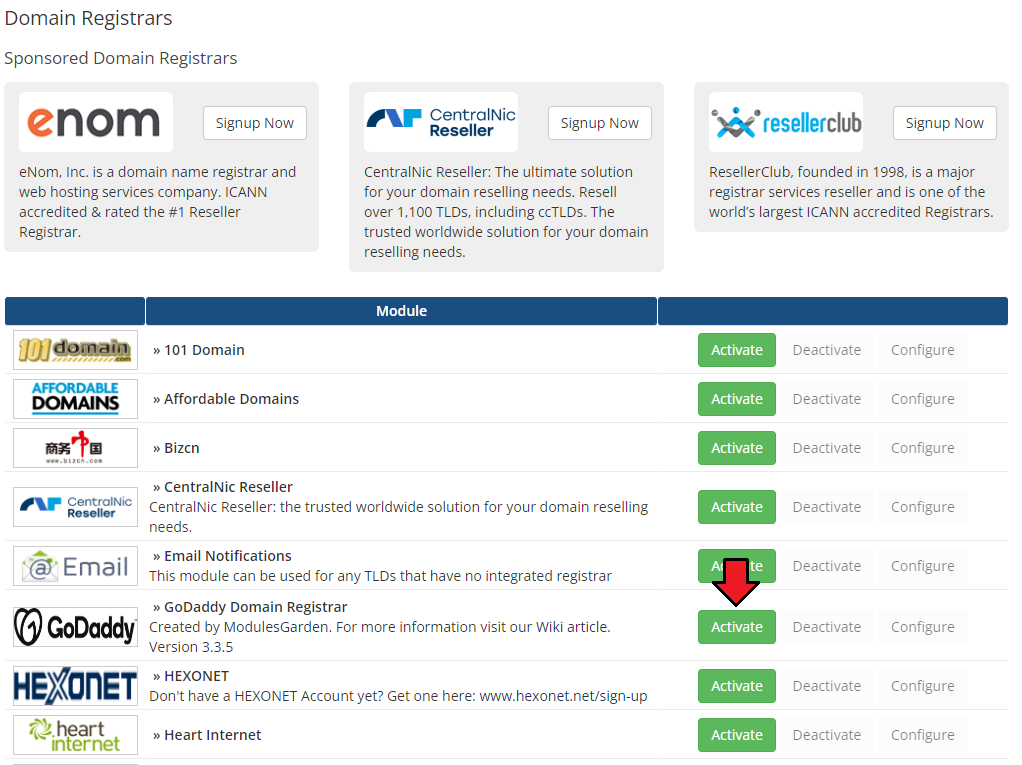
| 12. Now, log in to your WHMCS and proceed to 'Setup' → 'Products/Services' → 'Domain Registrars'. Find 'GoDaddy Domains 3' and press 'Activate' next to it. |
|
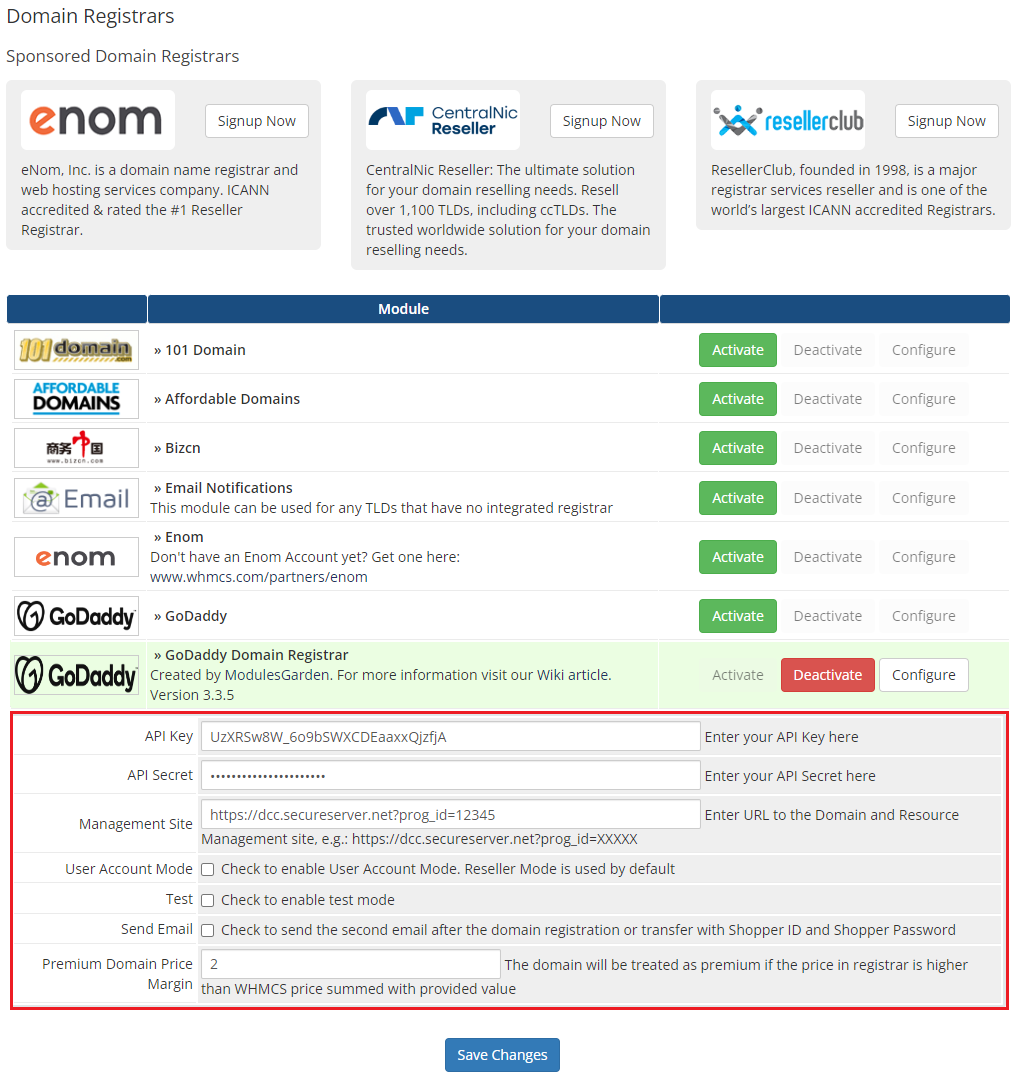
| 13. Afterwards, press 'Configure' and enter your live API 'API Key', 'API Secret' and a URL to domain management site. Note: API credentials are different depending on the selected below user mode. Now, you need to decide which GoDaddy Account Mode you will use for reselling domains:
Next, select Send Email if you want your clients to receive an email message including the Shopper ID and Password after the domain registration or transfer. |
|
For the Management Site you can use dcc.secureserver.net?prog_id=XXXXX address.The 'XXXXXX' part marks your reseller storefront's program ID, located in the Account Information section of your Reseller Control Center's Dashboard. |
Management
| GoDaddy Domain Registrar allows you to offer GoDaddy TLDs through the WHMCS system to your customers. In this short guide we will present you the possibilities of our module. |
Management of TLDs
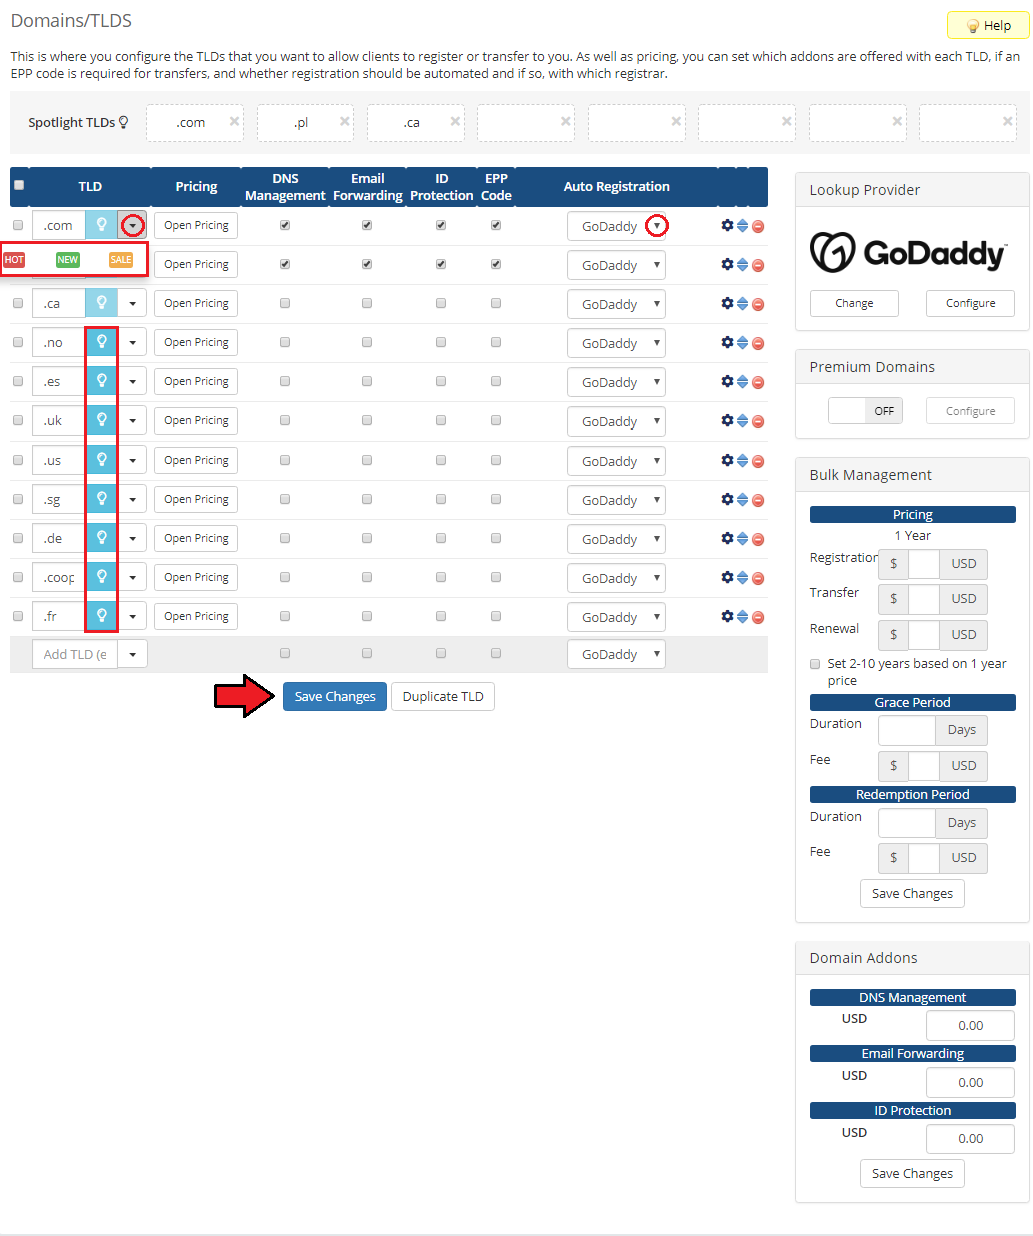
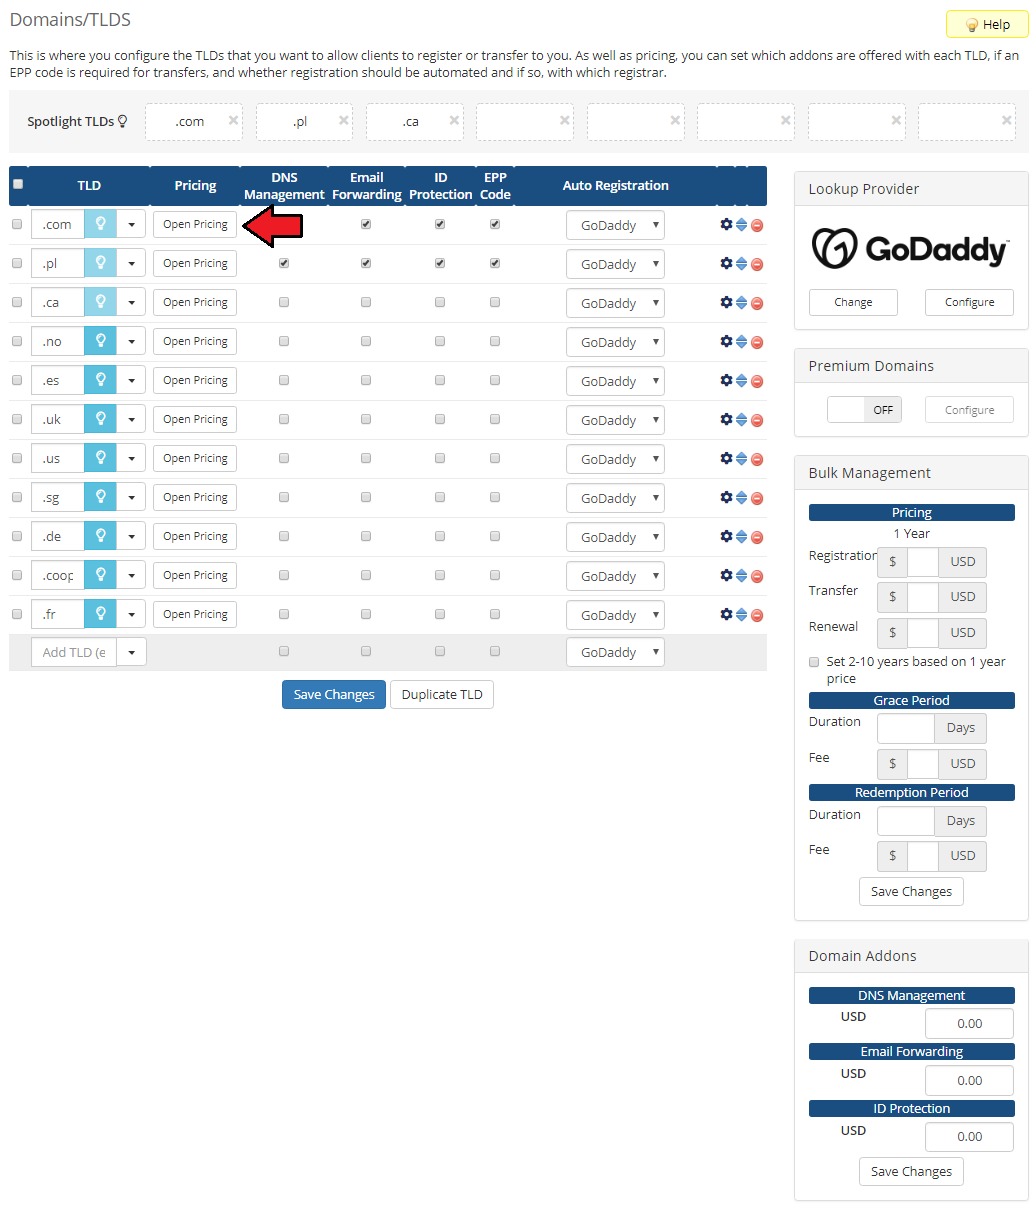
| Adding a new TLD is quite simple. To add it, go to 'Setup' → 'Products/Services' → 'Domain Pricing'. Enter your TLD and choose 'GoDaddyDoaminRegistrar' from 'Auto Registration' dropdown menu as shown on the screen below. |
|
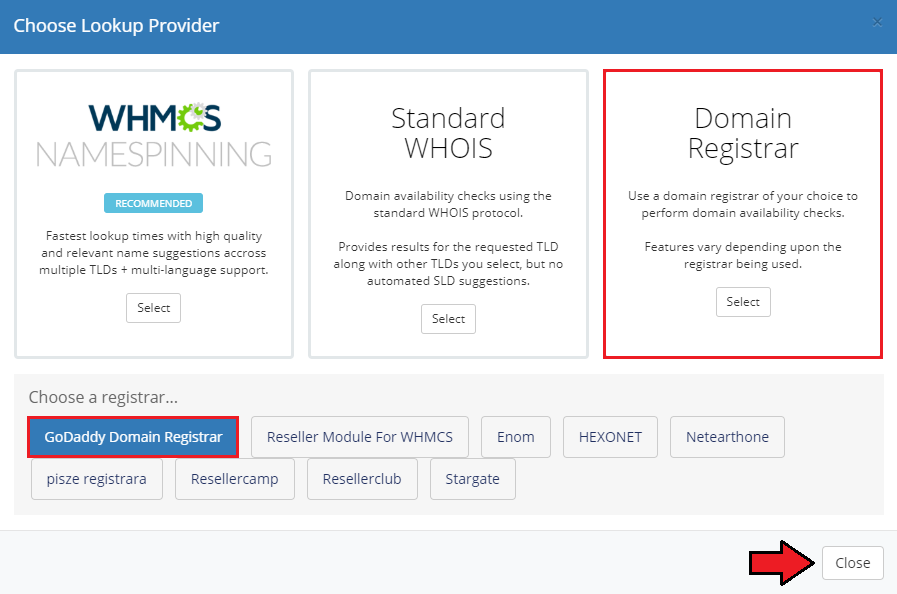
| On the right there is 'Lookup Provider' section which you can change and configure according to you needs. By default Standard WHOIS is set. Note that managing 'Lookup Provider' is available in WHMCS V7 only. |
|
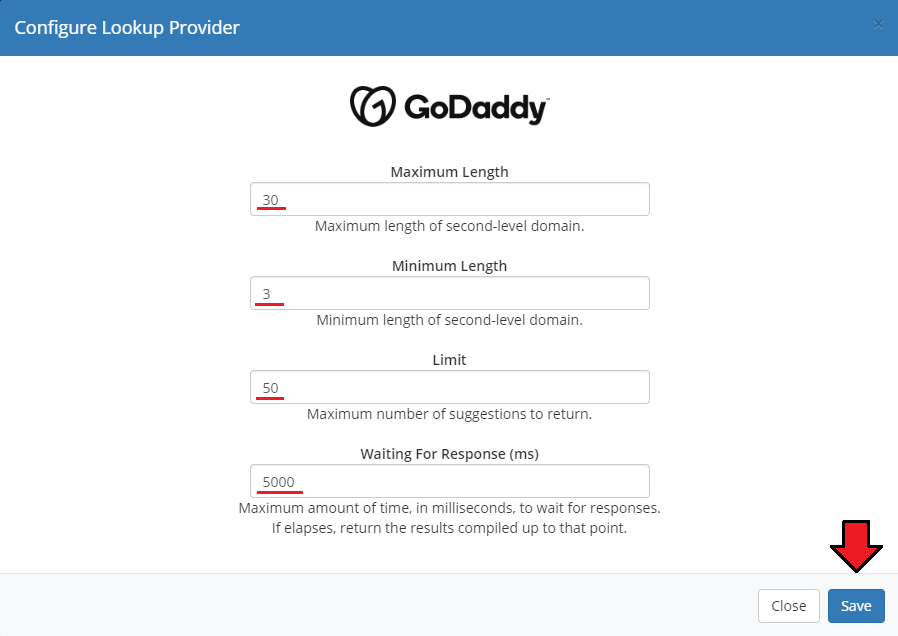
| When you select GoDaddy a new window pops up. The information you provide here will be responsible for returning domains suggested while searching for the available ones. |
|
| Then click on 'Open Pricing' button and set up your pricing. |
|
| In a newly opened window you can set your prices. Remember to save the changes. |

|
| That's all! Simple, isn't it? If you would like to set up pricing for more TLDs just repeat steps shown in 'Management of TLDs' as many times as you need. |
Ordering
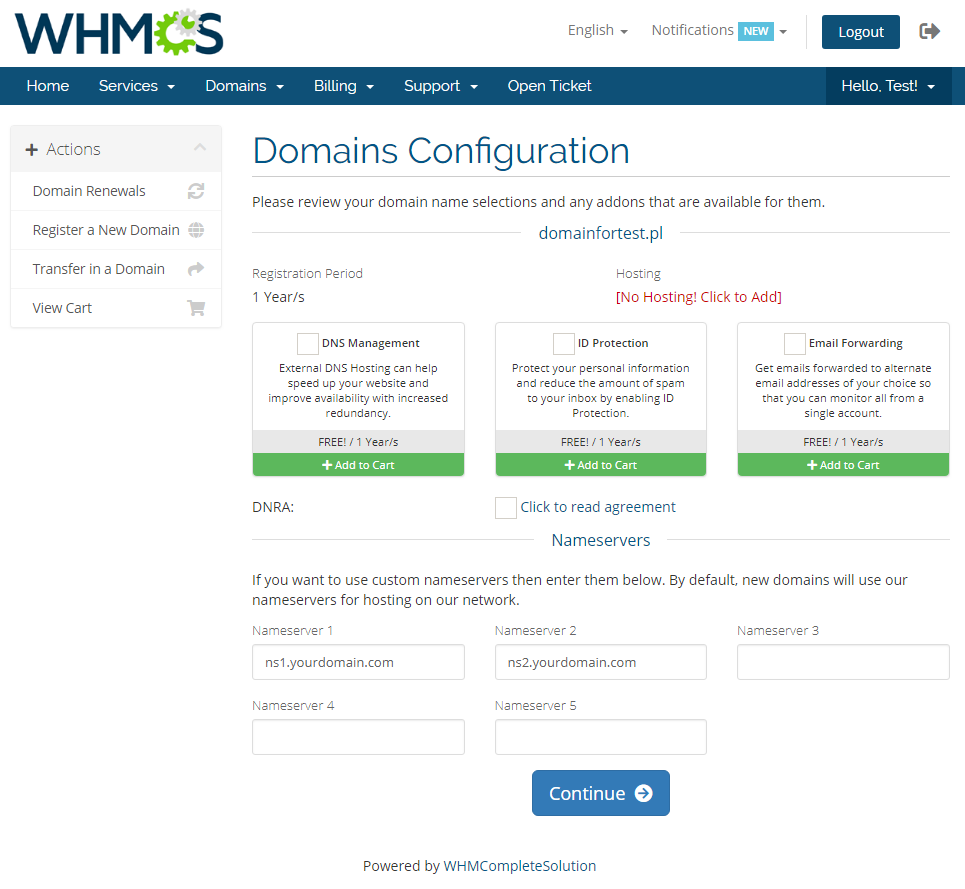
| Ordering GoDaddy domains goes alike ordering other domains. At this point you can choose addons available for new domain, including privacy protection, and provide custom nameservers. |
|
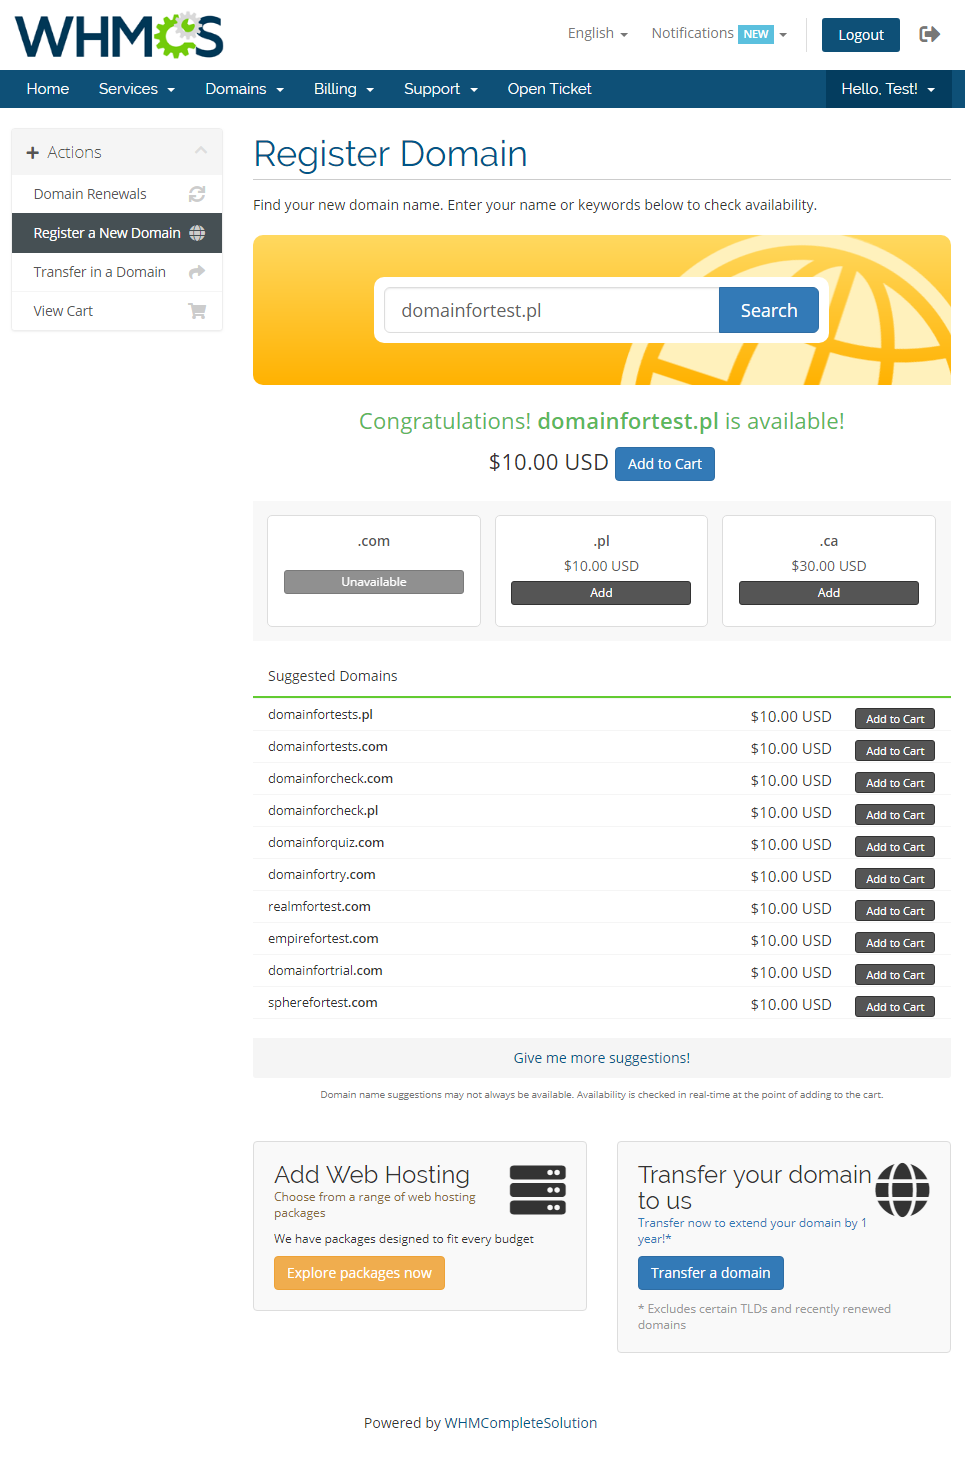
| While registering a new domain, you check its availability first. Here you will also find the list of suggested domains, similar to the one you want to register. When you choose the one, just add it to cart and then proceed to 'Checkout'. |
|
Email Template
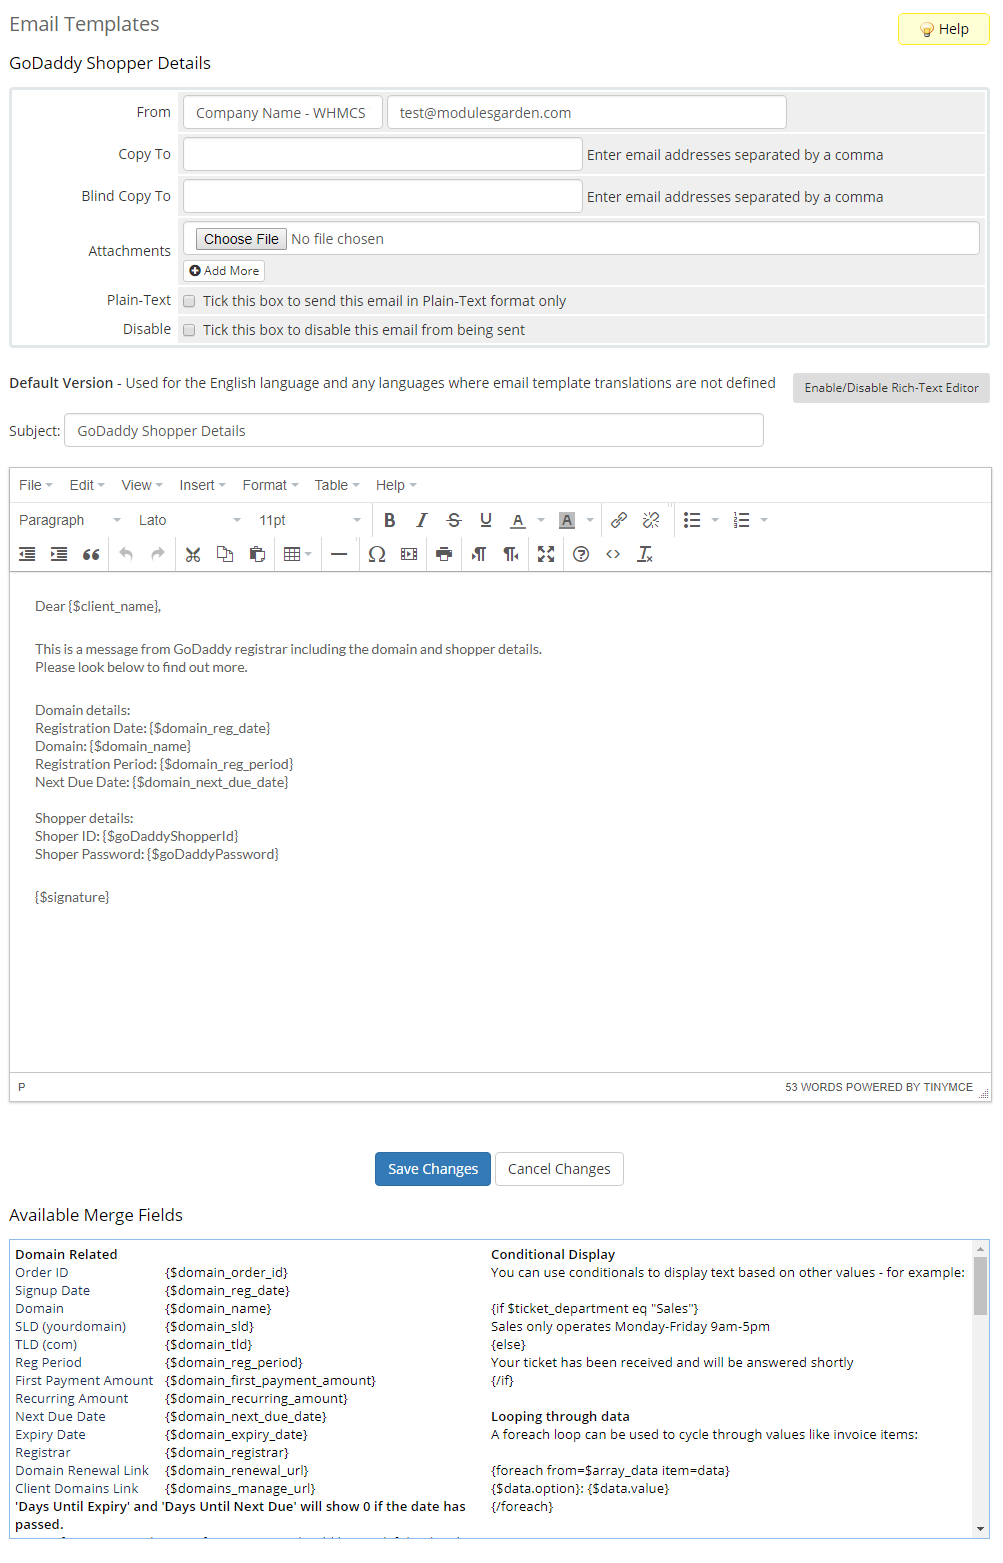
| The module includes a custom email template that can be used to send the second email notification. If the option has been enabled in the registrar configuration, clients will receive an email with shopper ID and password after the a domain registration or transfer. Note: The email template will be uploaded once you have run the registrar cron job, see point 8 installation section for more detais. Move to Setup → Email Templates → Domain Messages and find 'GoDaddy Shopper Details' custom template to see its content. |
|
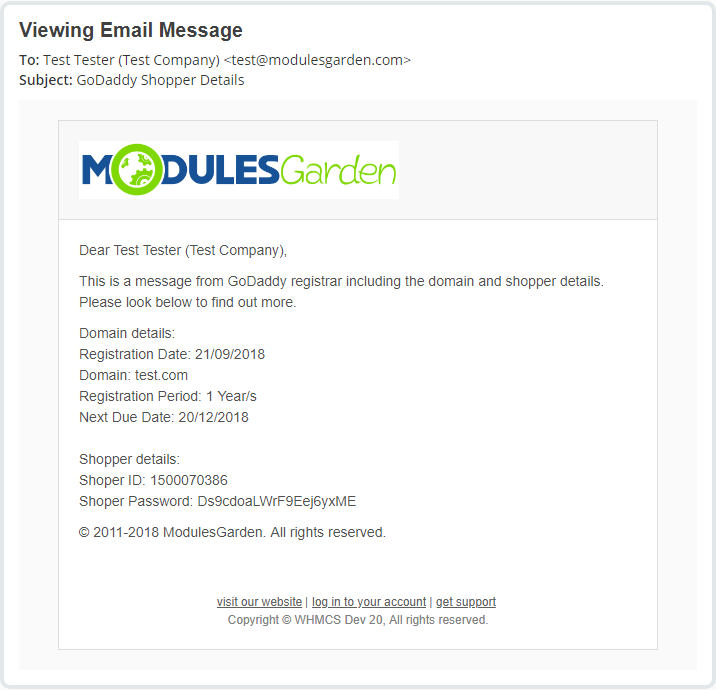
| The default tempalte includes details of the registered or transfered domain and shoper details: ID and password. There are two available merge fields related to the latter information, these are: {$goDaddyShopperId} and {$goDaddyPassword}. See below how such email may look like when delivered: |
|
Management of Domain
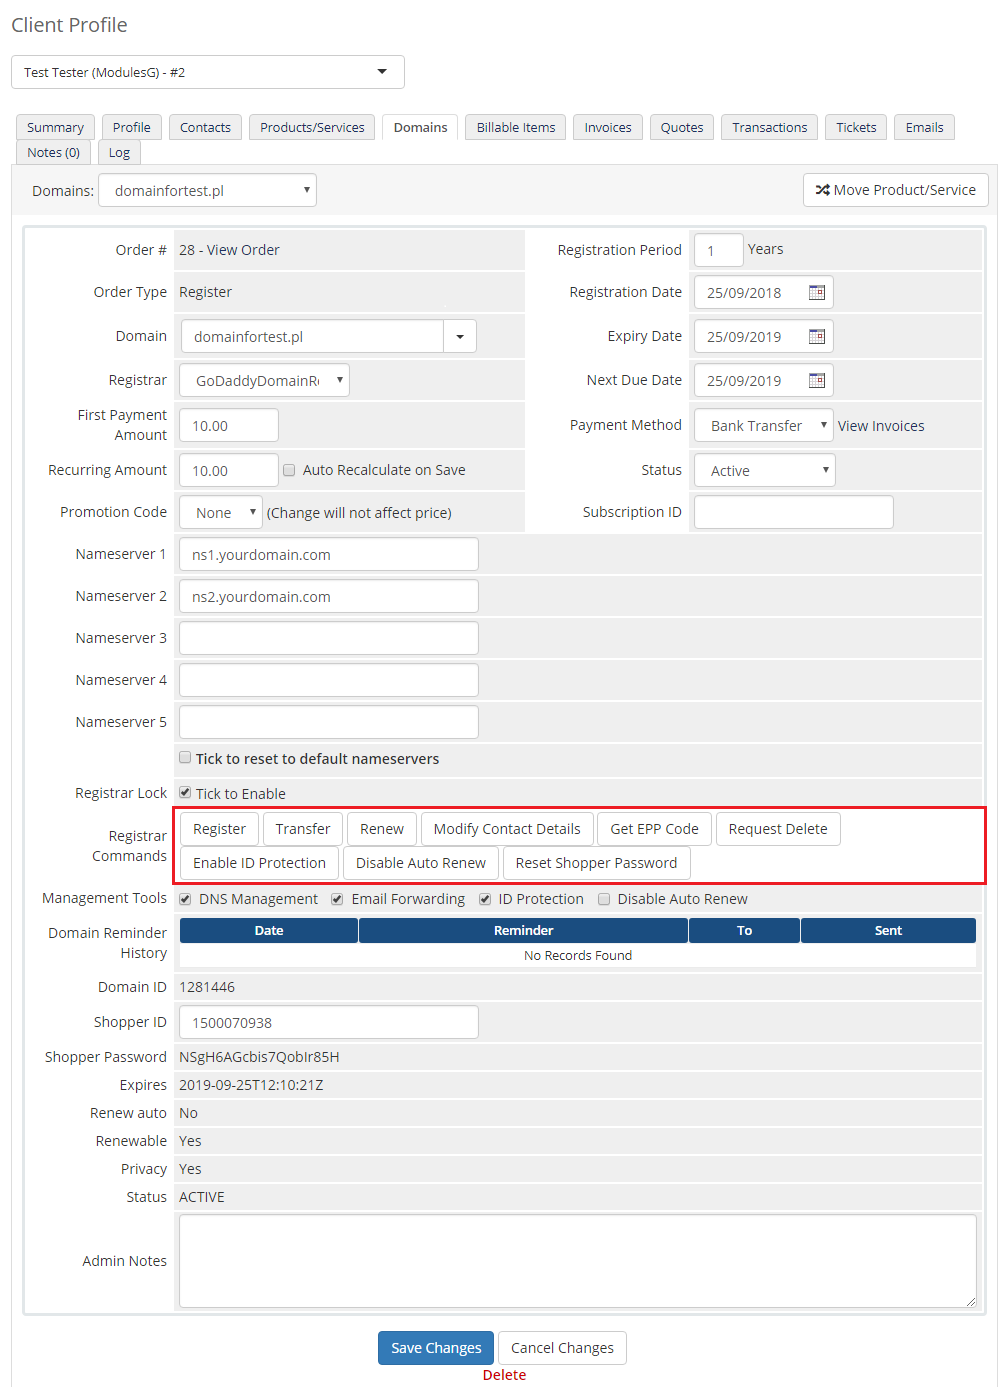
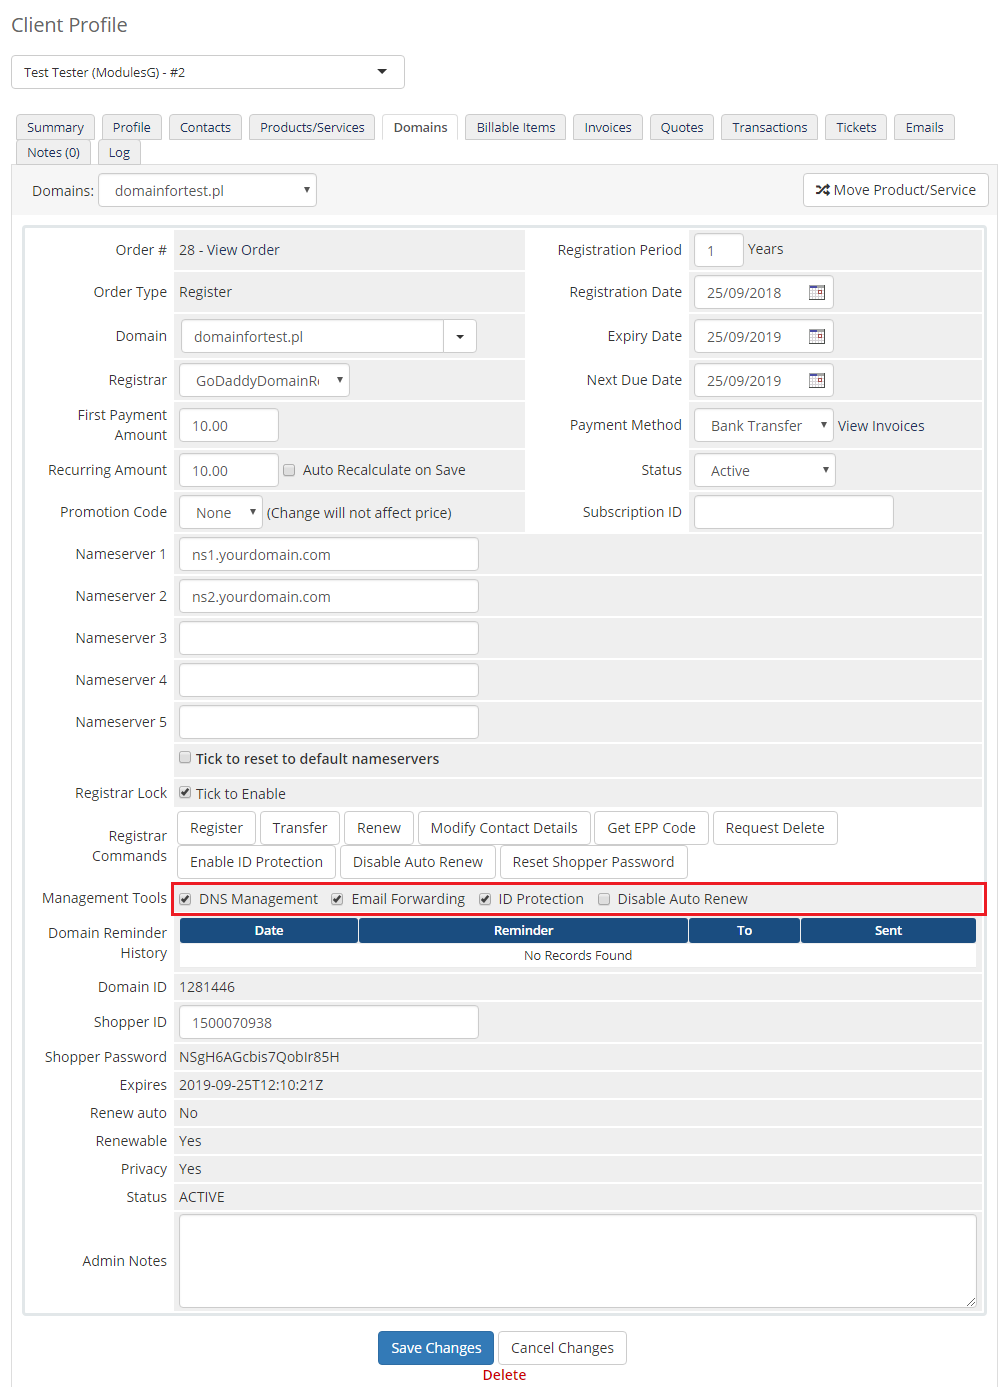
| In the admin area you can manage all the aspects of the domain. Starting with registering your domain. Allowed actions:
|
|
| Additionally, you can enable/disable features such as dns management, email forwarding, id protection and auto renew (on GoDaddy side). Important: |
|
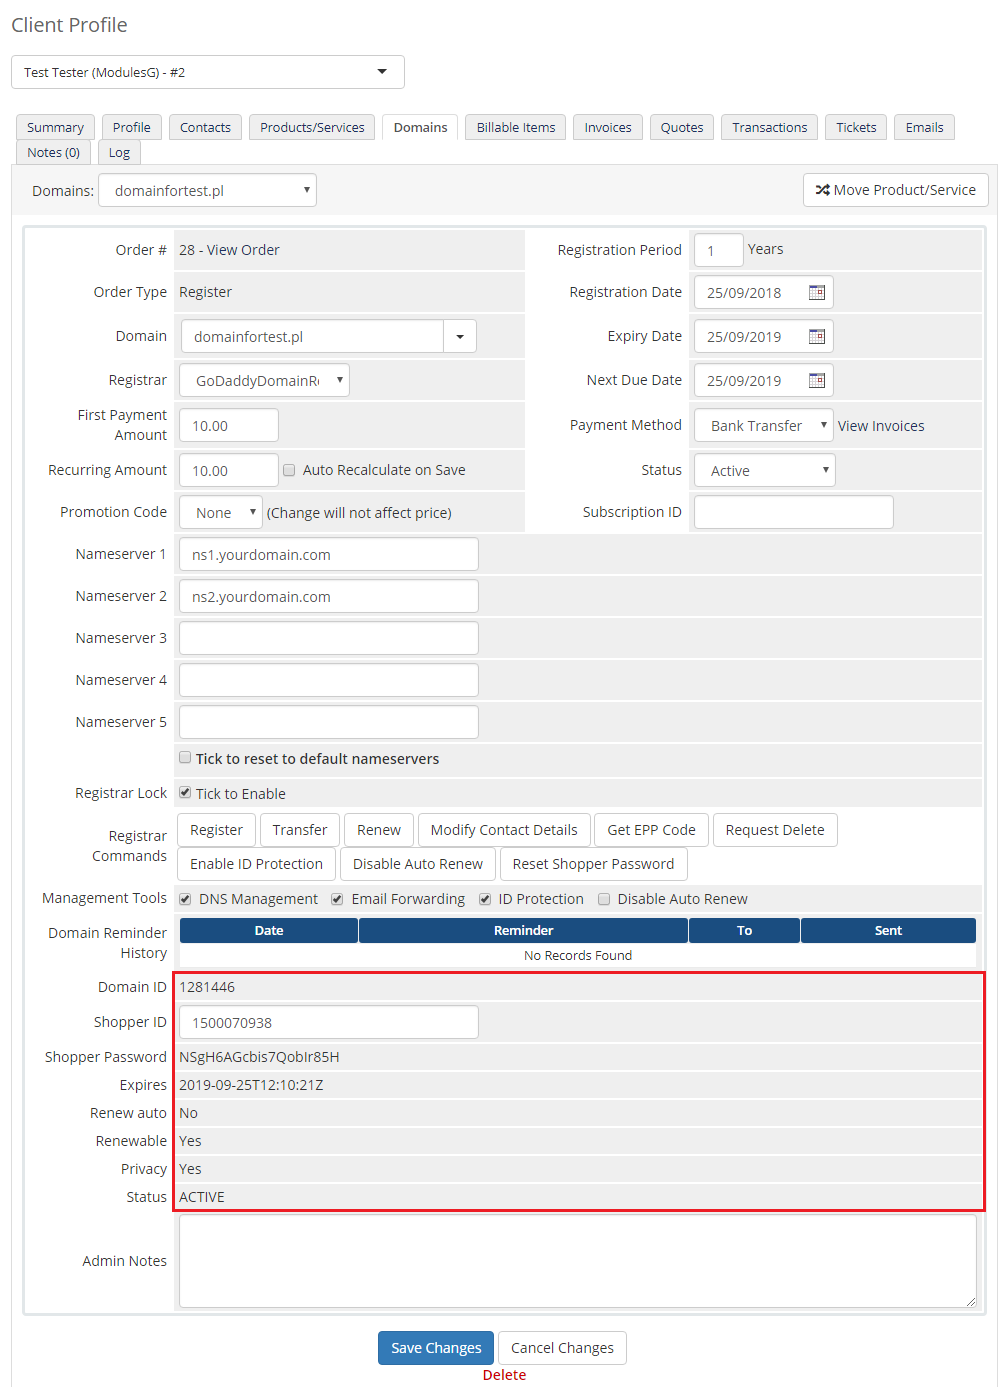
| Detailed information about the domain can be found below. |
|
Client Area
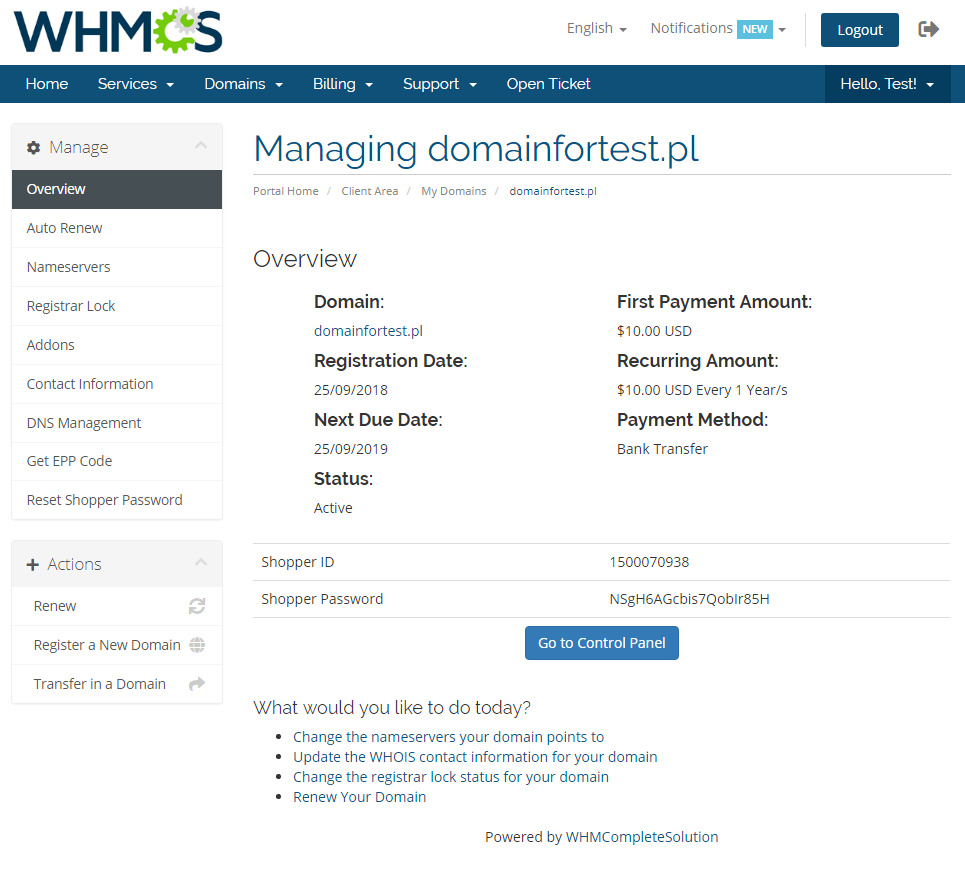
| Your customers can perform various actions on their GoDaddy domain from the client area. Clients can view basic information related to domains and perform several actions on them. Read below see exactly what can be done. |
|
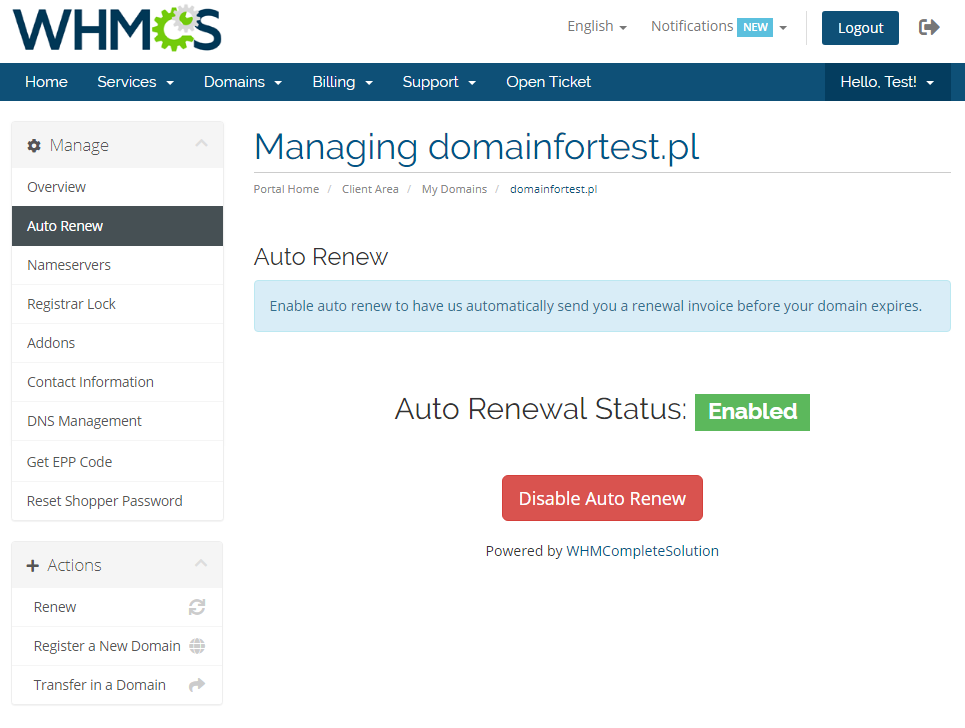
| At 'Auto Renew' tab clients can enable/disable auto renewal by pressing 'Enable Auto Renew' / 'Disable Auto Renew' button. |
|
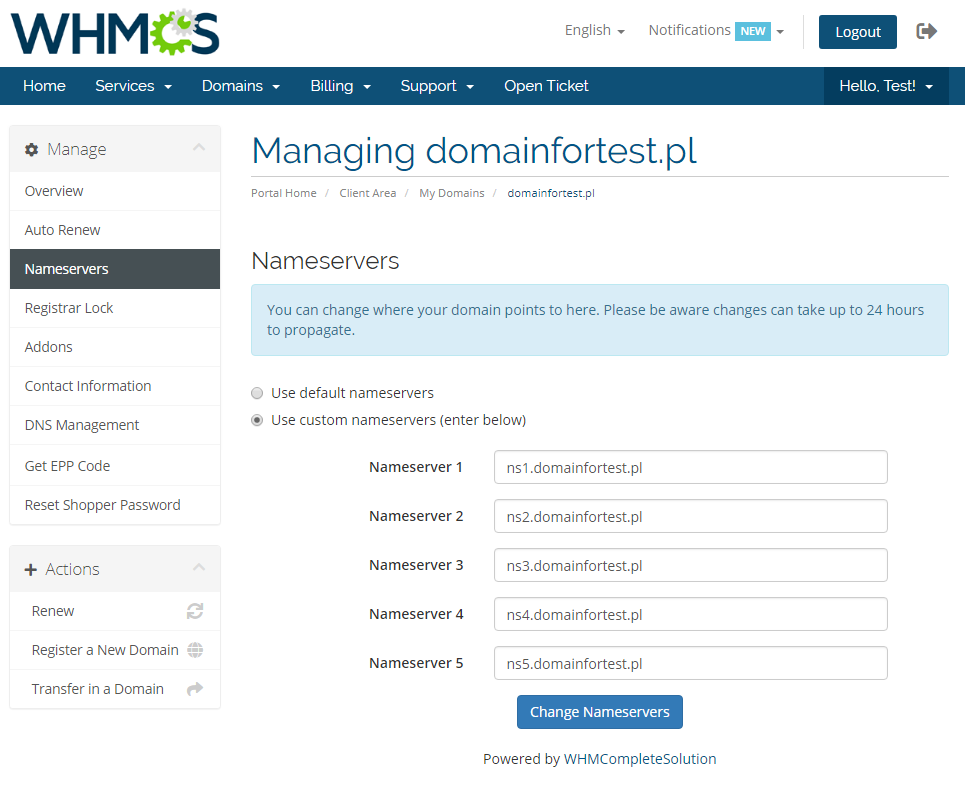
| 'Nameservers' tab allows clients to change nameservers used by their domains. |
|
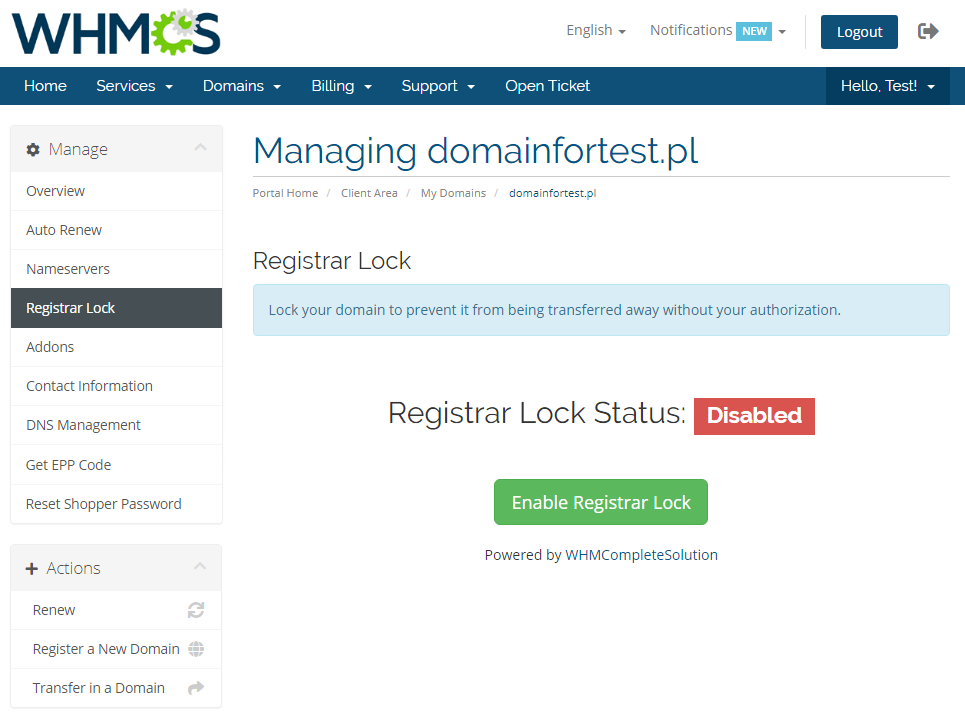
| Your customers can also lock/unlock their domains at 'Registrar Lock' tab to prevent them from being transferred. |
|
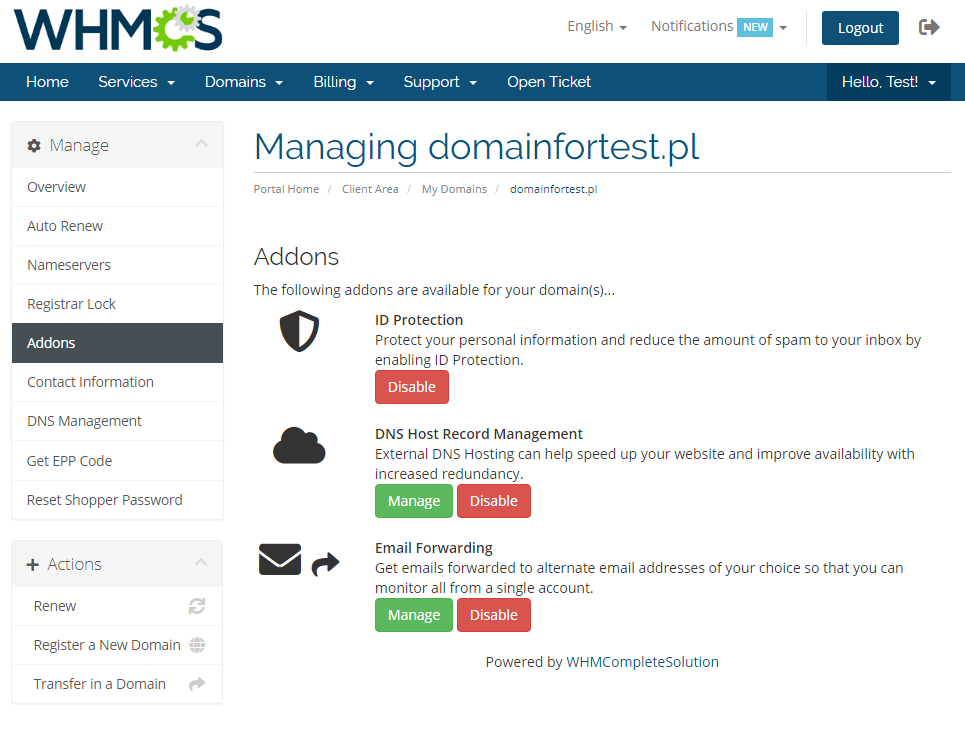
| 'Addons' tab allows your clients to view and manage addons purchased along with domain. |
|
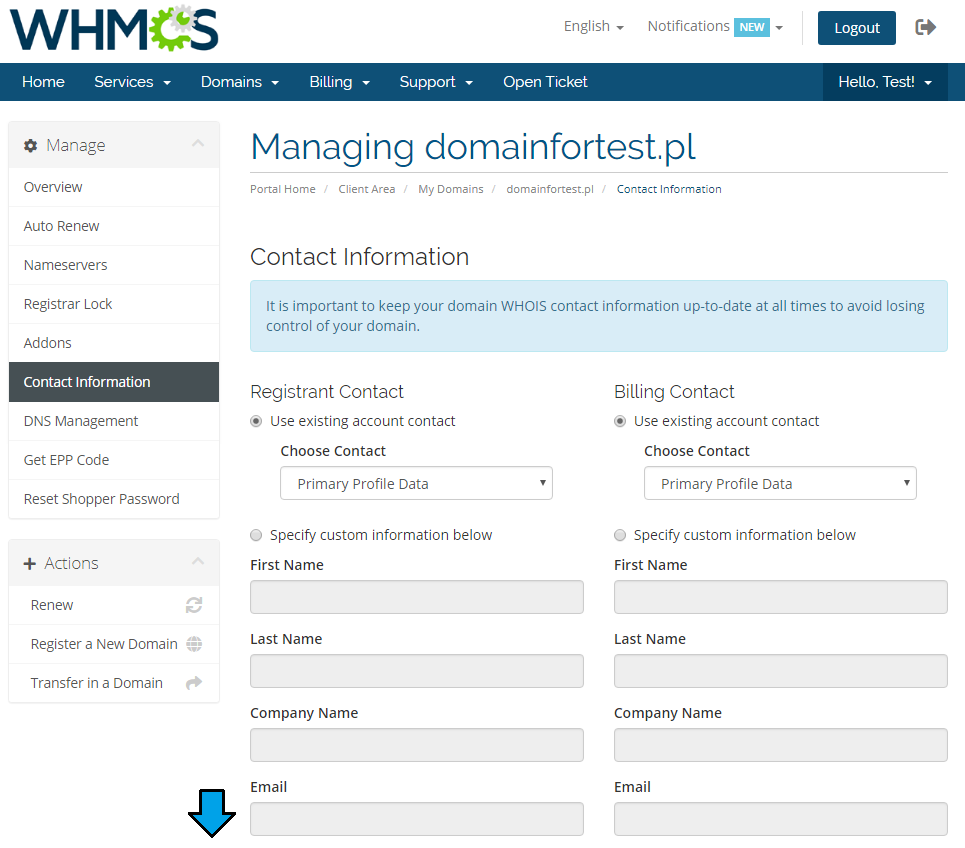
| Under 'Manage' → 'Contact Information' your clients can also view and modify contact information. Note: Please see 'Common Problems' section to learn about 'Contact Information' issues. |
|
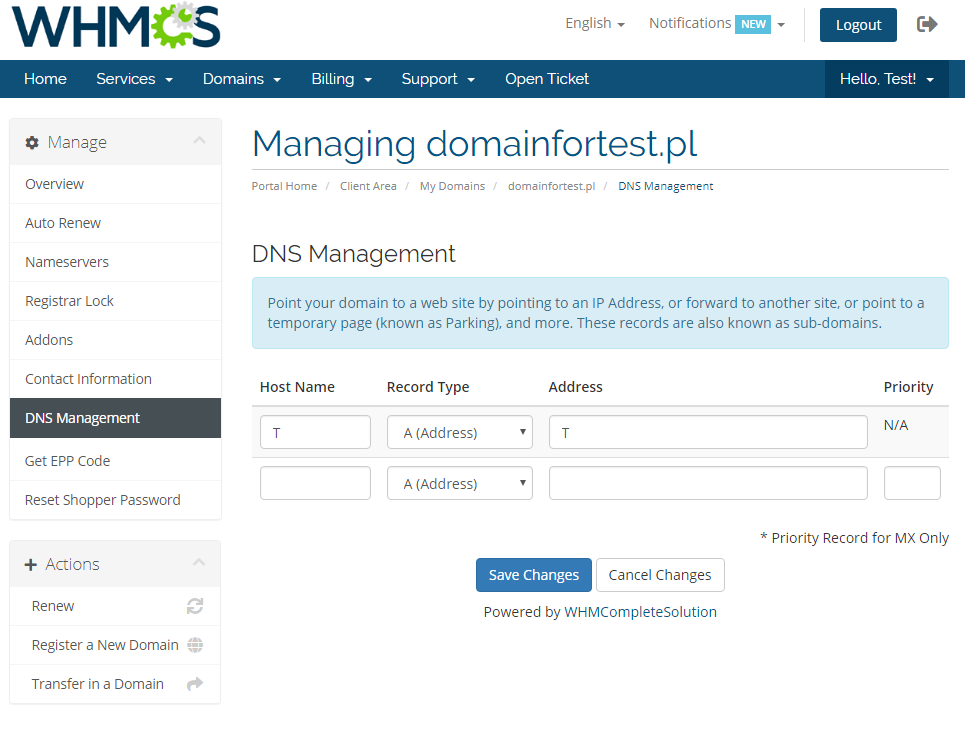
| In order to manage domain DNS records, find 'DNS Management' section (if option is enabled). |
|
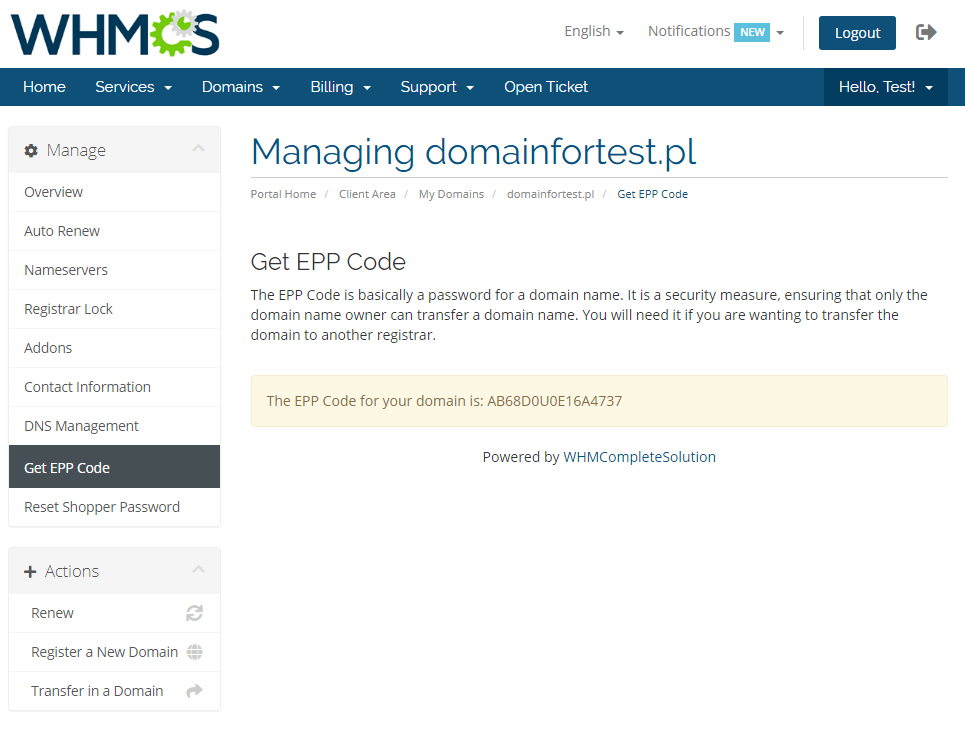
| You may also ask for EPP code (if option is allowed). |
|
Domains Migration
| In case you already have some domains existing in GoDaddy Reseller account, you will need to import them into your WHMCS manually. Take a look at the below instruction to learn how to do that step by step. |
| 1. Before you start, please turn off domains Auto Registration. This way you will avoid the new domains being registered instead of migrated. Move to WHMCS → Setup → Products/Services → Domain Pricing and select 'None' next to your TLD. |

|
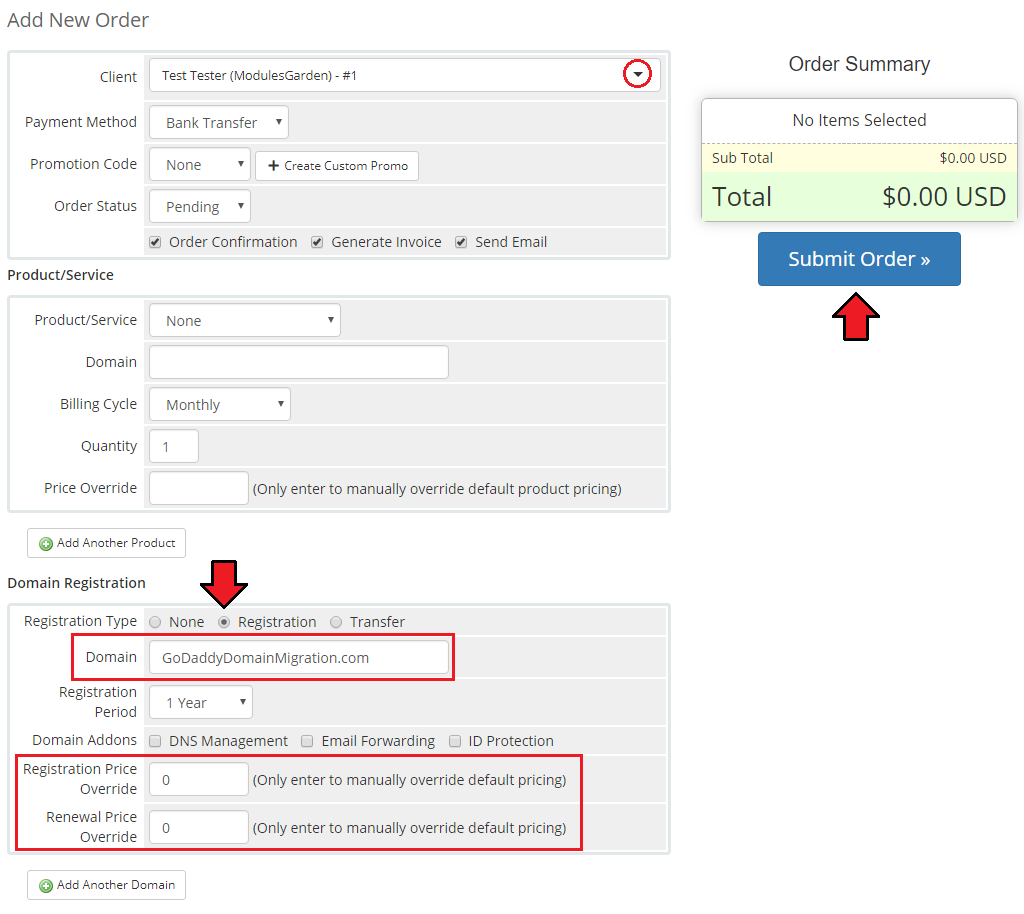
| 2. In your Admin Area you will need to place an order for your client and select 'Registration' as a domain 'Registration Type'. Then, type in the domain you are currently migrating. Override prices for registration and renewal of the domain not to generate invoices for the client and submit the order. |
|
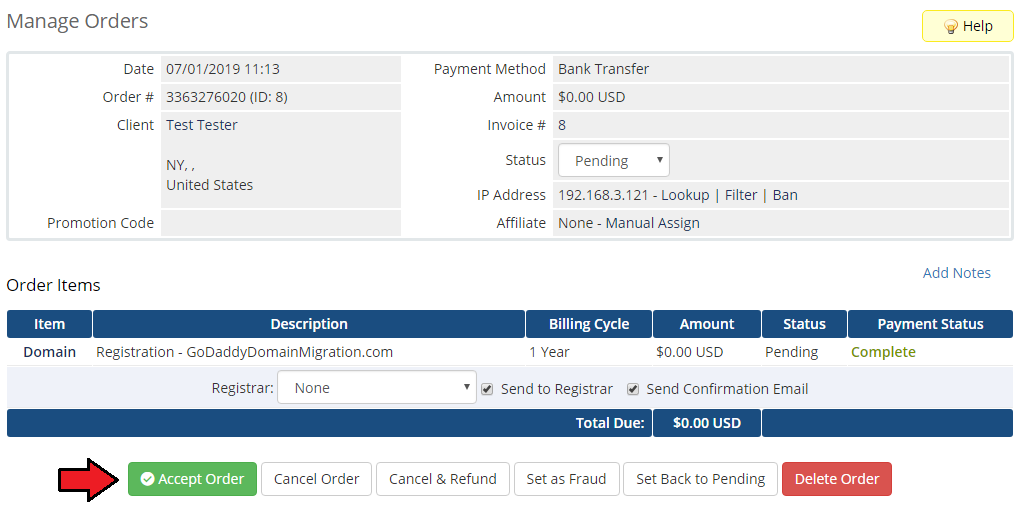
| 3. Accept the just placed order for your client. |
|
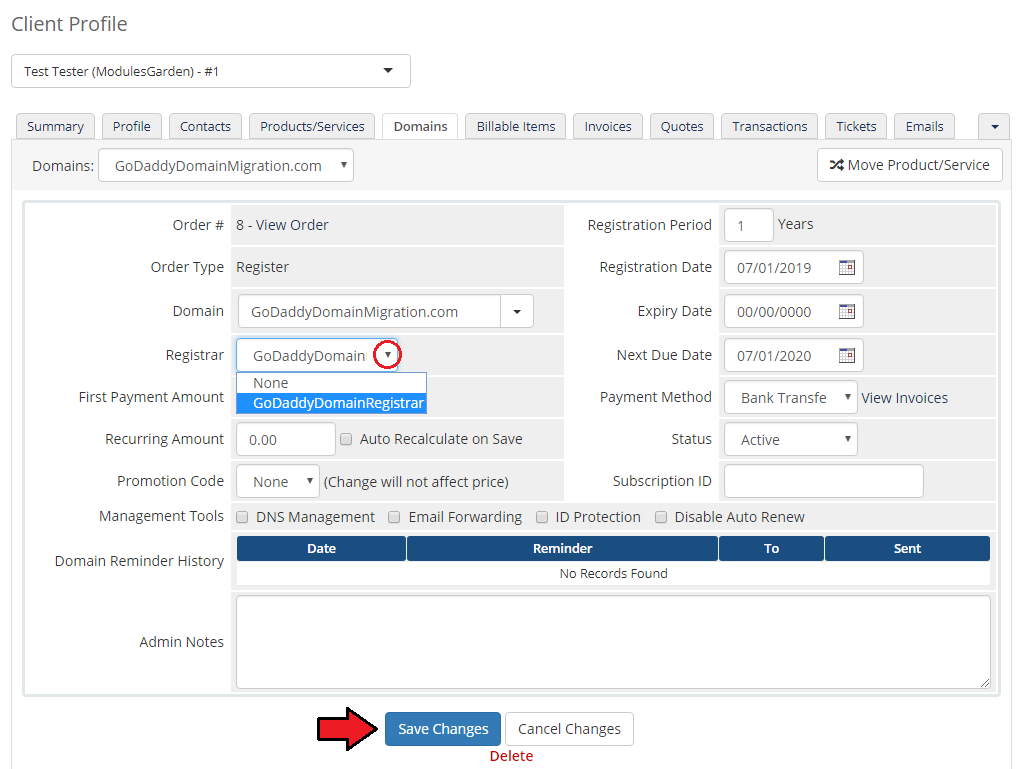
| 4. Move to the domain’s details, and select 'GoDaddyDoaminsRegistrar' as the domain registrar. Save the changes. |
|
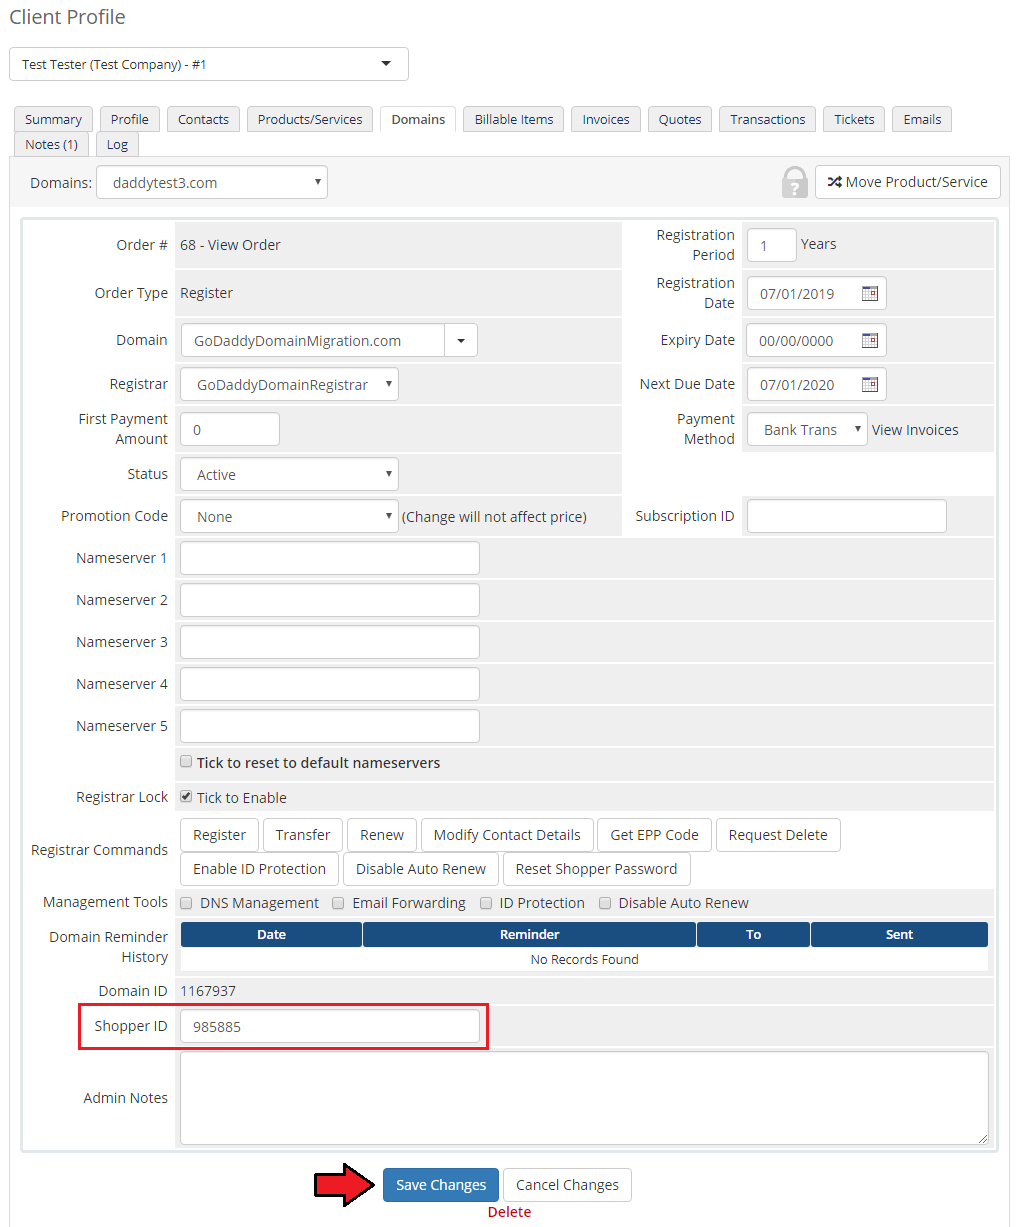
| 5. A new field 'Shopper ID' will appear. Fill in the domain Shopper ID and save the changes. |
|
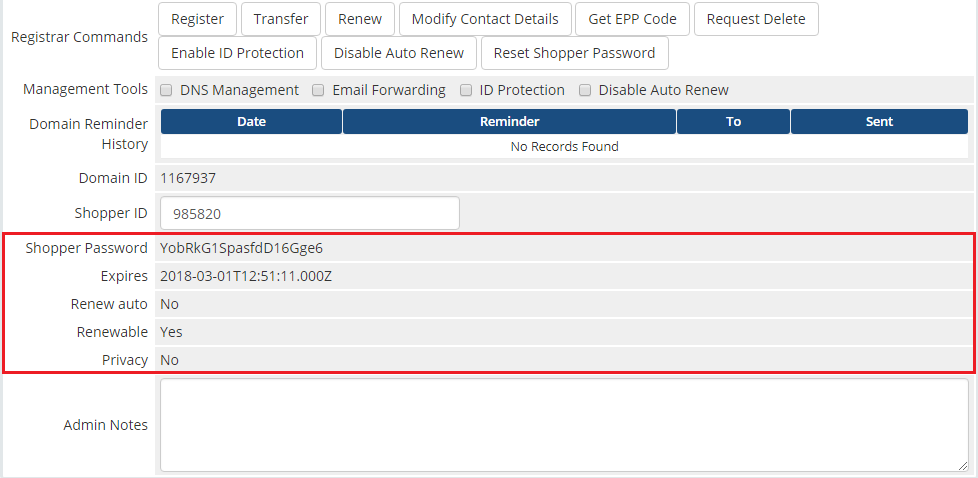
| 6. The migration process is over. The migrated domain details will appear underneath. |
|
| 7. In the end you may turn on the Auto Registration if you have turned it off previously (step 1). |
Tips
| 1. To use the test mode, simply select adequate checkbox under configuration on registrar activation page. |
2. In order to set up custom nameservers proceed to 'Setup' → 'General Settings' → 'Domains'. Type in default nameservers and save changes.
|
| 3. Module feature 'Enable GoDaddy Domain Suggestions' available for admins and client area feature 'Browse GoDaddy Domain Suggestions' are available in WHMCS V7 and later. |
| 4. Due to registry limitation, it is not possible to choose the 'ID Protection' for the '.ca' tld. We recommend disabling the 'ID Protection' for the '.ca' tlds. |
Update Instructions
| Essential guidance through the process of updating the module is offered here. Keep in mind there is a quick and easy option in our client area that will let you upgrade the license of your module to an open source version at any time - and at a lower price! |
Common Problems
| 1. When you have problems with connection, check whether your SELinux or firewall does not block ports. |
| 2. Contact Information option - management of contact information is highly limited in GoDaddy Domain Registrar For WHMCS 3.0.0. |
| 3. If one of the TLDs you have configured is unavailable, please make sure you have set up pricing in a default currency. |
| 4. If you encounter any problem with the module, make sure you have installed SOAP library on your server. |
5. In case you see error 'Private label ID does not belong to a reseller' while registering, you must contact GoDaddy support directly.
|
| 6. Some TLDs may require adding additional domain fields manually. For example, if you try to register a '.ca' TLD and get an error like 'Order Accept Encountered Problems. Please create new domain custom field called 'language'. Available values: FR, EN' //GoDaddy .CA $additionaldomainfields[".ca"][] = array( "Name" => "language", "DisplayName" => "Language", "LangVar" => "language", "Type" => "dropdown", "Options" => "FR|French,EN|English", ); This will result in adding a new option when ordering your domain: |

|
| 7. If you perform the 'Reset Shopper Password' action and you encounter the 'Cannot reset Shopper password - Unauthorized - Missing jwt.' error, then you need to make sure that API Keys were generated here https://reseller.godaddy.com/settings/keys as the ' Reset Shopper Password' action may be available only for reseller accounts. |