Domain Allocator For WHMCS
Contents |
About Domain Allocator For WHMCS
| Domain Allocator For WHMCS gives your clients the opportunity to assign domains to their own hosting accounts and allows to set its type to either parked or addon. With this module domain parking and creating addon domains will be possible over the ordering process and as a measure of handling already owned domains, within both admin and client area. The module connects finely with web hosting accounts of cPanel, Plesk and DirectAdmin. |
- Admin Area Features:
| ✔ Enable Domain Allocation For Selected Products |
| ✔ Manage Domain Assignments |
| ✔ View Summary Of Domain Assignments |
- Client Area Features:
| ✔ Domain Allocation During Order Checkout: |
| ✔ Assign Domain As Parked Or Addon Domain |
| ✔ Order New Web Hosting Account |
| ✔ Domain Allocation In Overview Section: |
| ✔ Assign Domain As Parked Or Addon Domain |
| ✔ Switch Domain Assignment Between Web Hosting Accounts |
| ✔ Change Nameservers To Match Web Hosting Configuration |
- Supported Modules:
| ✔ DirectAdmin & DirectAdmin Extended For WHMCS |
| ✔ cPanel & cPanel Extended For WHMCS |
| ✔ Plesk & Plesk Extended For WHMCS |
- General Info:
| ✔ Multi-Language Support |
| ✔ Supports PHP 7.1 Up To PHP 7.4 |
| ✔ Supports WHMCS V7.9 And Later |
| ✔ Easy Module Upgrade To Open Source Version |
Installation and Configuration
| This tutorial will show you how to successfully install and configure Domain Allocator For WHMCS. We will guide you step by step through the whole installation and configuration process. |
Installation
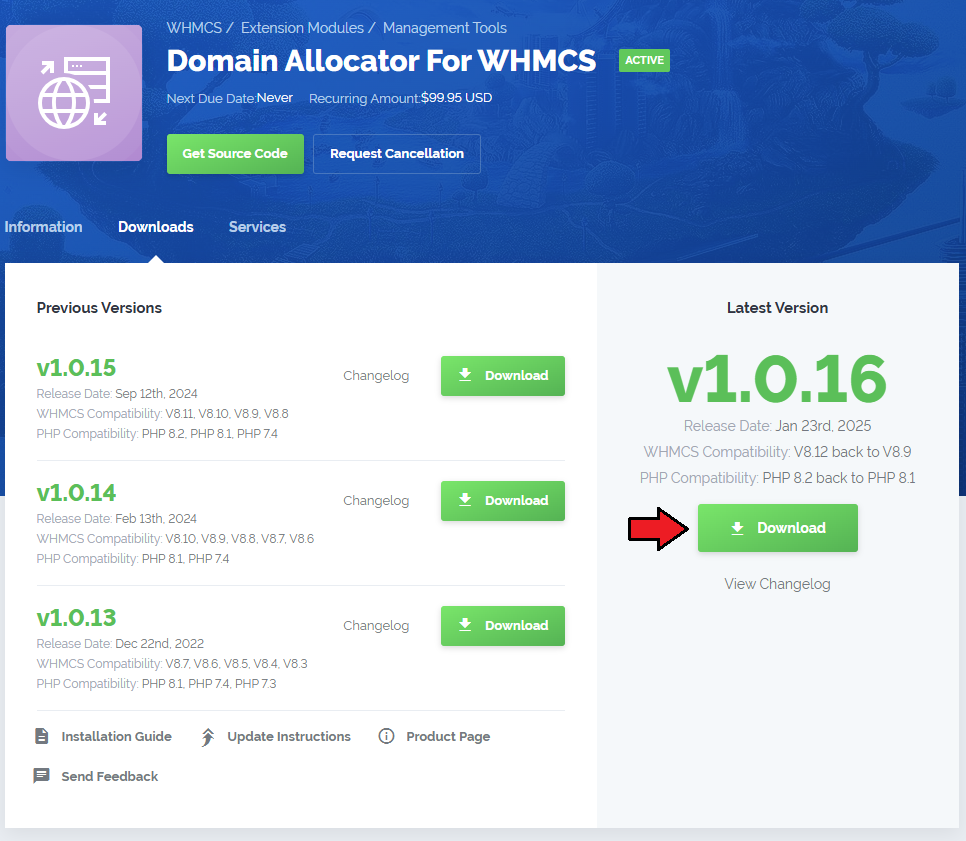
| 1. Log in to our client area and download the module. |
|
| 2. In the downloaded file you might find one or two packages that support different PHP versions. In the most recent versions of the module, you will find only one package that supports PHP 7.1 and later. |
| Previous updates of the module may contain two packages dedicated to various PHP versions. The first one that supports PHP 5.6 up to PHP 7.0, and the second one addressed to PHP 7.1 up to PHP 7.3. |

|
| Note: You can check the current PHP version in your WHMCS. To do so, proceed to 'Utilities' → 'System' → 'PHP Info'. |
| 3. Extract the package and upload its content into the main WHMCS directory.
The content of the package to upload should look like this. |
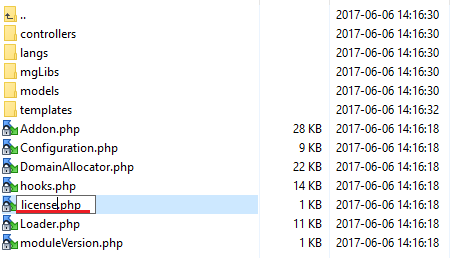
| 4. When you install Domain Allocator For WHMCS for the first time you have to rename 'license_RENAME.php' file. File is located in 'modules/addons/DomainAllocator/license_RENAME.php'. Rename it from 'license_RENAME.php' to 'license.php'. |
|
| 5. In order to configure your license key, you have to edit the previously renamed 'license.php' file. Enter your license key between quotation marks as presented on the following screen. You can find your license key in our client area → 'My Products'. |

|
Addon Configuration
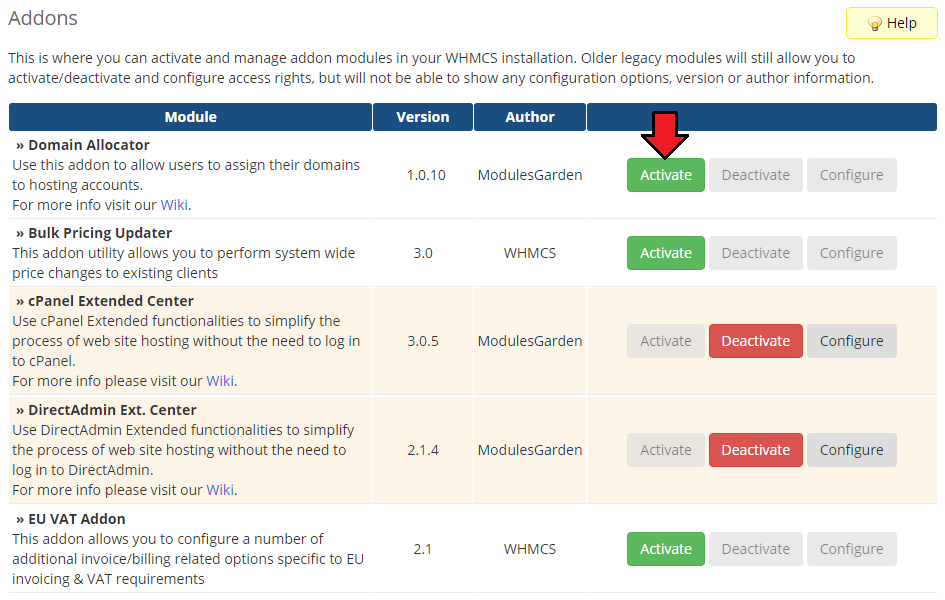
| 6. Now you have to activate the module in your WHMCS system. Log in to your WHMCS admin area. Go to 'Setup' → 'Addon Modules'. Afterwards, find 'Domain Allocator' and press 'Activate' button. |
|
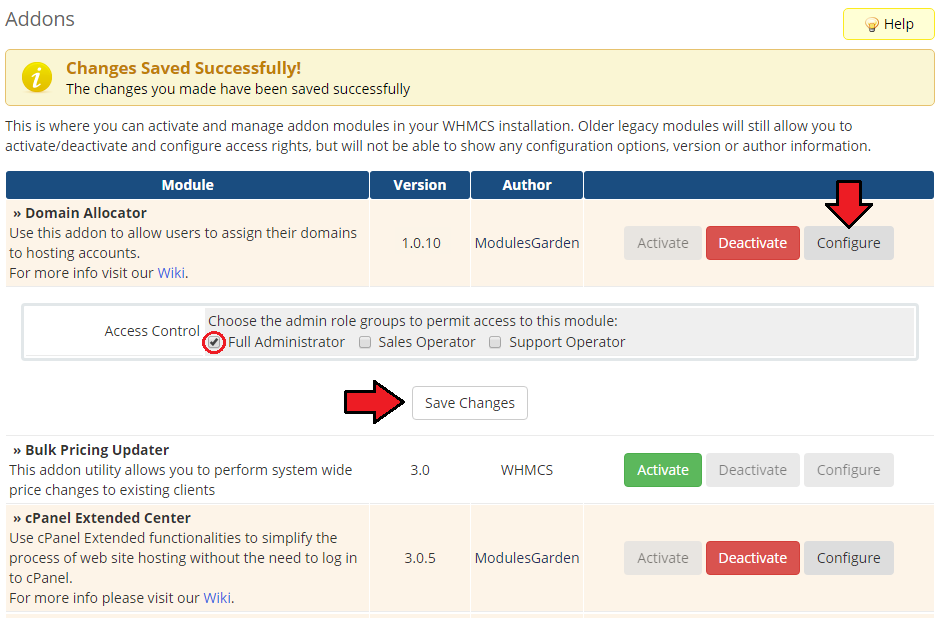
| 7. In the next step you need to permit access to this module. To do so click on 'Configure' button, tick 'Access Control' near desired admin role groups and press 'Save Changes'. |
|
| 8. You have just successfully installed Domain Allocator For WHMCS! |
Management
| In this section we will show you the possibilities of Domain Allocator For WHMCS. Our module allows your clients to manage assignment of parked and addon domains. |
Admin Area
Dashboard
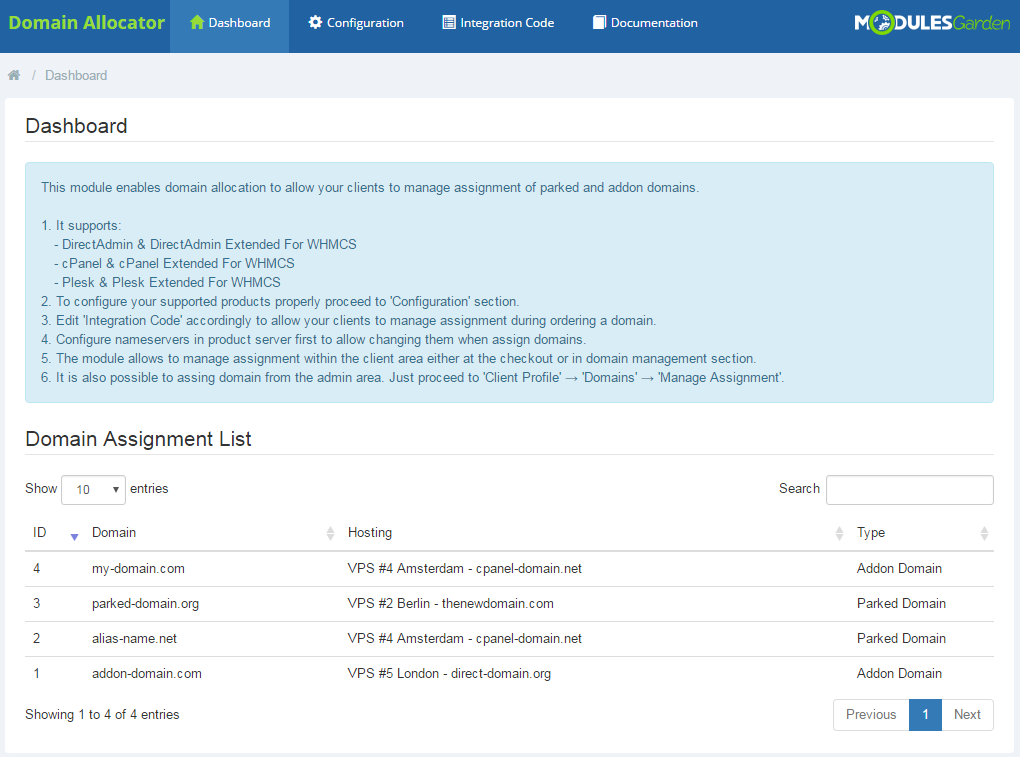
| Here you can see the short summary on the module details and the list of all domain assignment. |
|
Products Configuration
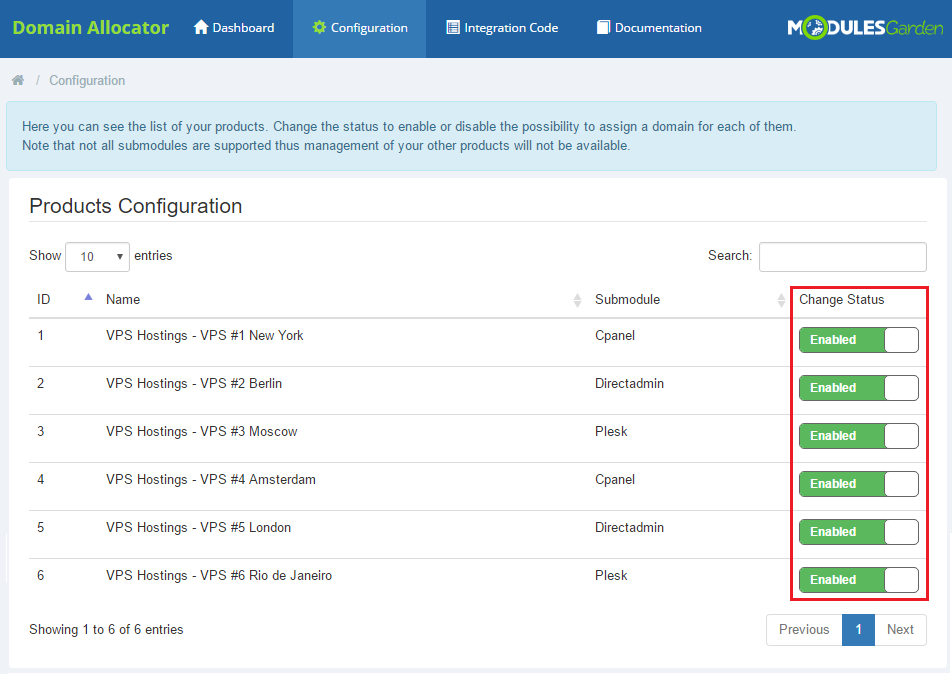
| In 'Configuration' tab you will find the list of your products. Here you can enable or disable automatic domain assignment for each of them. Note that not all submodules are supported thus management of your other products will not be available. |
|
Integration Code
| In order to allow your clients to manage assignment, follow these steps. |
1. Open the file found in the below directory.
templates/orderforms/standard_cart/configuredomains.tpl |
2. Delete the line:{if $domain.hosting}[{$LANG.cartdomainshashosting}]{else}<a href="cart.php" style="color:#cc0000;">[{$LANG.cartdomainsnohosting}]</a>{/if}
|
and add the proper code:
{if $loggedin}
    {if $hostcheck}
        <button data-domain-name="{$domain.domain}" class="assign_order btn btn-primary" role="button" type="button">{$btnassign}</button>
    {else}
        <div class="alert alert-warning alert_custom" role="alert">
            {$user_no_hosting}
        </div>
    {/if}
{else}
    <div class="clear_f"></div>
    <button data-domain-name="{$domain.domain}" data-toggle="modal" data-target="#loginmodal" type="button" class="login_btn btn btn-primary">{$btnlogin}</button>
{/if}
<div class="clear_f"></div>
{if $domain.hosting}
    <span class="active_hosting alert alert-info alert_custom" role="alert">{$has_hsoting}</span><br />
{else}
    <a class="add_hosting btn btn-primary" href="cart.php">{$no_hsoting}</a>
{/if}
|
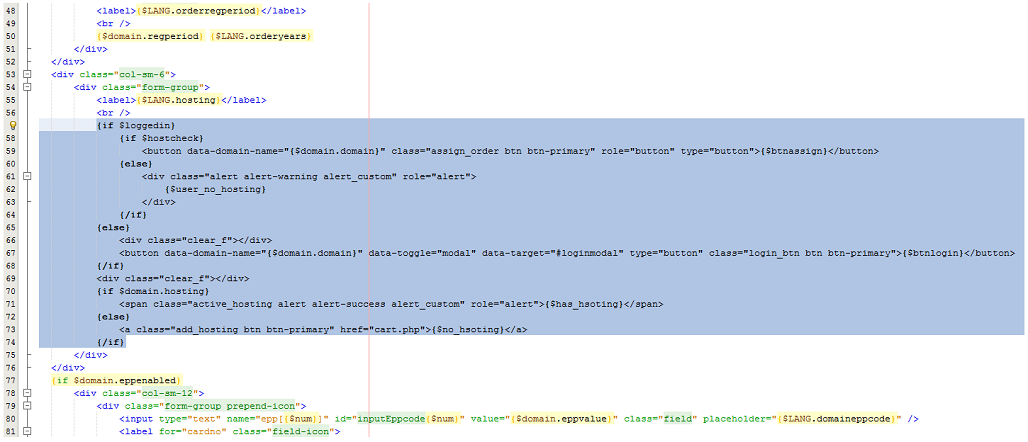
| 3. You can see correctly placed code below. |
|
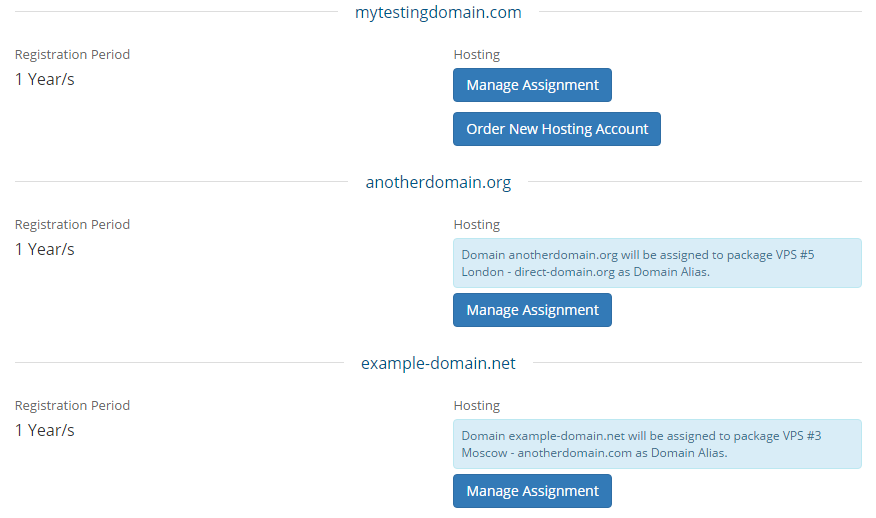
| 4. This is how it should be seen in the client area. |
|
Client Profile
| When you want to assign a domain from your admin area, just look at the details in the client profile. Select 'Domains' tab and click 'Manage Assignment' . |
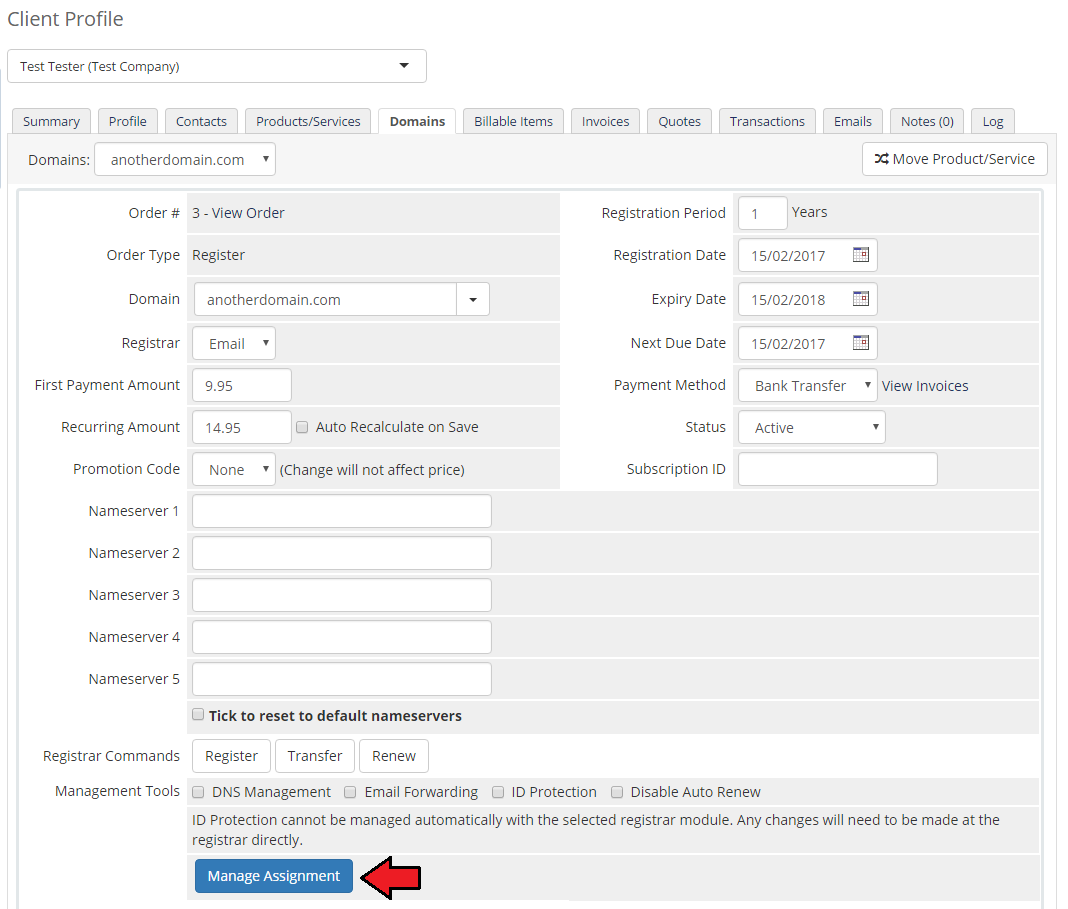
|
| Then select Web Hosting account to which your domain will be assigned and define this assignment type. |
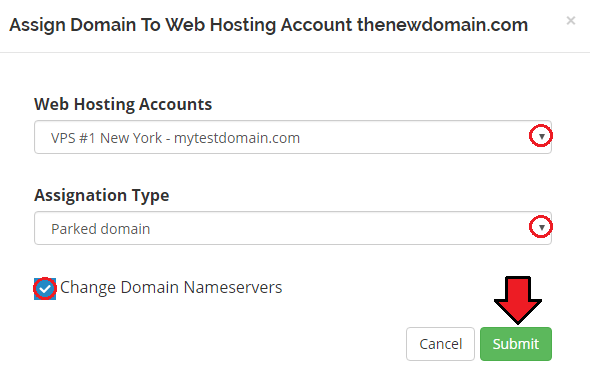
|
Client Area
| Your customers can perform various actions on their domains from the client area. Read the description below to see exactly what can be done. |
Manage Assignment
| In the client area proceed to 'Domains' → My Domains' . Here clients can view basic information related to domains and perform several actions on them. |
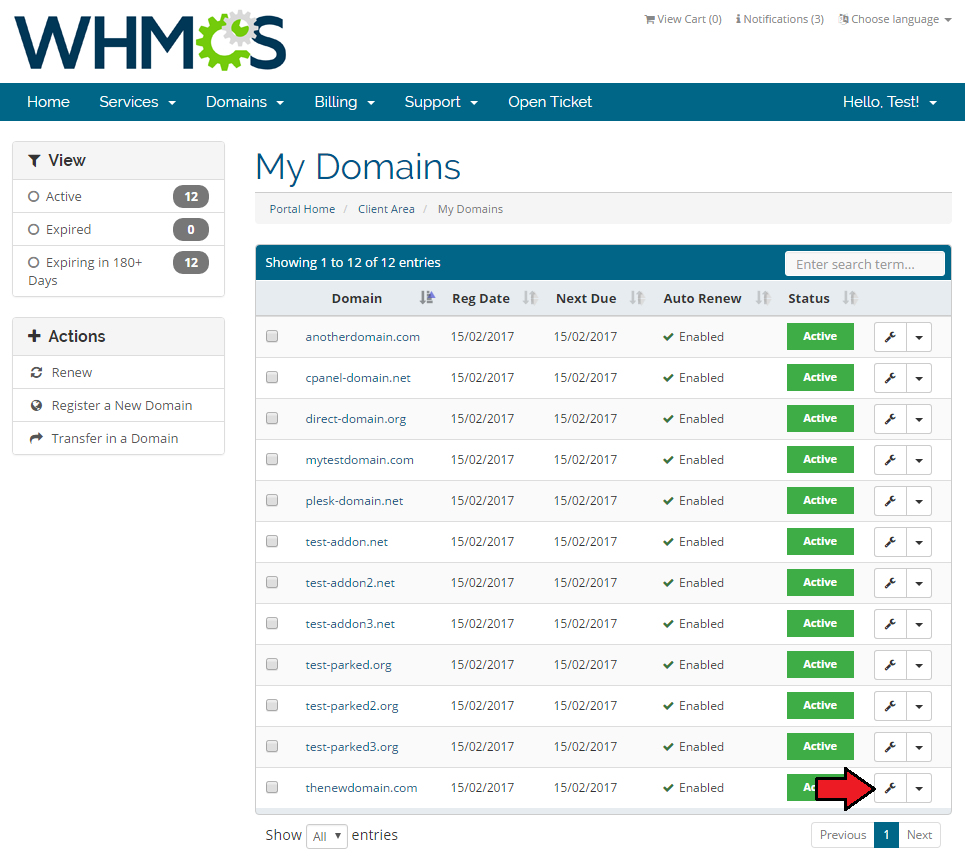
|
| Press 'Manage Assignment' to assign domain to Web Hosting Account. |
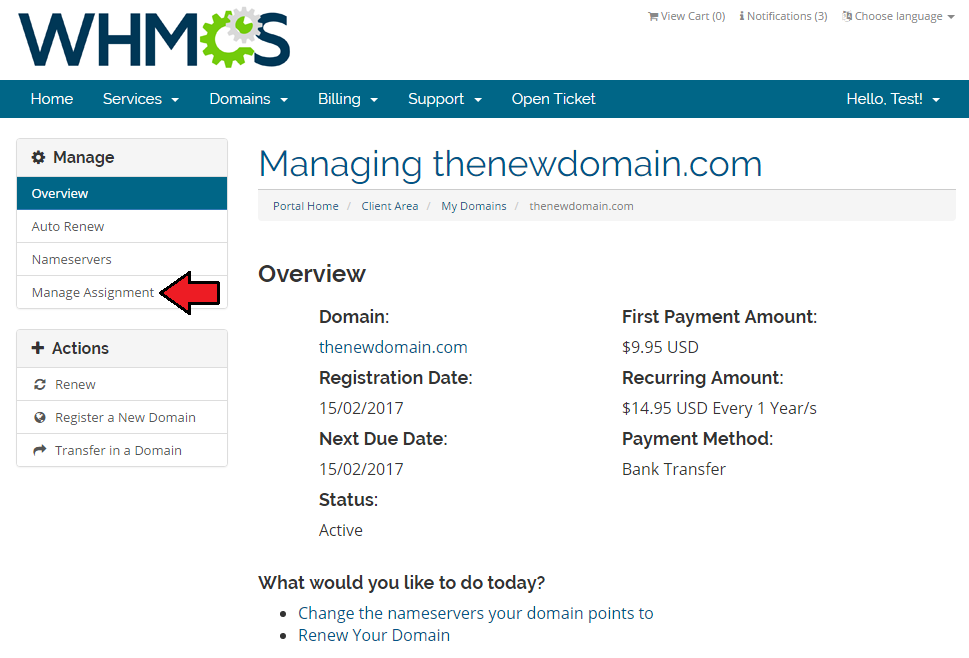
|
| Select preferred options from the dropdown menu and click 'Submit' button. |

|
Register Domain
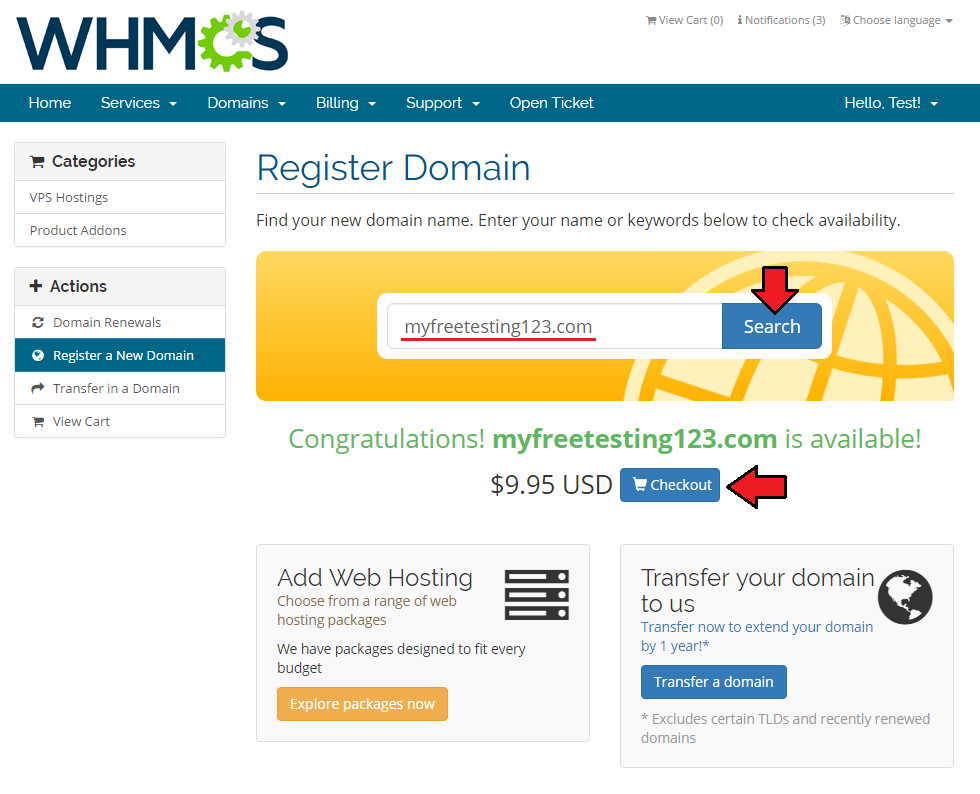
| It is also possible to register a completely new domain. Go to 'Domains' → 'Register a New Domain' and type in a name to check its availability. If so, add it to cart and click 'Checkout'. |
|
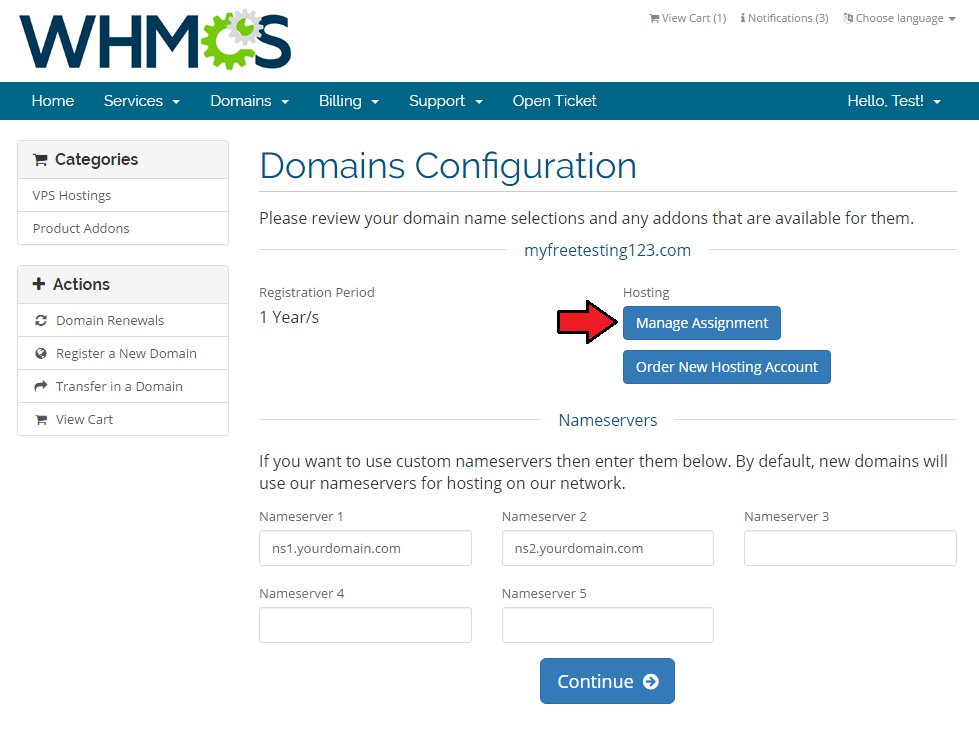
| Details will be visible now. 'Manage Assignment' to assign domain to already existing Web Hosting Account is one of the choices. |
|
| Just select preferred options from the dropdown menu and click 'Submit' button. |

|
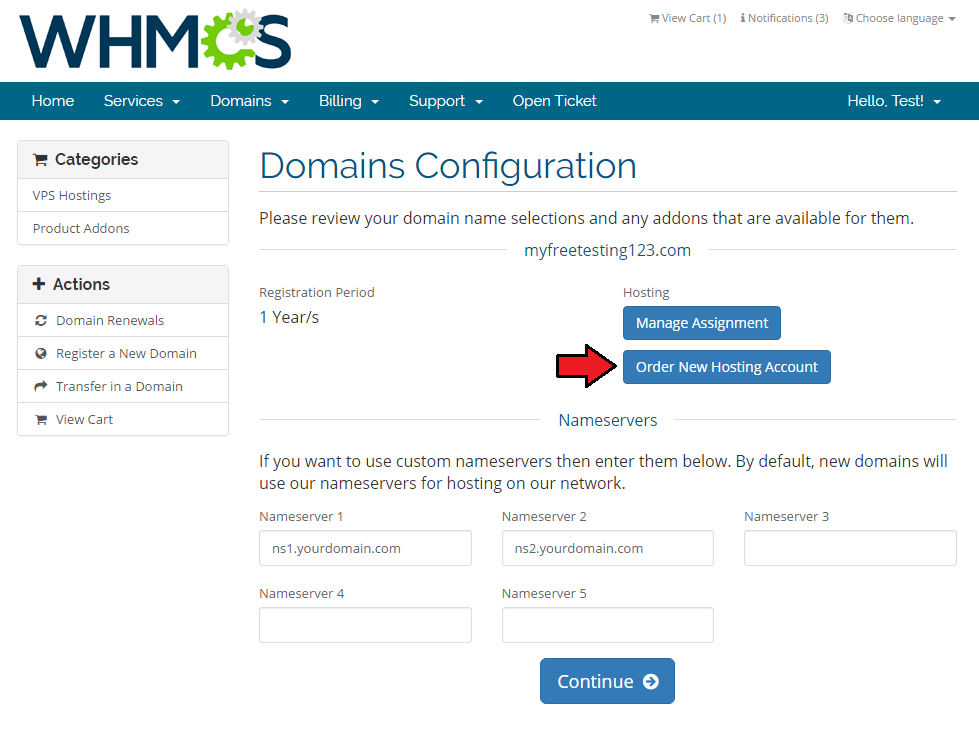
| Apart from that, a new account can be ordered. To do so, press 'Order New Hosting Account' button. |
|
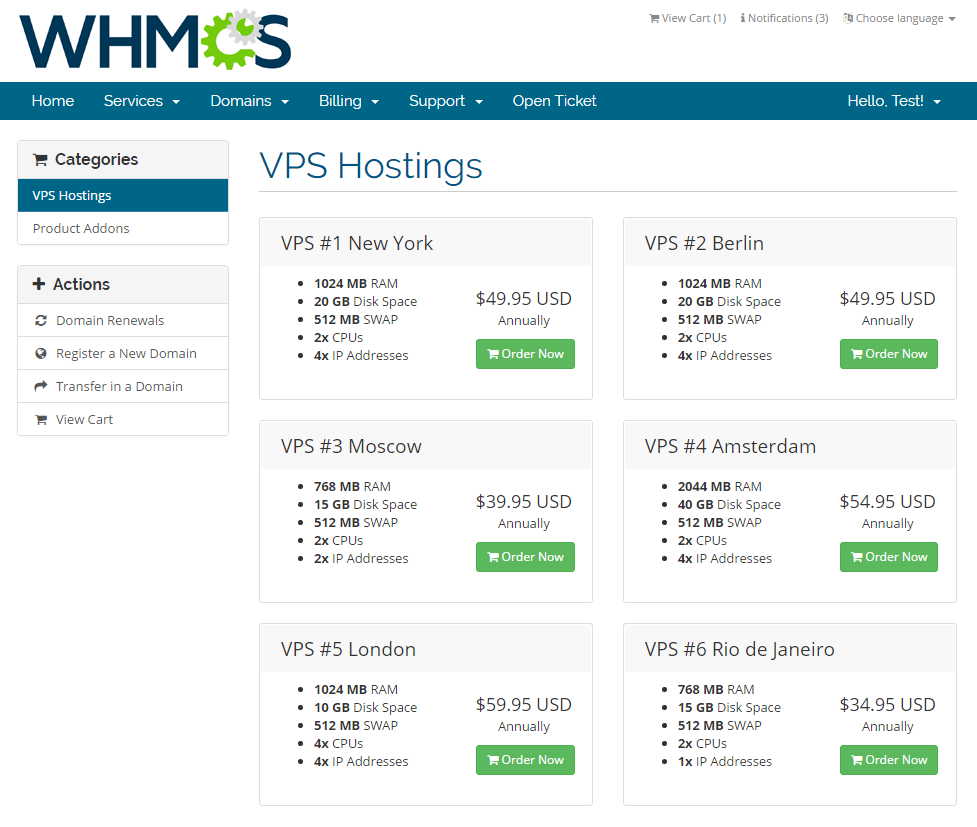
| Select the hosting that suits your needs most. |
|
Unassign Domain
| Clients are also given the possibility to unassign their domains. To unassign a domain go to 'Domains' → My Domains' and select one from the list. |

|
| Press 'Manage Assignment' to unassign domain from Web Hosting Account. |

|
| Then click the button as shown here: |

|
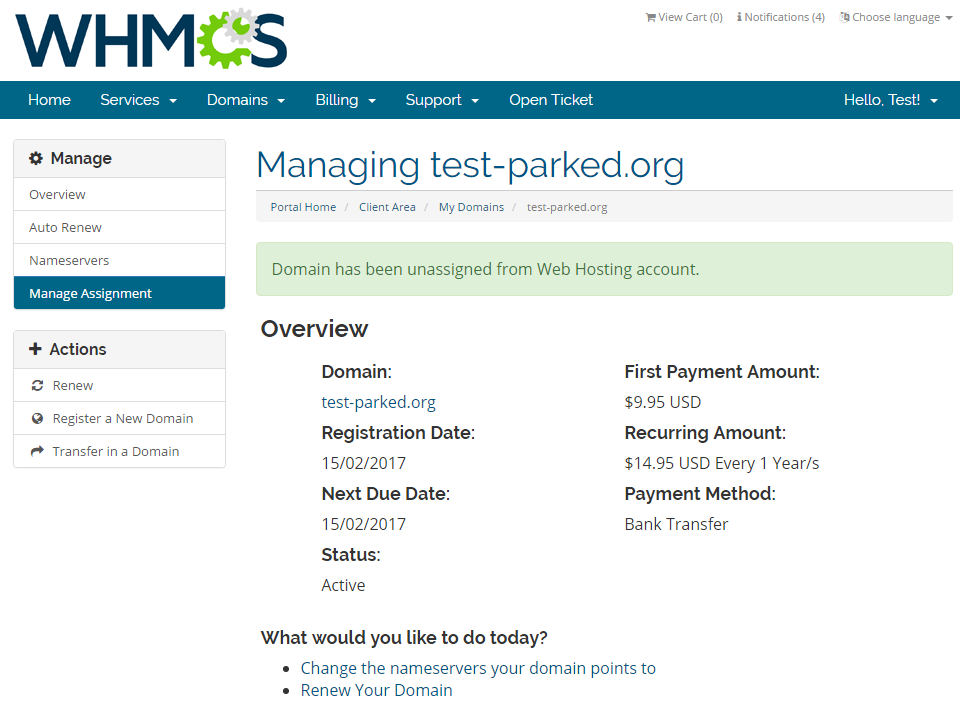
| A proper note will show up. |
|
Change Hosting Account
| Clients are also enabled to change the hosting accounts. To do so, proceed to 'Domains' → My Domains' and select one from the list. |

|
| Press 'Manage Assignment' to change the account. |

|
| Then click the button as shown here: |

|
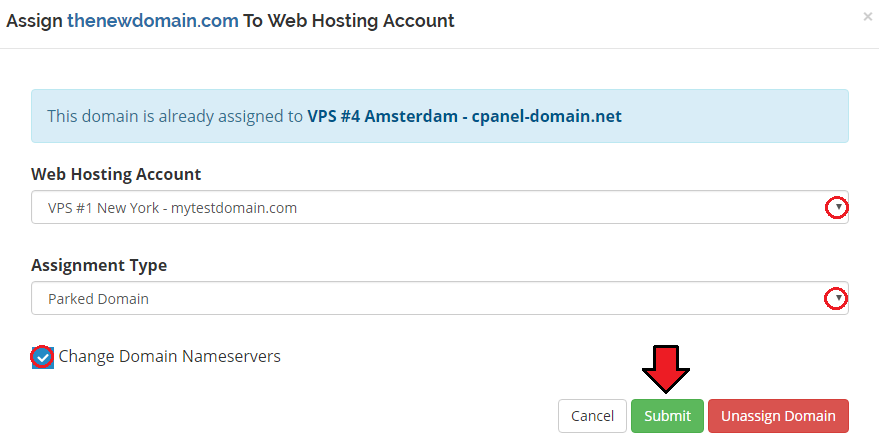
| Now, simply choose the new account and type of assignment. Then submit your request. |
|
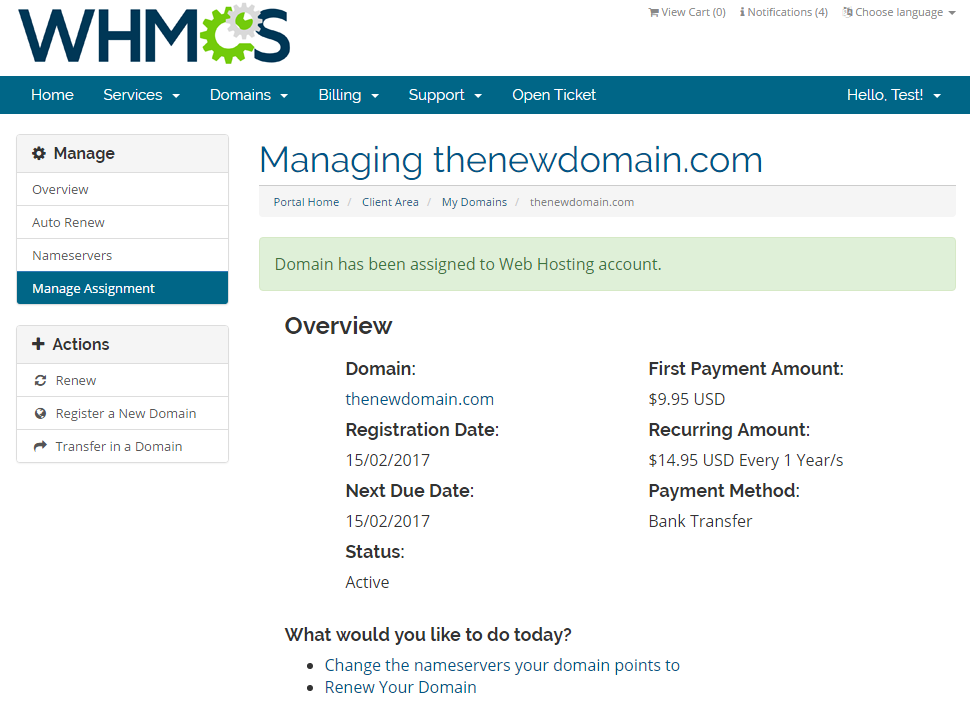
| You have successfully changed the account and your domain has been assigned to the new one. |
|
Tips
1. Should you encounter any problems related to nameservers, you need to check their setup in the server configuration.
|

|
| 2. As this module supports templates system, any changes made in the module's templates files will be saved after the upgrade process. |
Update Instructions
| Essential guidance through the process of updating the module is offered here. Keep in mind there is a quick and easy option in our client area that will let you upgrade the license of your module to an open source version at any time - and at a lower price! |
Common Problems
| 1. When you have problems with connection, check whether your SELinux or firewall does not block ports. |