Advanced Billing For WHMCS
About Advanced Billing For WHMCS
| Advanced Billing For WHMCS allows you to set up additional billing models for your products based on the actual usage of bandwidth, CPU and other server resources. The module features multi-currency support, and enables such variants as hourly billing, ticket billing, credit billing, and recurring billing, to name but a few. |
- Core Features:
| ✔ Hourly Billing For Any WHMCS Module |
| ✔ Ticket Billing |
| ✔ Configure Billing Per Product |
| ✔ Manage Extensions And Configure Them Per Product |
| ✔ View Current List Of Billable Items For Next Invoices |
| ✔ View Resource Usage History Of Any Item |
| ✔ Manage Awaiting Invoices And Convert Them To Invoices |
| ✔ Define Time Period Between Resource Usage Checks |
| ✔ Define Whether To Store Logs In Files Or Database |
| ✔ Define Number Of Days To Pass To Clear Log Records |
| ✔ View Logs |
- 'Recurring Billing' Extension Features:
| ✔ Bill On Account Termination |
| ✔ Bill When Invoice Is Generated For Hosting |
| ✔ Bill Each X Day Of Month |
| ✔ Bill Each X Days |
| ✔ Define Minimum Billing Amount |
| ✔ Automatically Generate Invoice |
| ✔ Define Invoice Payment Due Date |
| ✔ Automatically Apply Credits |
| ✔ Display Advanced Billing Cycle Info |
| ✔ Apply Discounts To Client Groups |
- 'Prepaid Billing' Extension:
| ✔ Enable Clients To Top Up Account With Credits Available For Hosting |
| ✔ Define Minimum Amount Of Credits To Top Up Account |
| ✔ Generate Summation Each X Days |
| ✔ Access Summations Of Credit Usage By Client |
| ✔ Send Email When Client's Credit Balance Falls Below Defined Credit Amount |
| ✔ Automatically Suspend Account When Client Is Out Of Credits |
| ✔ Automatically Refill Client's Credit Balance With Needed Amount Using Their WHMCS Credits |
| ✔ Define Invoice Payment Due Date When Topping Up Account |
- 'Credit Billing' Extension Features:
| ✔ Generate Invoice Each X Days |
| ✔ Define Minimum Amount Of Credits To Charge |
| ✔ Send Email When Client's Credit Balance Falls Below Defined Credit Amount |
| ✔ Automatically Suspend Account When Client Is Out Of Credits - With Override Support |
| ✔ Define Invoice Payment Due Date |
| ✔ List Summary Credit Billing Charges Of Any Hosting |
| ✔ Refund Credit Payment To Client |
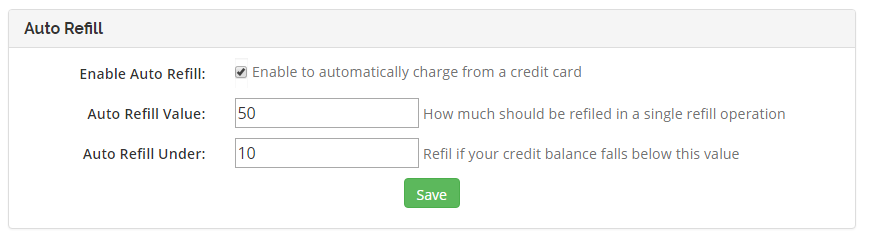
| ✔ Automatically Refill Client's Credit Balance Using Their Credit Card |
| ✔ Client Can Enable/Disable Auto Refilling And Define Single Refill Amount |
- 'Product Auto Upgrade' Extension
| ✔ Live Upgrade/Downgrade Of Products Along With Their Configurable Options Depending On Used Resources |
| ✔ Admin Area: |
| ✔ Define Product Auto Upgrade Groups |
| ✔ Enable/Disable Product Auto Upgrade Groups |
| ✔ Create Product Auto Upgrade Options |
| ✔ Assign Product To Option - Configurable Options Support |
| ✔ Define Options Upgrade/Downgrade Rules |
| ✔ Set Up Minimal Upgrade/Downgrade Interval |
| ✔ Enable/Disable Any Product Auto Upgrade Option |
| ✔ Drag & Drop To Reorder Options |
| ✔ Define Client Area Features |
| ✔ View List Of Hosting Accounts Affected By Product Auto Upgrade |
| ✔ Access Product Auto Upgrade History Of Any Hosting |
| ✔ Client Area: |
| ✔ Enable/Disable Product Auto Upgrade And Product Auto Upgrade Options |
| ✔ Manage Product Auto Upgrade Options Rules |
| ✔ Set Up Minimal Upgrade/Downgrade Interval |
| ✔ View Product Auto Upgrade History Per Product |
| ✔ Set Up Notifications Rules |
| ✔ Define Minimal Notification Interval |
- 'Fixed Pricing' Extension:
| ✔ Bill Clients With Fixed Amount For Active Service Usage After X Hours |
| ✔ Define Number Of Hours For Service To Be Active |
| ✔ Toggle Credits To Be Automatically Applied If Available In Client's Balance |
| ✔ Toggle Tax To Be Added To Generated Invoices |
| ✔ Define Invoice Payment Due Date |
| ✔ Define Fixed Payment Amounts In Available Currencies |
- 'Notifications' Extension:
| ✔ Allow Clients To Create Multiple Resource Usage Reminders: |
| ✔ Define Frequency Of Resource Checks |
| ✔ Define Frequency Of Notifications |
| ✔ Define Resource Usage Limits |
| ✔ Define Maximum Number Of Reminders That Clients May Create |
| ✔ Send Email Reminders To Clients Once Limit Is Reached Or Exceeded |
| ✔ Choose Reminder Email Template |
- 'Resource Usage' Extension Features:
| ✔ Define Period For Counted Resource Usage |
| ✔ Define Resource Usage Counting Precision |
| ✔ Show History Of Resource Usage |
| ✔ Define Number Of Usage Records Displayed Per Page |
- 'Graphs' Extension Features:
| ✔ View Graphs In Admin And Client Area |
| ✔ Generate Time Graphs Of Chosen Resource Usage |
| ✔ Show Data For Selected Time Period |
| ✔ View Disk Storage Used To Archive Data |
| ✔ Flush Archived Data Immediately Or After X Days |
- 'Free Limit' Extension Features:
| ✔ Use Product Configurable Options To Define Maximum Amount Of Usage Records That Will Not Be Charged |
- Additional Extensions:
| ✔ Proxmox Cloud Autoscaling - Scale Proxmox Servers Within Defined Limits On The Fly |
- Supported Modules:
| ✔ cPanel & cPanel Extended Integration: Hourly, Bandwidth, Storage, Databases, Addon Domains, Subdomains, Parked Domains, Domain Forwarders, FTP Accounts, Installed Applications, Email Accounts |
| ✔ DigitalOcean Droplets Integration: Hourly, Memory, Disk, Backups, Volumes, vCPUs, Size, Snapshots |
| ✔ DirectAdmin & DirectAdmin Extended Integration: Hourly, Bandwidth, Storage, Subdomains, Domain Pointers, FTP Accounts, MySQL Databases, Virtual Domains, Mailing Lists, POP Accounts, Email Forwarders, Email Autoresponders |
| ✔ EasyDCIM Dedicated Servers Integration: Bandwidth, 95th Percentile Bandwidth Overages |
| ✔ EasyDCIM Colocation Integration: Bandwidth, 95th Percentile Bandwidth Overages, Power Usage |
| ✔ Hetzner VPS For WHMCS Integration: Backups, CPU Usage, CPUs, Disk, Disk Bandwidth Read, Disk Bandwidth Write, Disk IOPS Read, Disk IOPS Write, Floating IPs, Hourly, Ingoing Traffic, Memory, Network Bandwidth In, Network Bandwidth Out, Network PPS In, Network PPS Out, Outgoing Traffic, Snapshots, Volumes |
| ✔ OpenStack Projects Integration: CPU Time, Disk Device Read Bandwidth, Disk Device Read Requests, Disk Device Write Bandwidth, Disk Device Write Requests, Floating IPs, Image Size, Memory, Memory Usage, Network Incoming Bytes Bandwidth, Network Incoming Packets, Network Outgoing Bytes Bandwidth, Network Outgoing Packets, OS Images, Snapshot Size, Storage Volumes, Usage Record, VCPU Cores, Volume Size |
| ✔ OpenStack VPS & Cloud Integration: Hourly, vCPU Cores, Memory Usage, CPU Utilization, Incoming Bandwidth, Outgoing Bandwidth, Disk Root Used, Disk I/O Read, Disk I/O Write, Floating IP, Fixed IP, Backups Number |
| ✔ Plesk & Plesk Extended Integration: Hourly, Subdomains, Disk Space, Email Boxes, Sites, Redirects, Mail Groups, Autoresponders, Mailing Lists, Users, Databases, Webapps, Traffic |
| ✔ Proxmox VE Cloud VPS Integration: Disk Usage (LXC), Disk Size, Bandwidth IN, Bandwidth OUT, Bandwidth Total, Memory Usage, Memory Size, Backups, CPU Number, CPU Usage |
| ✔ Proxmox VE VPS Integration: Hourly, Disk Usage (LXC), Bandwidth IN, Bandwidth OUT, Bandwidth Total, Memory Usage, Backups Usage, CPU Number, CPU Usage |
| ✔ Rackspace Email Extended Integration: Hourly, Mailbox Storage, Mailboxes, Sync Licenses, Blackberry Licenses, Exchange Storage, Exchange Mailboxes |
| ✔ SolusVM Extended Cloud Integration: Available Disk Size, Disk Usage, Available Bandwidth, Available Memory, Cores, IP Addresses, Disk Usage, Memory Usage (except KVM virtualization), Bandwidth Used |
| ✔ SolusVM & SolusVM Extended VPS Integration: Hourly, Disk Usage, Memory Usage (except KVM virtualization), Bandwidth Used |
| ✔ Virtualizor Integration: Bandwidth Usage, CPU Units, CPU Cores, CPU Usage, Disk Size, Disk Usage, RAM Size, RAM Usage, Network Speed IN, Network Speed OUT, I/O Disk Read, I/O Disk Write, IPv4 Addresses, IPv6 Addresses |
| ✔ Virtuozzo VPS Integration: Templates, CPU Usage, Memory, Bandwidth IN, Bandwidth OUT, Disk Used, Backups Usage |
| ✔ Zimbra Email Integration: Hourly, Mailboxes, Email Aliases, Domain Aliases, Storage |
- General Info:
| ✔ Store Usage Records In WHMCS Or External MongoDB Database (4.0 And Higher) |
| ✔ Count Usage Of All Accounts Assigned To Reseller - cPanel, cPanel Extended, DirectAdmin & DirectAdmin Extended |
| ✔ Fast Billing Calculation Via Multithreading Cron Jobs |
| ✔ Multi-Currency Support |
| ✔ Multi-Language Support |
| ✔ Supports PHP 7.2 Up To PHP 7.4 |
| ✔ Supports WHMCS Themes "Six" And "Twenty-One" |
| ✔ Supports WHMCS V8.1 And Later |
| ✔ Easy Module Upgrade To Open Source Version |
Installation
| In this tutorial we will show you how to successfully install and manage Advanced Billing For WHMCS. We will guide you step by step through the whole installation and configuration process. |
| 1. Log in to our client area and download the module. |

|
| 2. In the downloaded file you might find one or two packages that support different PHP versions. In the most recent versions of the module, you will find only one package that supports PHP 7.2 and later. |
| Previous updates of the module may contain two packages dedicated to various PHP versions. The first one that supports PHP 5.6 up to PHP 7.1, and the second one addressed to PHP 7.2 up to PHP 7.4. |

|
| Note: You can check the current PHP version in your WHMCS. To do so, proceed to 'Utilities' → 'System' → 'PHP Info'. |
| 3. Extract the package and upload its content into the main WHMCS directory.
The content of the package to upload should look like this. |
| 4. Now you have to activate the module in your WHMCS system. Log in to your WHMCS admin area. Click 'Setup' , then choose 'Addon Modules'. |

|
| 5. In the next step you need to configure your module. To do so, press the 'Configure' button. Select database driver for usage records:
If you choose MongoDB, you will additionally have to provide:
Here, you may enable the Cron Threads option.
Next, decide if you wish to enable option to regularly clear the log records.
Choose the desired admin roles groups to grant access to the module and 'Save Changes'. |

|
| 6. Now, proceed to the Extensions section to find more about configuring the license. |
| 7. The last step is setting up a cron job. You can find it following the path: WHMCS → 'Addons' → 'Advanced Billing' → 'Configuration' page. |

|
| Well done, you have just successfully installed your Advanced Billing For WHMCS! |
| If you used the previous version of Advanced Billing For WHMCS and you would like to migrate the data to the current version, please see the How To Update section and follow the instructions listed there. |
Configuration and Management
| Now, let us learn more about the functionalities of the module. We will show you the possibilities of our product, using cPanel Extended For WHMCS as an example. Please note that the billing features are different in both modules, but the core functionality of Advanced Billing remains the same. |

|
Core
| Our module core has been designed in such a way so as to allow the collection of records and invoices management. Any extra features are handled by extensions which can be easily enabled/disabled, and are always configured per product. |
Product List
| On the Products List you can find all products which have Advanced Billing enabled. If the product's submodule is not supported, the 'default' mode will be used instead. It enables you to bill your client only for an hourly usage of the product.
|

|
Settings
| Clicking on the 'Settings' button will allow you to see the 'Module Settings' only for cPanel/cPanel Extended modules and other enabled extensions. We will discuss them later. |

|
| Here you can set both Application Manager (Softaculous/Installatron) and cPanel theme. Simply enter a theme name as shown on the screen below. |

|
Used Resource Pricing
| Moving to the 'Pricing' section will allow you to set up billing for a specific server resource usage like bandwidth. |

|
Manage each usage record by setting up its:
In our case, as you can see on the screen below, a customer will not be charged for 1GB (1024MB) bandwidth.
For example, users pay for a quantity of subdomains each hour, but when the traffic is generated, bandwidth used since the last cron run will have to be paid once only.
If you select the 'GB' option, free limit will be still 1024 MB, and the price will be MB/hr, not GB/hr.
To proceed, choose your usage records, units, statuses, set up the prices and free limits. Afterwards, press 'Save'. Important: Remember to set up the pricing rules in every currency that you offer the product in. |

|
| As you probably noticed, there is also the 'Configure' column to the right. It allows you to set up different free limits and pricing depending on the resource origin. |
Items
| To view the counted resource usage, go to the 'Items' tab. Each cron run will create an item for each customer (if it does not exist at the moment) and add new records to the existing ones. |

|
| This section will show you some more detailed information on Bandwidth, Storage, Domains and other enabled records. See the price and usage, the last cron run date and the total records summary. |

|
Invoices
| In the 'Invoices' section you can manage all of your awaiting invoices. They can be generated both automatically and manually. On the screen below you can see a previously generated invoice for our cPanel Extended account. |

|
| Here you can verify and modify your awaiting invoices. To avoid any risks, you should double check that all your invoices have been generated correctly. |

|
| Now, let us manually generate a sample invoice for your customer. For this purpose, simply click on 'Generate' next to the chosen invoice. |

|
| After changing the product's package, the invoice will be automatically generated for an old package. |
Settings
| In the 'Settings' tab you can find pages such as 'Logs', 'Integration' and 'Extensions'. |
Integration Code
| The 'Integration' page contains codes required to integrate Advanced Billing For WHMCS with your client area. The first code allows you to display product pricing while placing an order. |

|
| If the code has been typed in correctly, the sample order should look like this: |

|
| The second integration code is responsible for displaying usage records in the client area. Note: To display usage records in the client area, you need to enable 'Usage Records' or 'Notifications' extension for the product. |

|
| If the code has been typed in correctly, the sample resource usage should display like this: |

|
Items Archive
| On this page, you can find information regarding the archived usage records. Once a client has paid for the used resources, the usage history will be automatically moved to the archive.
There is a number of archived items along with the space they take up on the disk. |

|
| Use the 'Flush' option to clear the archive and remove all stored data. You can also set the time interval to indicate the number of days after which the archive will be cleaned automatically. |

|
Logs
| On the 'Logs' page you will find information about the module's activity. You can view logs in the form of a 'Database' or a 'File' . You can select it in the place marked on the screen below. |

|
| Here you will see different types of logs including informative logs, error logs and critical logs. New log files are created every day to help you always find the information you are interested in. |

|
Extensions
| In this section, we will describe each extension step by step. Important: Only five of them are included in Advanced Billing For WHMCS. You can enable each one of them after moving to the 'Settings' → 'Extensions' section. |

|
| If you skip the steps 3-4 from the installation instruction, you have to configure the license for each of the 4 base extensions. Note that each of them uses the Advanced Billing license key. |

|
Usage Records
| This extension displays usage records and usage records history in the client area products page. To use it, you need to of course first enable it, and then place an integration code.
|

|
| For example, the client area with the DirectAdmin Extended product will look like this: |
|
|
| As another example, have a look at the client area for the OpenStack Projects product. |

|
Credit Billing
| 'Credit Billing' extension allows you to charge your clients for a product from the client credit balance. To enable this option for a single product, click on the 'Settings' button next to the chosen product. If the extension is enabled, a new tab will appear. |

|
|

|
| When the option 'Autosuspend' is enabled and your client's credit balance reaches 0, the client's product will be suspended. Additionally, an invoice reminding of the lacking amount will be generated. If it is disabled and the credit balance reaches 0, the client's product will not be suspended and invoice will be generated according to the number of days set in the 'Create Invoices Each' field. |
Credits
| All information related to the credit payment for hosting can be found in the 'Credits' tab that will appear in your menu when enabled. As you can see, there are two columns with credits. |

|
Prepaid Billing
This extension allows you to charge clients for their products from their prepaid credit balance as well as create summations instead of generating invoices.
|

|
Recurring Billing
This extension allows you to set up recurring billing for your product.
|

|
Fixed Pricing
| Use the 'Fixed Pricicng' extension to bill your customers after a specified number of hours of active service usage. Set a defined amount that will be billed per product. |

|
First of all, enable the extension for a single product. Keep in mind that 'Fixed Pricing' cannot be enabled together with 'Credit Billing' and 'Recurring Billing' extensions.
In case the defined in 'Settings' hour treshold is not reached, the client will be billed for generated usage in a standard manner. |

|
Free Limit
| Enable the 'Free Limit' extension to allow defining such limits with the means of the product configurable options. |

|
| How to set up free limit per single configurable option: 1. Open file json file located in: modules/addons/AdvancedBilling/config/configurable-free-limits.json and find: {
"configOptionName": "resourceName"
}
2. Check your available configurable options for the product you are going to set up the free limits at: 'System Settings' → 'Configurable options' → e.g.: 'Configurable options for cPenel Extended product' 3. Find the appropriate section with the desired product details on wiki in the Measurement Units section. |

|
4. Based on the available CO and the resource name, you can now set up for cPanel, for example: {
"MyStorageLimit": "storage",
"databases": "databases",
"FTP Accounts": "ftp_accounts",
"dropdownlimit": "email_forwarders"
}
5. Now, provided the 'Free Limit' extension has been enabled in Advanced Billing addon and the single configurable options values are numerical, these configurable options' values will be now considered as free limits. |
Graphs
| Enable the 'Graphs' extension to gain access to the graphical display of usage records for every configured service in your Advanced Billing module. |

|
| When enabled, a new entry in your navigation menu appears → 'Graphs'. |

|
| Please note that before proceeding, you must also enable the 'Graphs' extension for the product. To do so, move to 'Configuration' → 'Products List' → 'Settings' → 'Graphs'. Enable the extension and save the changes. |

|
| In the 'Graphs' section you will find an extended list of all services in your system. Press the 'Show Graph' button and you will be moved to the generated line chart. |

|
| You will immediately see a line chart generated for a default resource usage and time period. You may change the requirements at any time to see a customized version of the graph with data that you actually need, and the time period you desire. Use options located to the left of the graph to personalize the chart statistics. |

|
| Line charts can be displayed not only by administrators in their panel but the clients as well. Find 'Resource Usage Chart' in the product's details to preview the generated graph. Clients, just like admins in the admin area may specify the time range and select resources which they wish to see in the graphical mode. |

|
Notifications
| Enable the 'Notifications' extension to allow your clients to set email reminders that will be sent when a specified resource usage limit is reached or exceeded. |

|
| Before your clients will be able to configure reminders, you have to enable the 'Notifications' extension for the product. To do so, move to 'Configuration' → 'Products List' → 'Settings' → 'Notifications'. Enable the extension and, if you wish, define a maximum nuber of notifications a client may create and change the default email template. Save the changes when ready. |

|
| You will find a list of email templates in the 'WHMCS' → 'Setup' → 'Email Templates' section. By default, the 'Advanced Billing Resource Usage Reminder' template in 'Product/Service Messages' is used. You can modify the template to your needs, or alternatively create a new one, then assign it in a previous step.
|

|
| Now, while in the client area, you can see the tab with new reminders. Press 'Show' to expand it and click on the 'Add Reminder' button. |

|
| Set the name of a reminder name along with the frequency with which the module will check the usage and send notification emails once the limits are reached or exceeded. Note that in addition to selecting the default frequency option from the dropdown menu, you can enter a different numeric value that will determine the frequency in hours. |

|
| Now you can define resource limits on the basis of which notifications will be sent. |

|
| Determine if reminders shall be dispatched after a particular value is reached, exceeded or both. |

|
| If any of defined conditions is fulfilled, the reminder is sent to the client with the frequency set in the previous step. The reminder will no longer be sent if, after the resource usage check, it turns out the level of a given resource type is once again below a defined limit. |

|
| Keep in mind that you can add multiple reminders, each with different limits and different frequencies of checking resources and sending notifications. Once created, you can easily toggle the status of every notification, as well as modify its settings whenever required. |

|
Product Auto Upgrade
| Product Auto Upgrade For WHMCS extension is an automatic upgrade/downgrade of a product according to its usage. It will allow you to set rules related to the server resource usage according to which the module will resize your products and their configurable options. |

|
| Before you can do anything you must enable the products you want to work with for Advanced Billing. |

|
| Only then you have to enable the extension Product Auto Upgrade For WHMCS for each of the products. Move to 'Settings', find appropriate section and enable the extension. |

|
Configuration
| As you might have already noticed, a new tab dedicated to the extension appeared on your Advanced Billing For WHMCS module main menu. Under this section there is located the whole management of the extension. Let's move to 'Configuration' firstly. |

|
| What you will find there is a full list of autoscaling groups displayed. Here you can find information such as status of a group, its name and used submodule. |

|
| Let's see now how to create a new group. Press 'Create New Group' button and a short formula will appear. |

|
| You can add products and define rules inside of the group which will result in upgrading/downgrading client's hosting. Name your new group - this name is only for your information and convenience. Then select the product that can be automatically upgraded or downgraded according to resource usage count. |

|
| Your newly created group appeared on the list. Now you can configure it according to your specific needs. |

|
There are two main sections where a group can be configured.
|

|
Group Settings
General Configuration
|

|
Client Area Configuration
Do not forget to save the configuration when it is ready. |

|
Group Options
| The second place where the group rules are configured is Options section. These rules will be used by the extension to determine which service should be changed. |

|
| Every group has already some predefined basic options - disabled at the start. You can base your rules configuration on them or add your own ones in case they are not sufficient. Let us show how to set the autoscaling rules on the basis of these options. Before you can do anything, you must configure the upgrade and downgarade rules. |

|
| 'Upgrade Rules'/'Downgrade Rules' can have multiple rules defined. To add a new rule, select it from a dropdown menu marked on the following screen and press 'Add'. |

|
| You can define comparison type and threshold of any added rule. To add a rule which will be fulfilled when the product has more or equal than 3 FTP accounts, choose '≥' from 'Comparison Type' and type '3' into 'Threshold' field. |

|
| You also have to define a product for each package that will be used when upgrading/downgrading. Press button marked on the screen to go on. |

|
| Select the product you need from the available in the dropdown menu. Then select option you wish to be used by clients and add it. Save the changes. |

|
| Every selected option appears in the box above. Here you can specify available selection under 'Setting' or delete it. |

|
| Repeat that for all packages that you want to enable. Note that only packages with selected products can be enabled! |

|
| Additionally, you can change the order the rules are displayed, simply drag and drop a rule and make a previously downgrade rule an upgrade. |

|
| Add new option, just type in its name, press 'Add New Option' and then configure it like the previous ones. |

|
| Finally, you can describe shortly each option. Press ' Description' and a text area will appear. Type in your description there. As you can see you can prepare a few language versions of the description. |

|
Accounts
| To access the list of hostings affected by the autoscaling groups proceed to 'Product Auto Upgrade' → 'Accounts'. Information about each hosting can be found here along with access to the hosting history. |

|
| Hosting history contains the list of changes ever made for the hosting. |

|
Client Area
| In the following section we will show you client area with all autoscaling features enabled. As you can see, autoscaling is displayed on the main page of a product right below the Advanced Billing For WHMCS usage records. |

|
| You can easily enable/disable autoscaling (red) or a selected option (blue) through pressing 'Enabled'/'Disabled' button and saving the changes. To browse other options, use their names marked on the following screen. |

|
| Through pressing 'Show Rules' you can manage switching rules of currently displayed option. Additionally, you can change the minimum interval between the changes through using marked field. |

|
| Rules are displayed in a table, press pencil icon next to the rule you wish to change. Do not forget to save changes when you finish. |

|
| Besides the management of autoscaling, you can view the history of switches made on a hosting through pressing 'History'. |

|
| Client can also set up notifications, they will be sent when requirements defined by a client are met. For the settings shown on the following screen, notification will be sent once in ten minutes if the following rules are met. |

|
Sample Usage
| In this section we will show you a sample situation when Product Auto Upgrade For WHMCS is used simultaneously with another built-in extension to Advanced Billing - Recurring Billing. |
| Let's say you have configured 3 cPanel Extended products enabled for Advanced Billing. |

|
Each of the products has different limits set:
Afterwards, you have created an autoscaling group, added products listed above to it and defined them with following rules. |

|
|

|
| Now, this is which is going to happen: 1. A client, John orders product C and creates 3 FTP accounts in it. |
|
That was all about upgrading/downgrading the products, but let us now see how the payments look like. |
Proxmox Cloud Autoscaling (Sold Separately)
| Proxmox Cloud Autoscaling For WHMCS enables automatic alterations of servers provisioned by Proxmox VE Cloud VPS For WHMCS depending on their load. The module will allow you to set out rules on VPS resources according to which servers will be modified through resizing or cloning. |

|
Billing Types
| Hourly billing allows you to charge your customers for each hour of use of the product (hourly billing calculations are based on the 'Registration Date' product). You can enable hourly billing for any product type. |

|
| With the Summary billing type, you can charge your customers for the summed usage over the billing period. For example, if a client uses 200 MB over the first hour, 0 MB over the second hour, and 300 MB over the third hour, the summed usage is 500 MB. |

|
| The Highest billing type enables you to charge your customers basing on the highest value. For example, if a client has 5 Floating IPs and removes 2 of them, the module will take into account the highest value which is 5, even when a client now has 3 Floating IPs. |

|
Ticket Billing
| Ticket billing works exactly as it sounds. When enabled, it bills your customers for each opened ticket. Remember that you must have a product with Ticket Billing submodule assigned to it. |

|
| As in the case of hourly billing, you can enable ticket billing for any product type. |

|
Sample Configuration
| In this section, we will show you two samples of configuration of Advanced Billing. |
Two Weeks Billing
| In order to set up the invoice generation for resource usage every 2 weeks, follow these steps: 1. Go to 'Addons' → 'Advanced Billing' and select your product from 'Enable Advanced Billing For:' |

|
| 2. Go to 'Products List' → (your product's) 'Settings' → 'Recurring Billing' , enable the extension together with the 'Bill on Termination' option. Additionally, choose 'Bill Every X Days' from the 'Billing Type' dropdown menu. Enter '14' into the 'Billing Type Value' textbox and set 'Due Date' to '7' days. |

|
| 3. Remember to enter your pricing settings. |

|
| Congratulations, you have just successfully configured your billing options! Your Advanced Billing main page should look like the screen below. |

|
$20 Billing
| To bill your client as frequently as possible, follow these steps: 1.Go to 'Addons' → 'Advanced Billing' and select your product from 'Enable Advanced Billing For:' |
|
|
| 2. Go to 'Products List' → (your product's) 'Settings' → 'Credit Billing' and press 'Enable'. Afterwards, enter '1' into 'Create Invoices Each', '20' into 'Minimum Credit' and '50' into 'Low Credit Notification'. |

|
| 3. Remember to set up your pricing. |

|
| Congratulations, you have just successfully configured your billing options! Your Advanced Billing main page should look like the screen below. |

|
Measurement Units
Take a look at the table below, you will find precise data on the measurement units used for billing purposes per each supported submodule.
|
Default
|
cPanel/ cPanelExtended
|
Digital Ocean Droplets
|
Direct Admin/Direct Admin Extended
|
Hetzner VPS
|
Openstack VPS/Openstack VPS Cloud
|
Openstack Projects
Openstack Projects Dynamic Resources
|
Plesk/Plesk Extended
|
Proxmox VPS/Proxmox Cloud VPS
|
Rackspace Email Extended
|
Solusvm Extended Cloud
|
Solusvm Extended VPS
|
Solusvm Pro
|
Ticket Billing
|
Virtualizor
|
Virtuozzo Hybrid Infrastructure S3
|
Virtuozzo
|
Virtuozzo VPS
|
Zimbra Email
|
Tips
| 1. Deactivation of the module removes products' configuration, usage records and awaiting invoices. |
| 2. 'Installed Applications' usage record supports both Softaculous and Installatron. |
| 3. You can set up as many products as you want. |
| 4. If your client uses currency that is not WHMCS base currency (for example, WHMCS base currency is €, while client uses $): An invoice for such client will be generated in the chosen currency, while usage record and calculation in Advanced Billing will use base currency. |
| 5. You can modify record names along with their format that are displayed in the 'Usage Records' section of the client area. To do this, you need to find a file that is located here: modules\addons\AdvancedBilling\extensions\ClientAreaUsageRecords\lang\english.php. Next, provide the preferred names of records that should be shown up to clients. Please take a look at the below example to see which part of the line can be altered: $_LANG['ClientAreaUsageRecords']['Databases'] = 'Your Translation' |
| 6. If you would like to edit the translation of extensions, you need to proceed to the following file: your_whmcs\modules\addons\AdvancedBilling\extensions\your_extension\lang The translation for the module can be found here: your_whmcs\modules\addons\AdvancedBilling\langs |
Update Instructions
| Essential guidance through the process of updating the module is offered here. If you switch from Advanced Billing v2.x to v3.x, all data from your previous version of the module have to be migrated to the latest one. /your_whmcs/modules/addons/AdvancedBilling/migrationScript.php If you already own Advanced Billing v3.x and would like to switch to a newer version, just overwrite the files as you would do during a regular update. Keep in mind there is a quick and easy option in our client area that will let you upgrade the license of your module to an open source version at any time - and at a lower price! |
Common Problems
| 1. When you have problems with connection, check whether your SELinux or firewall does not block ports. |
| 2. You have problems with finding the specified line in clientareaproductdetails.tpl. Cause 1: You use Classic or Portal template. <div align="center">{$moduleclientarea}</div>
Cause 2: You use extensively customized template. |
| 3. If your cron has encountered an error and cannot start again, please check the cron folder in the 'yourWHMCS/modules/addons/AdvancedBilling/cron' path. If there is the 'pid.php' file, delete it and try to execute the cron again. If there is still an error occur, check the details in the logs. |
| 4. Cron Threads feature currently does not work for the EasyDCIM submodule. In case you have enabled Cron Threads, cron tasks for EasyDCIM submodule will be executed in a basic way. This option will be implemented into the Advanced Billing module the future releases. |